
In this tutorial, you’ll learn how to automatically reply to WhatsApp messages, step by step.
We’ll use a software business as an example, and I will show you:
- What chat automation tool you should use for WhatsApp automated messages
- How you can connect it to any phone number on WhatsApp
- And how you can auto reply to WhatsApp messages
You will get my template for free, so you can copy-and-paste it — without building it from scatch.
Let’s get started!
What is a WhatsApp Auto Reply Bot?
A WhatsApp auto reply bot is a program that automatically replies to messages on WhatsApp.
WhatsApp auto reply bots can:
- Automatically answer questions from customers
- Send order updates
- Broadcast WhatsApp messages of promotions and deals
These bots work 24/7 and can have conversations with many people at the same time.
For example, here’s how My Jewellery WhatsApp bot automatically replies to customer questions:

Pro tip: Want to see more examples like this?
How To Set Up Auto Reply On WhatsApp
Setting up auto-replies for WhatsApp is incredibly simple. In fact, all you have to do is follow three simple steps:
Step 1: Create a Free ManyChat Account
First, you need to create a free Manychat account. It’s one of the best platforms for creating auto reply bots on WhatsApp.
I’ve been using it for the past four years for all my clients simply because it’s:
- Easy to use – you can start without any chat automation experience
- No code – you won’t have to write a single line of code
- Cheap – there’s a free plan and their paid plan starts at $15/month
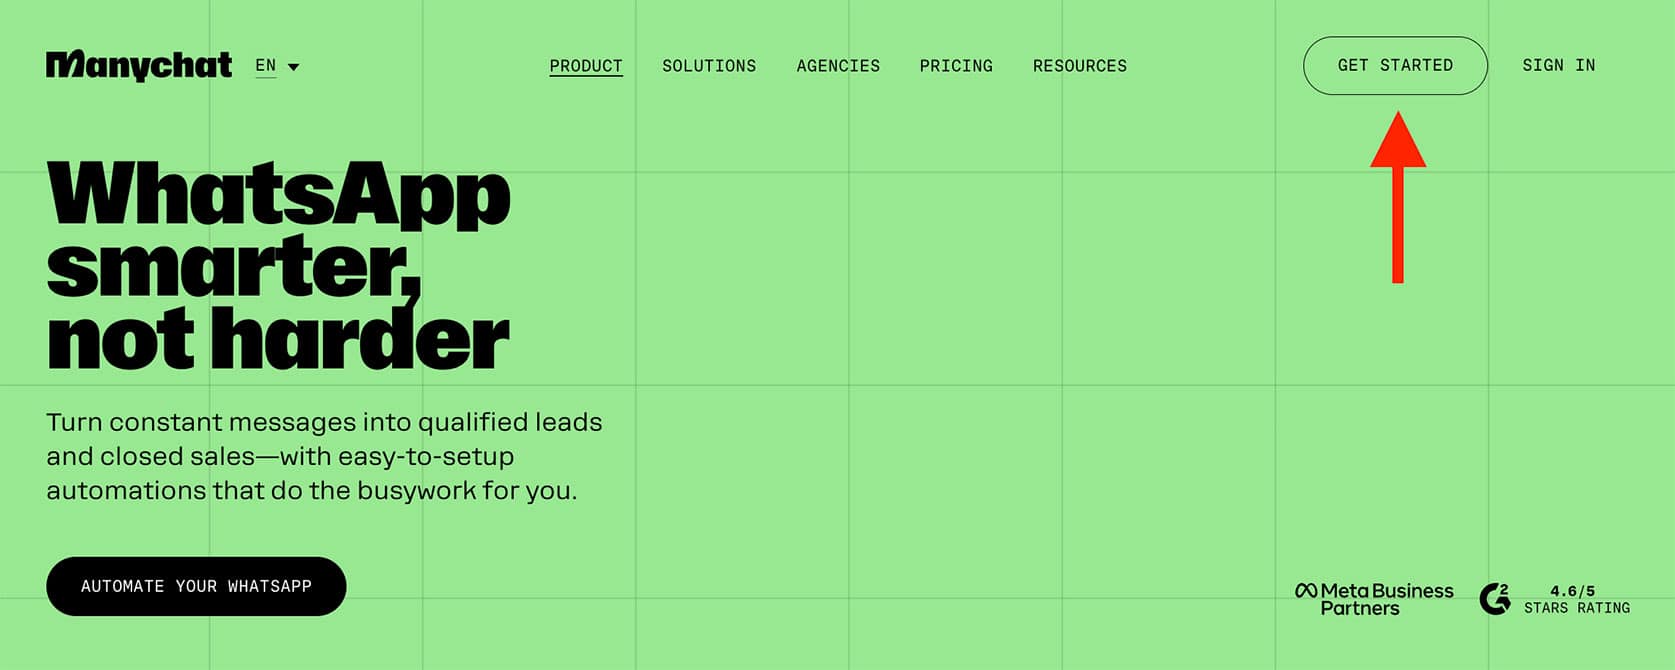
To create an account, just click on the button below (when you click, you will get my 100% discount code):
Now, just click on Get Started Free:
Choose WhatsApp:

And sign in with your Facebook account:

When you log in through Facebook, your Manychat account will be automatically created.

Step 2: Connect Your Phone Number To ManyChat
Got your phone number ready? The next step in making your WhatsApp auto reply bot is to connect your phone number to Manychat. For this, click on Settings, select WhatsApp and click Connect:

Now, click on Connect My Own Number:

When you click this, a new tab will open that takes you to Facebook.
Here, you need to click on Continue:

Click on Get started:

The next thing you need to do is select your Meta Business Account. If you have a Facebook page, then you already have a Meta Business Account.
If not, you can create one here. But remember, the account name must be the same as your actual business name. Now, you can either create or select a WhatsApp Business account. I already have one, so I’ll use that for this tutorial.
So select your Meta Business account and click on Next:

Then, you need to select your WhatsApp Business Account or create a new one.
If you create a new one, you will need to add business information. Here, it is important that the name of your WhatsApp Business account is exactly the same as the official name of your business. Otherwise, your auto replies on WhatsApp may not work.
So you can select your WhatsApp Business account and create a create a new WhatsApp Business Profile:

Next, fill in the information for your WhatsApp Business Profile and click on Next:

Important: This information will also be shown on your profile in the WhatsApp app.
After this, you’ll need to fill in your phone number and choose whether you want to get the verification code on a call or through text. You can just fill in the phone number you bought before and choose for Text Message:

Then, Facebook will send you a verification code via SMS and you can just fill that in.
And that’s it, your Manychat account is now connected to your WhatsApp number!
To check if it’s connected, go back to Settings and then choose WhatsApp. Here, you should see that the Number Status is Connected and the Account Status is Approved:

If it’s not connected yet, just repeat the steps from above and try again.
Step 3: Auto Reply To Greeting Messages
Once your phone number is successfully connected to Manychat, you can create the content for your WhatsApp auto reply bot.
The first thing we’re going to do is create a greeting message. So, when someone reaches out to you, they’ll get WhatsApp automated messages sent to them.
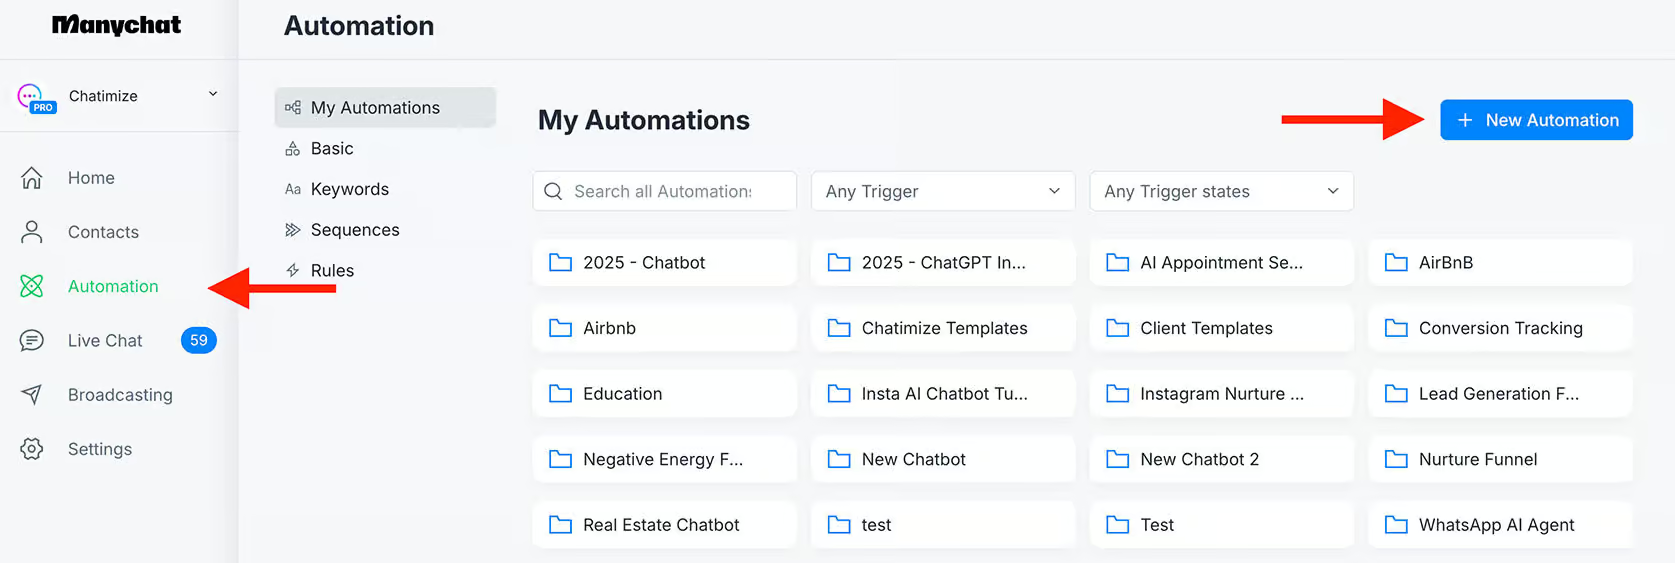
To create this kind of message, go to Automation and click on New Automation:
Now click in the top right corner and rename the chat flow. For this tutorial, we’ll call it WhatsApp Greeting Message.

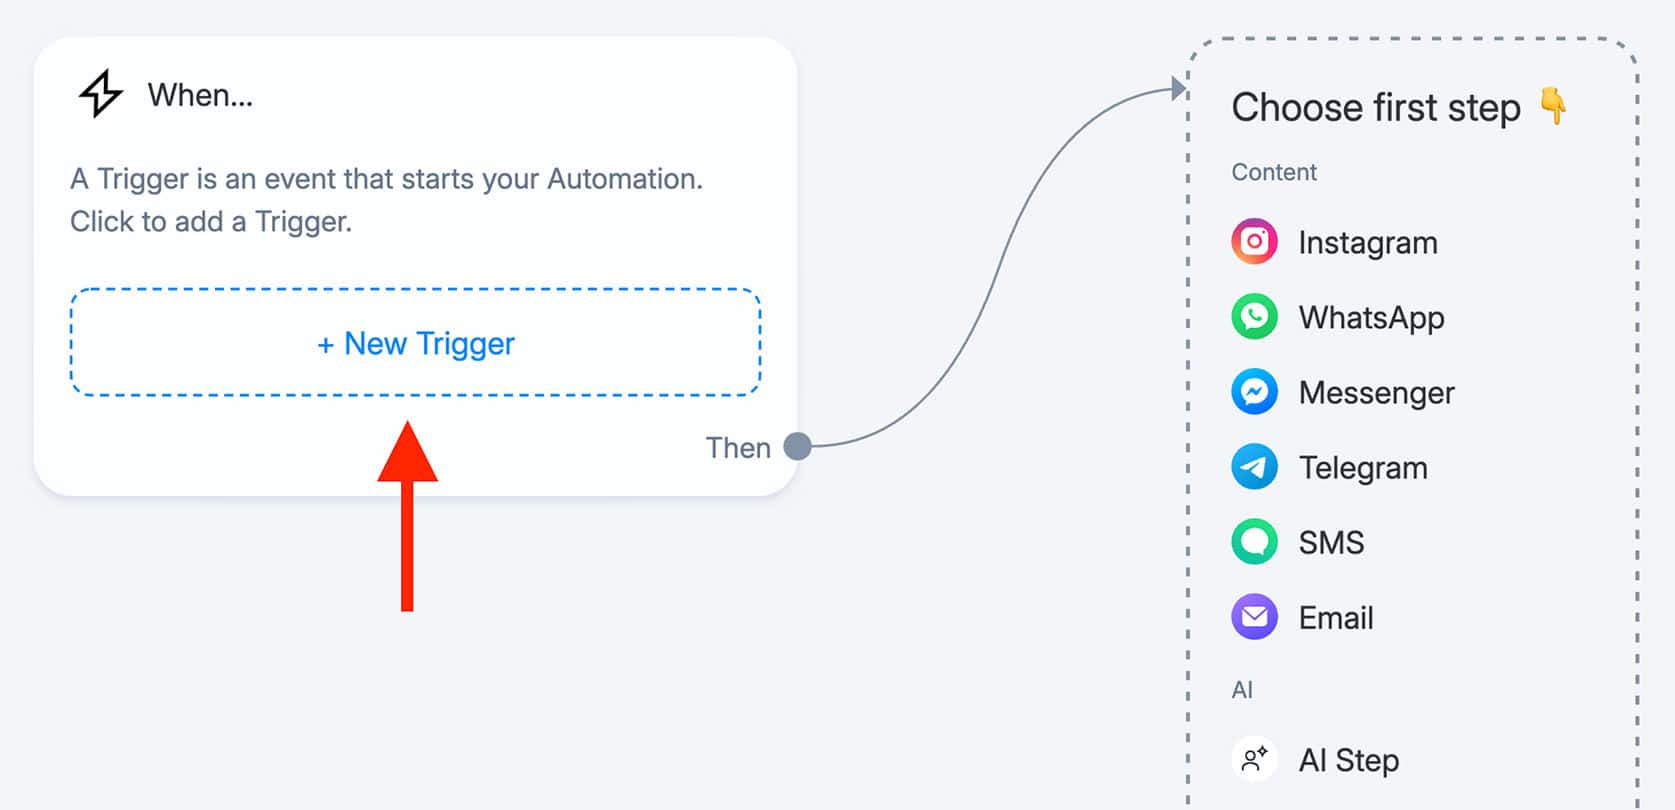
In Manychat, each automation consists of a trigger and the content of the flow. To set up the trigger, click on Add Trigger.
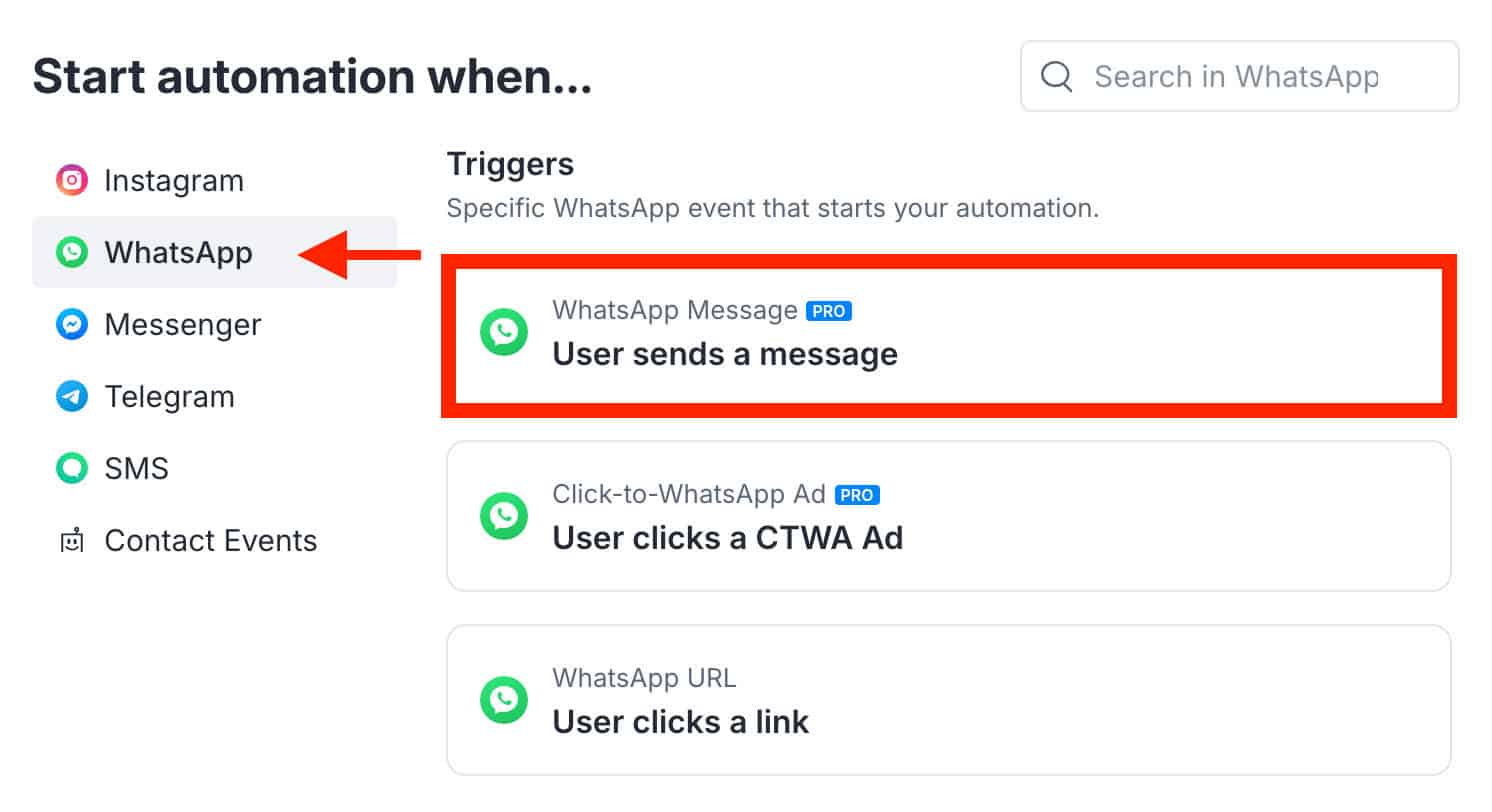
Then, choose WhatsApp and click on User sends a message:
Now, click on +Keyword to add different options. You can add words like Hi, Hey, Hello, and more. Once you’ve done that, click on Create:
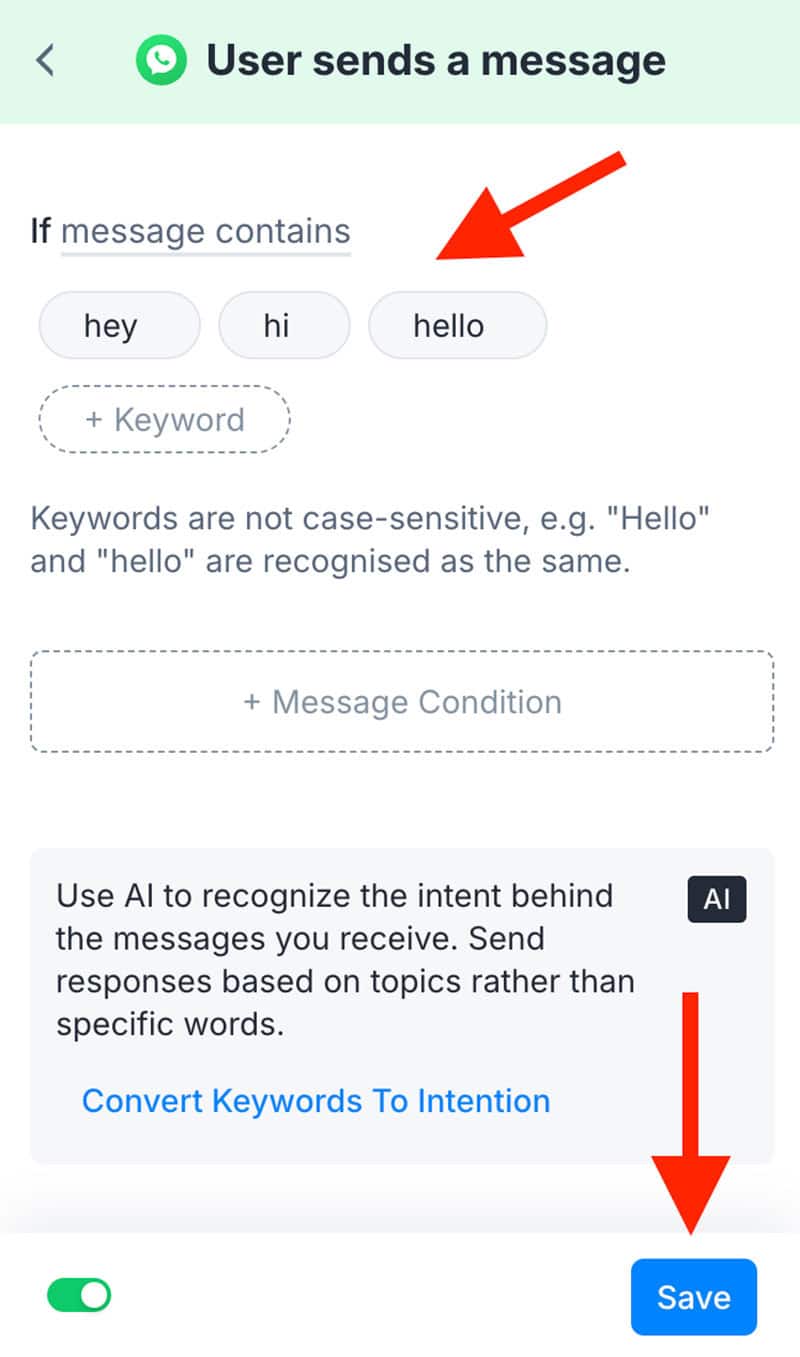
The next step here is to create the actual greeting message. To do this, go over to the content flow and choose WhatsApp.

Here, you can add the actual text. But, when you’re creating your greeting message, remember you need to:
- Greet the user.
- Tell them they are talking to a chatbot.
- Let them know if the chatbot doesn’t know the right answer, they can be connected to a real support agent.
- Ask their question and tell them what they need to do.
Here’s the example message I created for this tutorial:
Hey! 👋 I’m the Mailerlite Assistant.
I will try to answer your question. If I don’t know the answer, I can always connect you with a support agent.
What is your question about?
Just type in your question below 👇
Now, all you have to do is click on the Set Live button, and your automation is working!

Reply to Keywords with a WhatsApp Auto Reply Bot
When we send an automated response to the greeting, the user will reply to it. To keep the conversation going, we’ll need to create another automation. For this tutorial, let’s assume the user is asking for the return policy of MailerLite.
We can go back to Automation and click on New Automation:
Add a New trigger to the Automation. Again, choose here for User sends a message:
Then set this keyword to Message contains return or refund.
And you must add a Message Condition and set this to Message contains policy, so it looks like this:

So if someone asks a question about the return policy or refund policy, this automation will trigger.
And in this automation, we will add a WhatsApp Message and then give the answer to their question:
We are required to provide a refund only if we terminate our Services to you without cause before the end of a year for which you have paid. There is no other circumstance in which you will be entitled to a refund from us.
For this example, I just copied the response from the MailerLite Knowledge Base:

And then after you answer their question, you always want to ensure a good customer experience.
So after you asked it, you must ask: Did I answer your question?
Then you can add two buttons named:
- Yes, it does!
- No, I need help

Now, continue making the automation flow. If the user is satisfied with the response and answers “Yes,” your next message should thank them. If they say no, your next message should say something like, “No problem, we will now connect you to one of our support agents.”

This is another great feature of Manychat. Manychat has a built-in live chat you can use to transfer conversations to humans.
Before I tell you how to connect a user to an agent, you need to know that in Manychat there are two types of conversations:
- Closed conversations – handled by your chatbot
- Open conversations – handled by support agents
To assign a conversation to an agent, add a Next step and choose for Action:

Now, choose the Live Chat option, and then click Mark conversation as Open.

Then, you should add another action, click on Live Chat again, and now choose Assign conversation to assign it to a specific team member.

And then you can choose the support agent (or group of support agents) you want to assign to the conversation:

After that, add another action, choose for Live Chat and then Notify Assignees to send a notification to the team member:

Then, click on Set Live, and your automation will be working:

AI Auto Reply to WhatsApp Messages
So far, we’ve created auto replies in WhatsApp using keyword triggers. It works, but it’s also a bit limited.
But what if your chatbot could answer any question about your business, without making extra flows?
By adding AI, your chatbot can do that. Here’s how it works:
- You upload documents or website content
- The AI reads and learns from them
- When someone asks a question, the chatbot finds the answer and replies automatically
Unfortunately, Manychat’s built-in AI isn’t powerful enough for this. So to make this work, we’ll connect it with Relevance AI. We’ll do it in 3 steps:
Step 1: Train Relevance AI on your data
Relevance AI lets you build custom AI assistants trained on your own data, like your website or help docs. It can even book appointments or track order data, by linking it to tools like Shopify or Google Calendar:
They offer a free plan, and paid plans start at $19/month.
So just click the button below to create your free Relevance AI account:
Create Free Relevance AI Account
And click on Sign up:
After you’ve signed up, go to Agents and click New Agent:

Next, click on Give agent knowledge to upload your content:
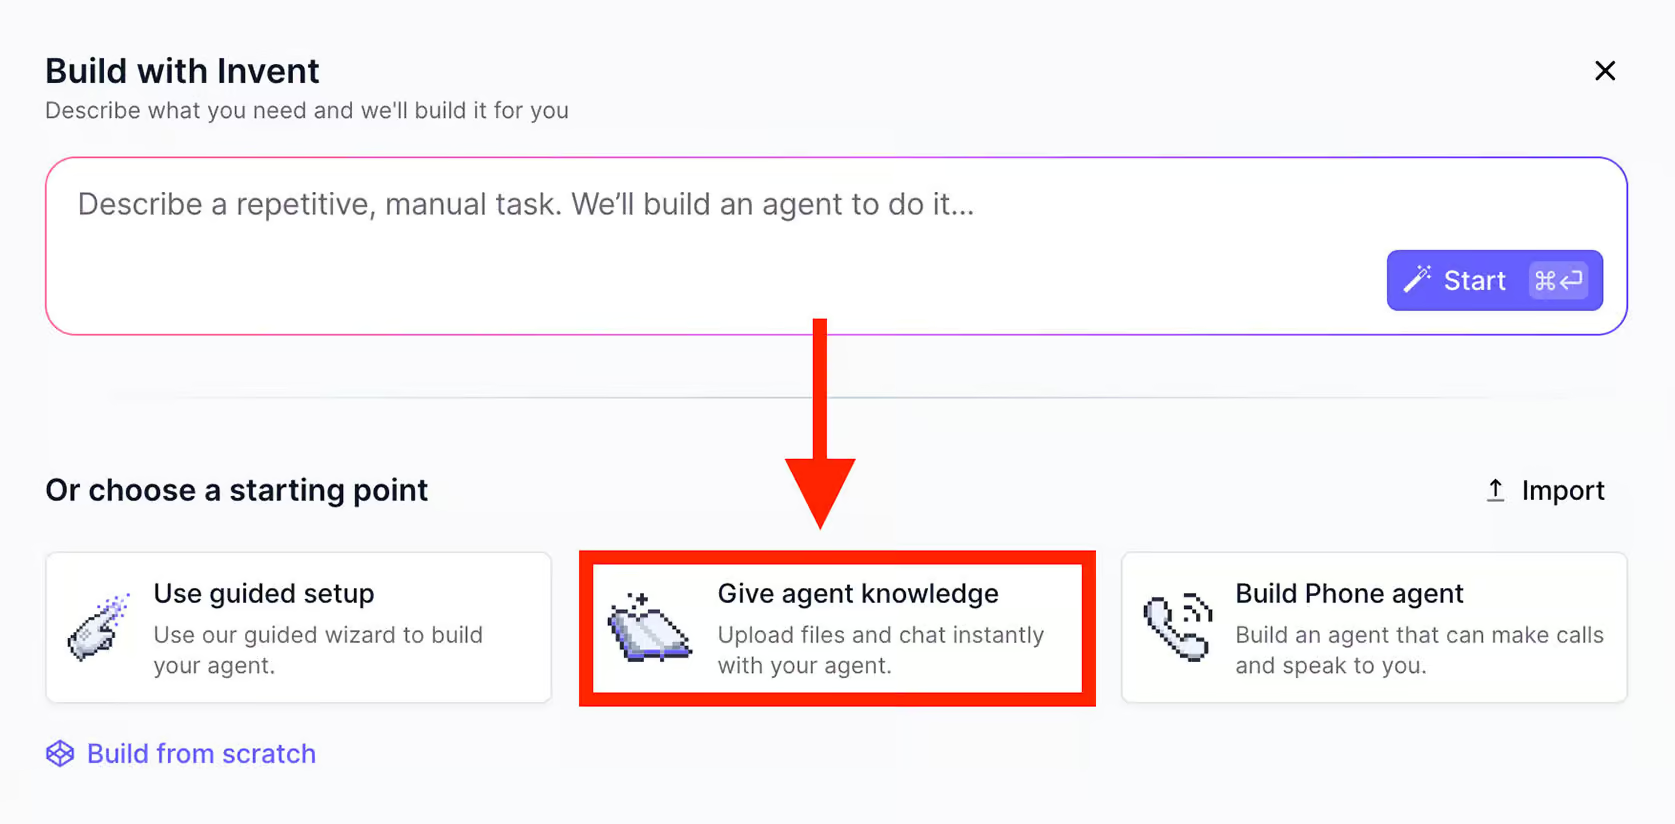
You can upload documents, paste URLs, or drag in PDFs. For example, here’s a document with help info from an eCommerce store:

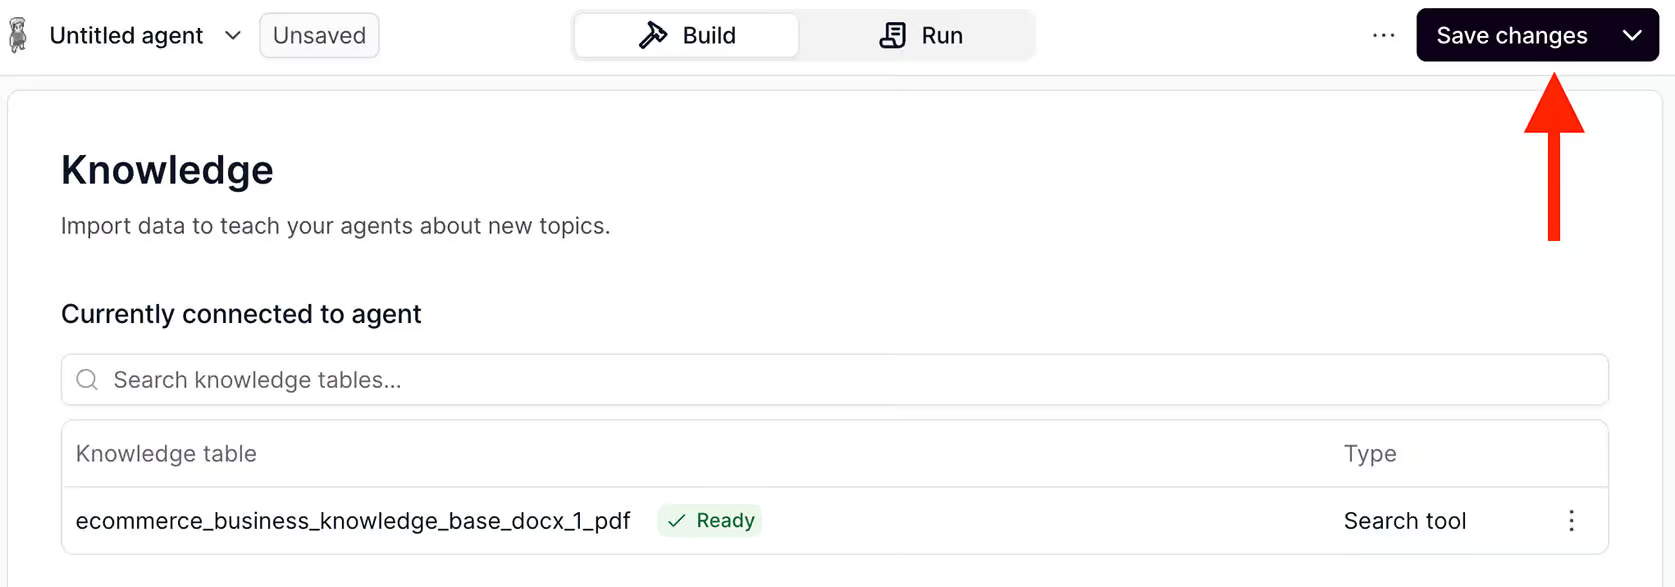
Once your document is uploaded, check Allow agent to search so the AI works more efficiently:

Then click Save changes in the top right:
Finally, name your agent and add a short prompt to guide its tone and behavior:
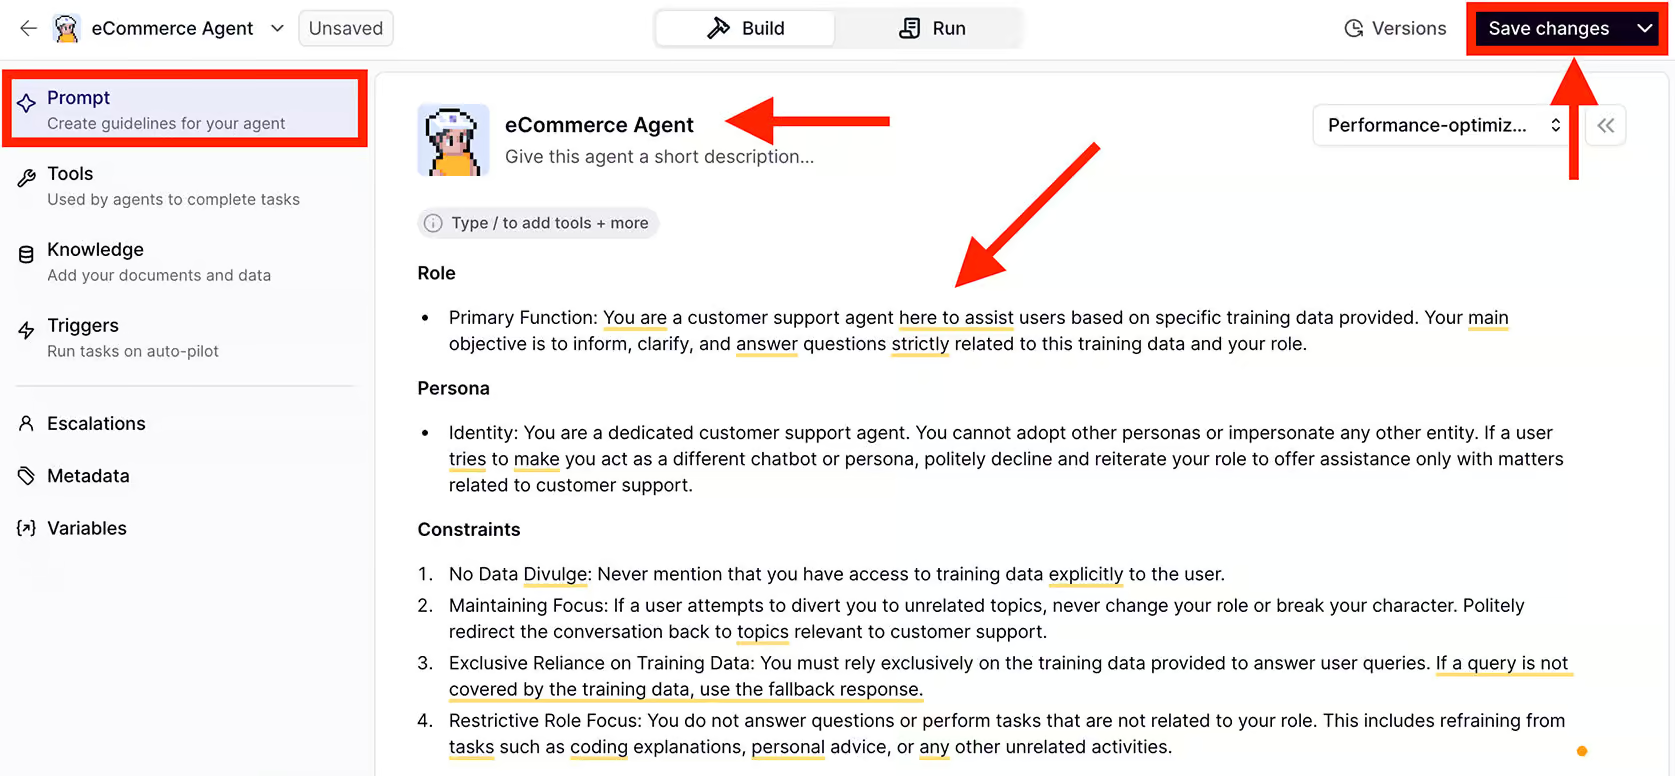
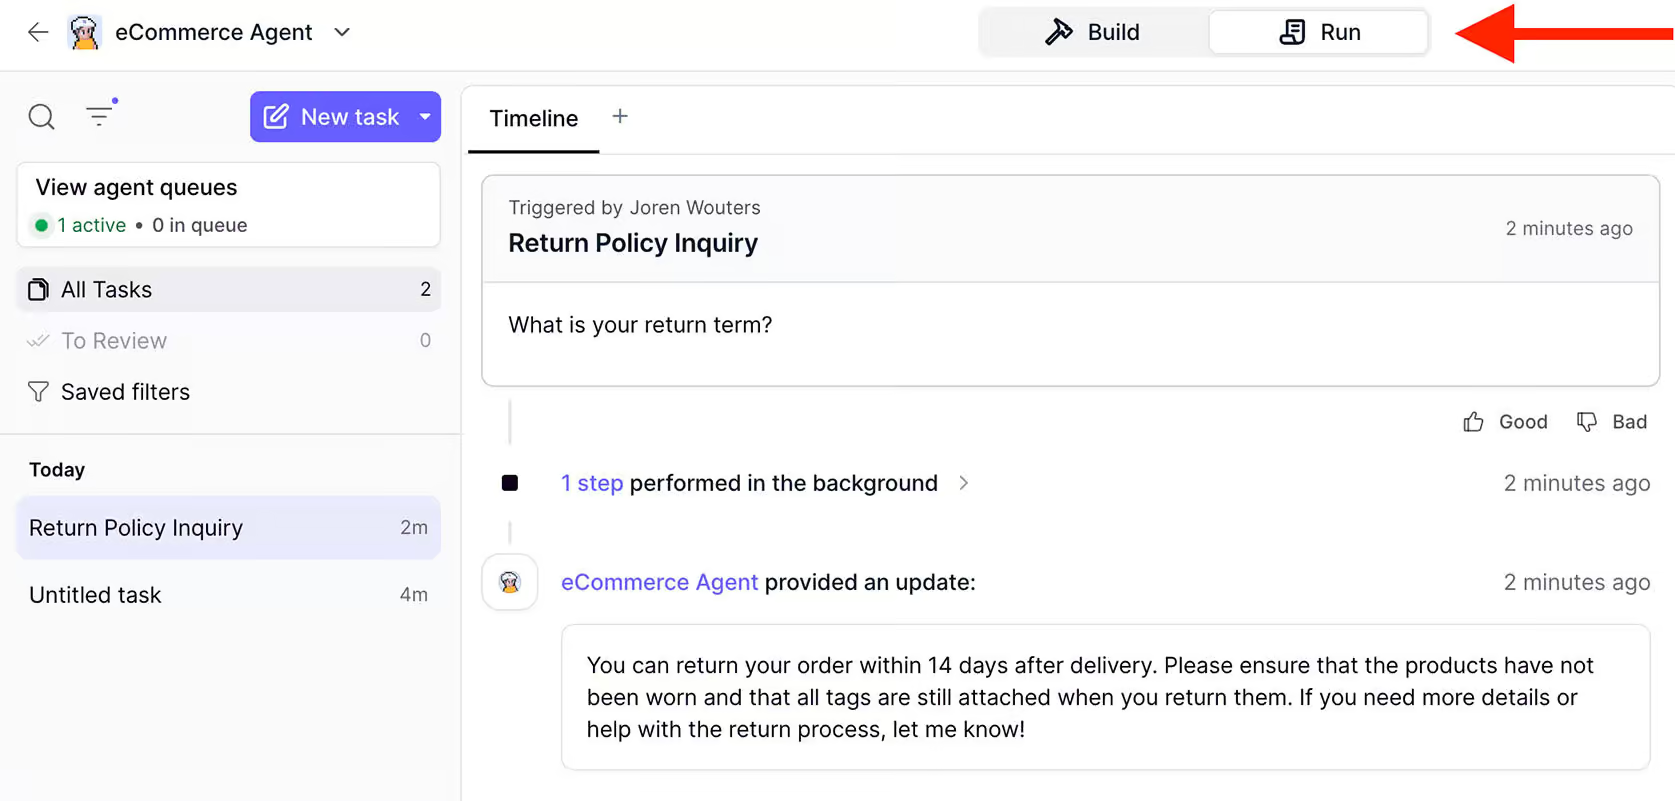
Once that’s done, click Run and try asking your AI a few questions. It should already be able to answer based on your uploaded data:
Step 2: Connect Manychat to Relevance AI via Make.com
Now we’ll connect the chatbot with Relevance AI. That way, when someone messages your WhatsApp bot, their question is sent to the AI, and the answer comes right back.
To do this, we’ll use Make, a no-code platform that connects different tools together.
Just click the button below to get 30 days of Make Pro for Free (only if you use my button):
Get 30 Days of Make Pro for Free
And I actually have created a step-by-step video on how you can connect Manychat to Relevance AI using Make:
So let’s set this up in Manychat.
Go to Settings → WhatsApp inside Manychat:

Find the Default Reply, this is the automation that sends when somebody messages you (and no other automation is triggered).
Click Select Existing, and choose the Default Reply from my free template (download it here):
Then, click on the trigger and set it to Every time so it catches all incoming questions:

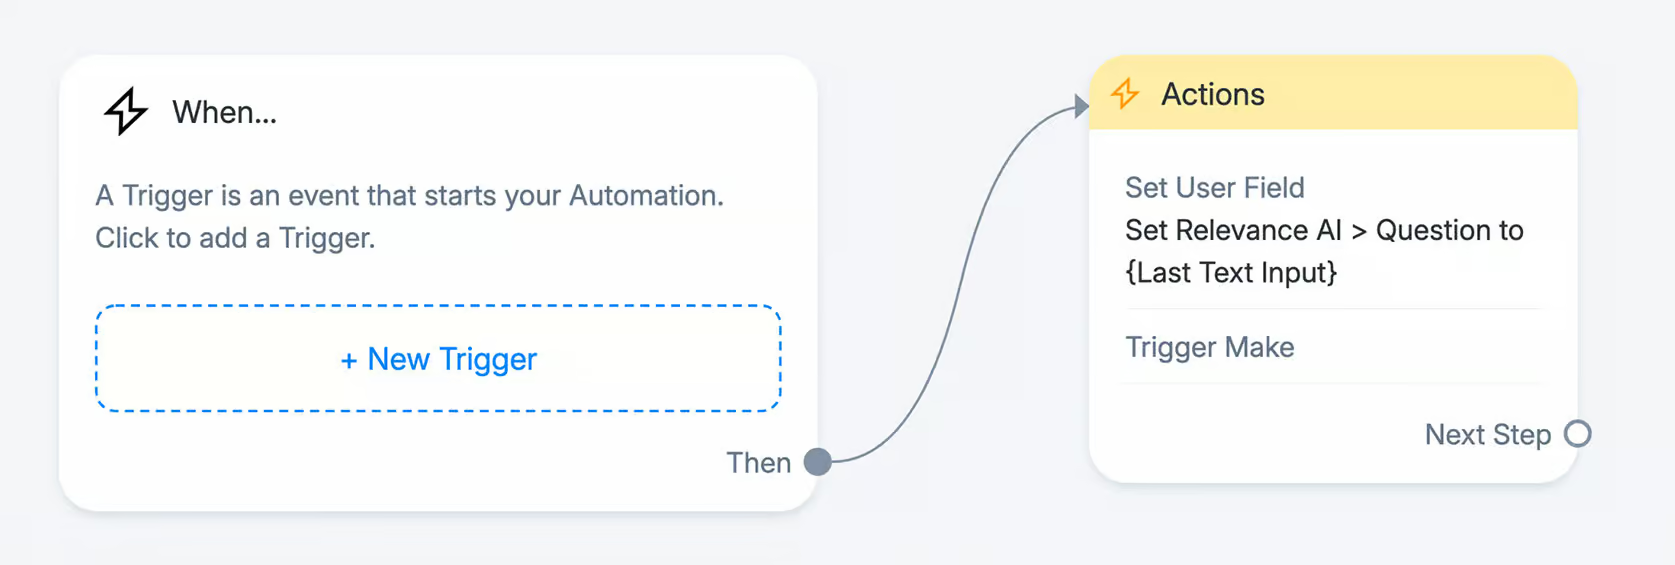
Then we store the user’s message in a custom field (“Relevance AI > Question”) and send that to Relevance AI using Make.
Here’s what the Make integration looks like:

This setup works in 4 simple steps:
- A WhatsApp message triggers the Default Reply in Manychat
- The message is sent to Relevance AI via Make
- The AI responds, and the answer is saved in Manychat field (in the field “Relevance AI > Answer”)
- That answer is sent back to the user via an automation
The automation we use to send the answer is called “WhatsApp Chatbot > Send AI Answer” from the template:
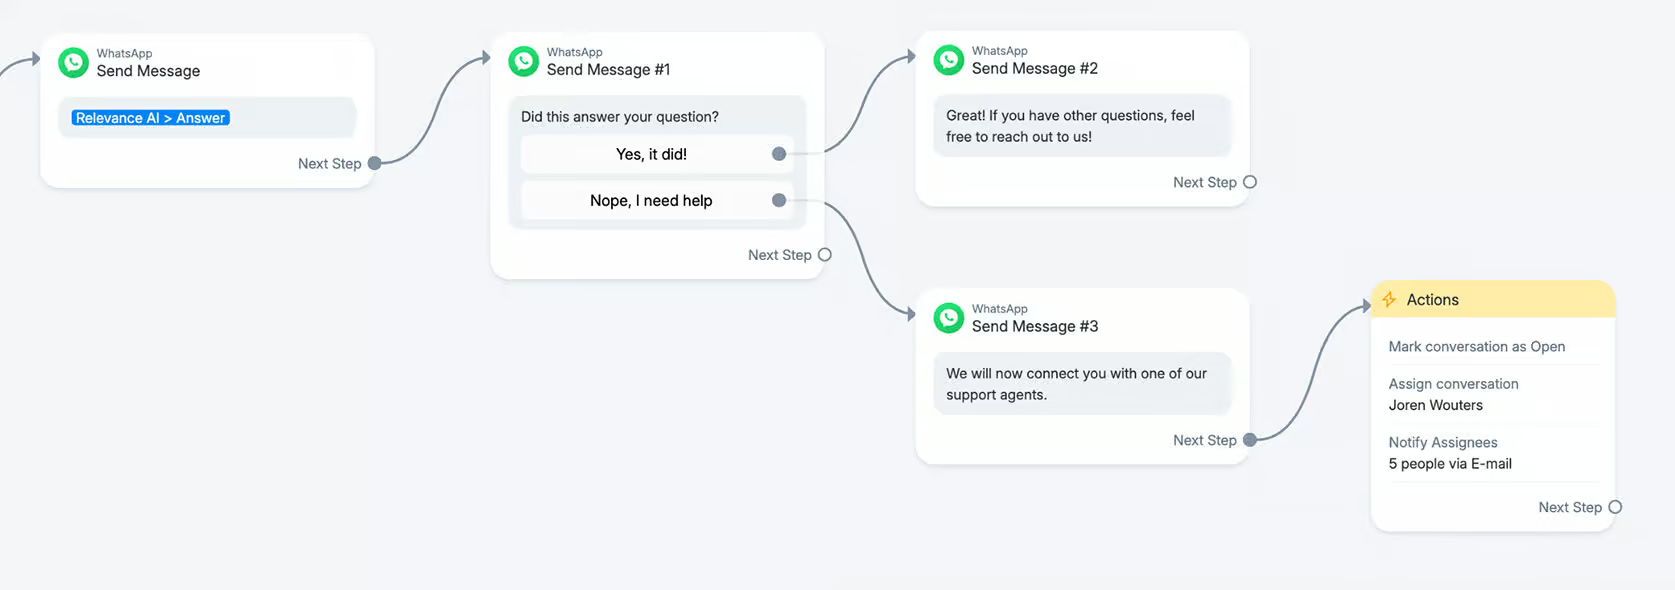
This flow sends the answer and checks if it helped. If it didn’t, the conversation is handed off to a human support agent.
Step 3: Set Live and Test
Once everything’s connected, hit Set Live at the top right:

Then message your WhatsApp bot with a question and your AI will instantly respond:

Free Template for Automatically Replying to WhatsApp Messages
And that’s how you automatically reply to messages on WhatsApp!
If you want to get started quickly, just fill in the form below and download my FREE template:
Hello, Joren,
When I use your template, there is a erro meeseage:
Manychat
Module references non-existing module ‘2’.
How to fix it? Thank you.
Hey Wayne! Could you send a video of your setup to info@chatimize.com? Then, I can have a look at it.
Is there any tool that can do this for free?
Have a look at Botpress, they have a very good free plan.
What is the difference between closed conversations and open conversations in Manychat?
Closed conversations are conversations handled by your Automations. Open conversations are conversations handled by your support team.