
By Joren Wouters • Updated on
Step 1: Create a Free Manychat Account and connect it to your WhatsApp
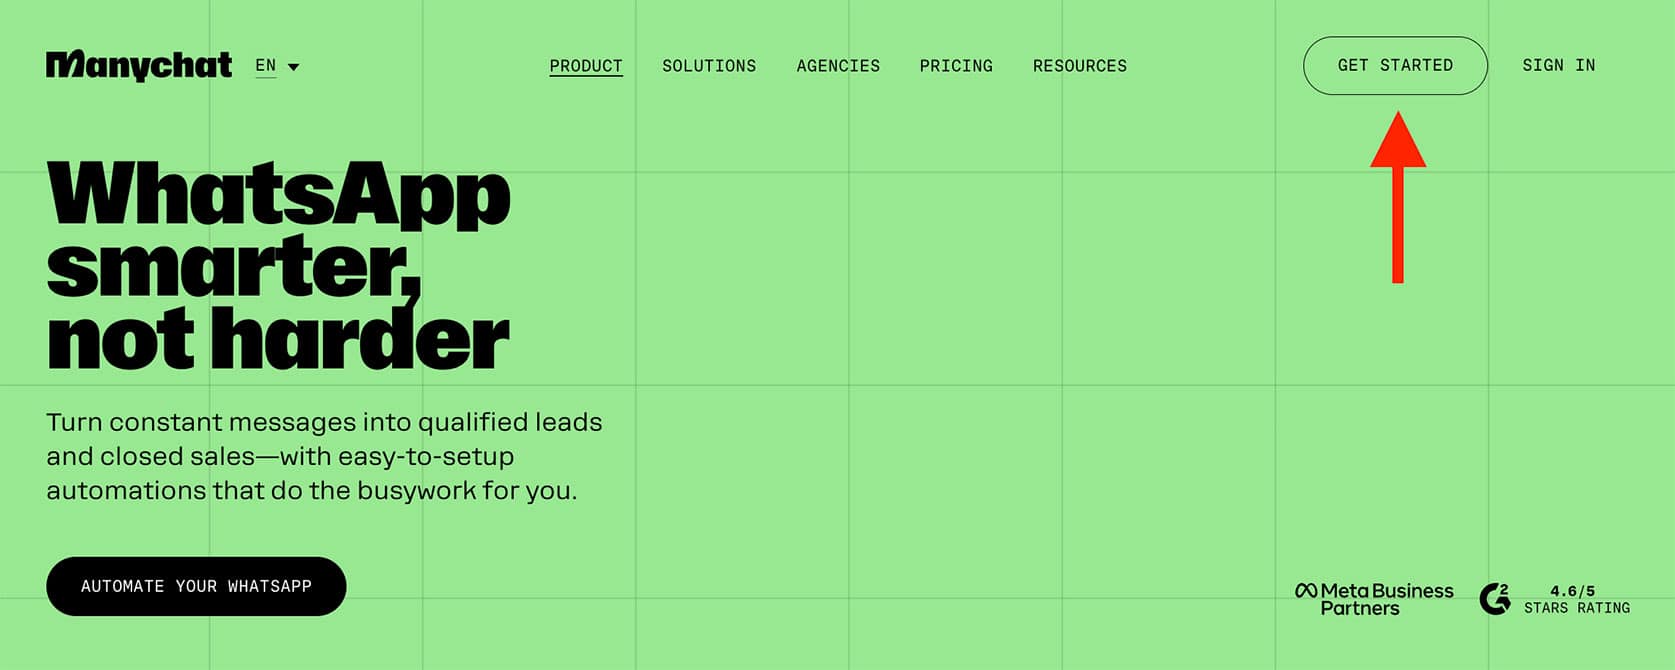
To create a Manychat WhatsApp automation, the first step is to create a free Manychat account.
Manychat is one of the best WhatsApp automation platforms. I’ve been using it for 5 years because it’s:
- Easy to use: you don’t need any prior chat automation experience
- 100% Meta approved, so there is no risk of getting banned
- It’s very cheap: it comes with a free plan, and their paid plan starts at $15/month.
To create a ManyChat account, just click the button below (and get my 100% discount code):
Now click on Get Started Free:
Then, click on WhatsApp:

Once you’ve done that, click on the Continue with Facebook option to log in with your Facebook profile:

I also have a video that explains all the steps you need to do to connect your WhatsApp to Manychat. I recommend checking it out to ensure you have a good connection:

Step 2: Set up your WhatsApp Welcome Message (So Customers Feel You’re Always Online)
In the rest of this tutorial, we will create a WhatsApp automation for an Airbnb company.
Let’s say, for example, you’re an Airbnb rental company with over 10 apartments. People can come to your apartment and have questions, such as:
- What’s the WiFi password?
- Can I extend my stay?
- Can I leave my luggage?
And we can automatically answer these questions with a WhatsApp automation.
Before writing your welcome message, think about the tone you want your brand to have on WhatsApp. Friendly? Professional? Fun?
Your greeting sets the first impression. Make it sound human, not robotic.
So, when you’re in Manychat, go to Automation and then New Automation:

Every automation in Manychat starts with a trigger. Once it’s triggered, we can send messages.
In this case, the trigger will be when someone says “Hi”, “Hello”, “Hey”, or a similar greeting.
Let’s click on Add Trigger:

Then go to WhatsApp, and choose User sends a message:

Here, we choose Detect specific words in a message, and then we choose the keywords. If the message contains “Hey”, “Hi”, “Hello”, or “Howdy”, then we can automatically reply to that message:

Then, we’ll choose WhatsApp:

And now we write a reply to a person’s message. In this case, we’ll say:
Hey! I’m Airy, the digital assistant of Airbnb Company.
I will try to answer your question. If I don’t know the answer, I’ll connect with someone from the team.
What is your question about?
Please choose an option below

We’d want to give them buttons to choose from, but on WhatsApp, we can have a maximum of three buttons. In this case, that’s not enough.
So, if you want more than three options, I’d recommend using a list message. To do that, click on More, and then List Message:

Then, we should copy the message and put it here:

And feel free to delete the original message from the original box.
So now, instead of having a normal button, a list button with many options. We will set the button title to See Options:

When people click on that, it opens a pop-up in WhatsApp. In that pop-up, people can click on one of the options.
So, when people have questions, these questions will typically be about three things:
- The place
- The stay
- The neighborhood
So we will add these as sections in our List button. Than under each section, we can add specific buttons that lead to the specific questions people have.
For example, questions about WiFi password and House rules fall under the Your place section. And questions about a Taxi or Supermarkets nearby fall under Your neighborhood.
Pro Tip: Grouping your FAQs by topic (“Your Place”, “Your Stay”, “Neighborhood”) keeps your menu clean and easy to use.
Here’s how that looks in Manychat:

For all nine options, we can automatically reply to questions about them.
There are two types of questions:
- Some questions will have default answers, such as Wifi password or House rules.
- For some questions, such as Extending the stay or Late checkout, we want to get some information from the customer. Then, we’ll connect them to an agent that can do the stuff for them. The agent can check whether they can actually extend the stay or checkout later.
Step 3: Auto Reply to Standard Questions (And Save Hours Every Week)
First, we will create the default answers for the first type of questions. Let’s start with the WiFi password.
We’ll click on WiFi password, then choose WhatsApp:

Here we can respond with “You can find the WiFi password on the flyer on the table.”

This is great because you can have the same answer for everyone. You don’t need to have different responses for different apartments.
Now, we’ll repeat the process for the next question, House rules.
Here, we’ll add a message “Just click the button below to get the house rules 👇”. Then, we’ll add a button, and name it “House rules”. When they click the button, it will take them to a PDF with your house rules.
Once you click on Open website, you will be able to input your URL where the PDF is. In this case, I’ll enter my website, just as an example:

The next question is about Drinking tap water. So, we’ll repeat the process, click on the button and choose WhatsApp again.
Then, we’ll write this message: “In your apartment, it’s safe to drink water from the tap. If you prefer to drink water from a bottle, please check one of the nearby supermarkets 👇”
This is a nice way to do two things at once:
- Answer the customer’s question
- Connect our automations to each other
So, we’ll also add a button and name it “Supermarkets nearby”:

Here, we’ll be able to connect this to the Supermarkets nearby automation. We will do that later.
The next question with a default answer is about Nice restaurants.
We’ll write the message: “Here’s a map with the best restaurants in the neighborhood 👇”, and we’ll repeat the process that we did with House rules. We add a button, and we click on Open website.
And here, you can set the URL to Google Maps. You can set a map in Google Maps, and in it, you can have multiple pins. Each pin will be a restaurant.
If all apartments are relatively close to each other, you can have a list of 20 restaurants to recommend to your guests. That way, they can choose the ones they like, but they can also see which restaurants are the closest to their specific apartment.
I will just input Google Maps as an example:

The next question is I need a taxi.
We’ll say “No problem! You can book a taxi with our preferred taxi partner. Just click the button below 👇”. We’ll add a button and click on Open website.
Then, just add a URL to a taxi service in the neighborhood. In my case, I’ll just put “taxi.com”:

The last question with a default answer is Supermarkets nearby.
Here, I would just do the same as with the restaurants. Write a message, for example “Here’s a map with the supermarkets nearby 👇”.
Then, add a button, go to Open website, and create a Google Map with a lot of supermarkets. I’d also recommend picking one or two of your favorites, since you’re the local.
And, as mentioned before, we can now connect our two automations Drinking tap water and Supermarkets nearby:
Now, we’ll move on to asking if their questions have been answered.
Let’s create a new automation for that.
The idea here is that whenever we give an answer, we also ask the customer if this actually answers their questions properly.
We’ll name the automation “Answer to question”, then click on WhatsApp:

Here, we will say “Does this answer your question? Just click on one of the buttons below 👇”. We can add two buttons, one for when the answer is “Yes”, one for when the answer is “No”.
Then, if they click on the “Yes” button, we can create a new message:

In that message, we can say “Awesome! If you have any other questions, feel free to ask them here.”
And then, we’ll also create a message for when they click on “No”.
This is where we start asking them for their information, such as their email.
First, we’ll check whether we already know their email. It’s possible a person has had multiple questions during their stay, and they already gave their email earlier.
So, we’ll choose Condition:

Then, we’ll add a Condition and choose Email:

And then, if the email is unknown, we’ll ask for their email:

Here, we’ll click on Data Collection, and we’ll say “What is your email? Just type in your email below 👇”. Make sure to set the Reply Type to Email:

Then, scroll down and remove the Skip button text (so that users cannot skip this question):

Once they answer with their email, we move on to the next step.
Add another Data Collection element, and we’ll ask them what question they have for us. Then, we can save this to a custom field in Manychat. Let’s call this “Airbnb -> Question”, and click on + User Field:

And we’ll click on Create to make a new User Field.
So now, when they answer the question, it will be saved to this custom field.
Also, make sure to add the other option of the condition. So, if we already have their email, we just ask them what question they have for us:

The next step is to connect them to one of the agents. In order to do that, we’ll first create another message “We will now connect you with one of our agents”.
Now, we need to add an action. With actions, you can send notifications to an agent.
So, let’s add an action:

Click on + Action, then Live Chat and Mark conversation as Open:

In Manychat, you have two types of conversations:
- Closed conversations, which are handled by our automations
- Open conversations, which are handled by our team or live chat agents
In this case, we’re marking the conversation as Open. That way, someone from the team can take it over.
So, we’ll click on + Action and Live Chat again, and now, we’ll choose Assign conversation:

You can assign it to a specific person or a group.
And lastly, we need to Notify Assignees:

Once that’s done, we can simply click on Set Live, and it will be working:

Going back to our Welcome Message, each time we send an answer, we can also ask “Does this answer your question?”. In order to do that, we need to connect the two automations.
First, we’ll go back to our first automation, choose Next Step and click on + Start Automation:

Now, find AirBnB and click on the Answer to question automation:

Then, we need to connect each default answer we have to the automation:

And now every time someone asks a question with a default answer, we give that answer and we also ask “Does that answer your question?”.
Step 4: Collect data from customers and send to agents
Previously, we’ve taken care of default questions with default answers.
But now, we have another option for when people want to extend their stay, get a late checkout, or leave their luggage.
In those cases, you want to get more information about what they want to do and get their email. Then, you connect them to one of your agents.
Common Mistake: Asking for too much info upfront (like full name, email, phone) can feel intrusive. Start with just one question to increase response rates.
First, we’ll write down what type of request they have.
Let’s start with the Extend stay option. We’re going to create a custom field in Manychat that has that information. Now, click on Next Step and then + Actions:

Then, go to Contact Data and click on Set User Field:

Here, we’ll create a new User Field called “Airbnb > Request” and set the value to “Extend stay”:

Now, we’ll create one for Late checkout and Leave luggage options as well.
There’s no need to repeat the whole process again. We can simply duplicate the one we have two more times:

Of course, now, we’ll have Extend stay three times. So, let’s change the second one to Late checkout and third one to Leave luggage.

Now that that’s set up, we want to get more information about what people want to do.
For example, if they want to extend they stay, you’d want to ask for how long. If they want to get a late checkout, you’d ask until what time.
You need that information to fulfill their request. To get the information, we can just ask them another question.
We’ll add another Data collection element, and ask them “Got it! To what day would you like to extend your stay?”.
Then, we’ll click on Contact’s Reply (we choose “Text”), and we can save this as a new custom field. We can call this “Airbnb > Request > More info”:

Then, they can simply answer that question.
And, instead of repeating the process for all three options, we can just duplicate the message we have:

Now, we need to connect the Late checkout option to the duplicated message, and change the message to “Got it! At what time would you like to checkout?”:

Then, it will go to the same custom field.
And, we’ll duplicate the message again, this time for the Leave luggage options. The process is the same, except the message can be “Got it! At what time would you like to leave your luggage?”.
Once they answer the questions, we can ask them for their email.
There’s no need to create this message again, because we already did it before in our “Answer to question” automation.
So, we’ll just copy it from there. Hold “Shift” on your keyboard to select both of these, then press “Ctrl + C / Cmd + C”.
Then, we’ll go back to our initial automation and paste it there. We’ll connect it to all three of our questions:

This way, if we don’t know their email, we ask for it.
Then, we can tell them “Thank you! We have notified our agents. Someone will be with you as soon as possible.”

First, we need to connect this:

Now we need to connect them to one of the agents. Once again, we can copy it from our other automation:

Paste it in the initial automation, then connect it to the last message:

Then, we can also personalize this notification. Here, the agent needs to know what the customer wants to do.
So, let’s adjust the notification text. We can say:
“{Full Name} has a request.
Request: {Airbnb > Request}
More info: {Airbnb > Request > More info}”
It’s important to use curly brackets, because that will then contain information about leaving the luggage or extending the stay. It will also provide more information, for example how long they want to extend their stay:

So, this is the entire automation we’ve created:

Finally, click on Set Live.
Make sure to enable this welcome message:

Step 5: Set Up Your Default Reply in WhatsApp (So No Message Goes Unanswered)
Now, the only thing left to do is set up a default reply.
In Manychat, a default reply triggers when none of the other automations are triggered. It’s used when someone has a question, but your chatbot can’t answer it.
We’ll create a new automation inside AirBnB and call it “Default Reply”.
So, we’ll write a message “Sorry, but I don’t know the answer to your question. Do you want to be connected to an agent?”. We will add two buttons, one for saying yes, one for saying no:

If they say no, we can simply tell them “Okay, no problem”.
Common Mistake: Don’t leave users at a dead end. Even if they say “No,” offer a fallback like “You can message us again anytime 👋.”
If they say yes, we need to collect their information and connect them to an agent.
We already did that before, so once again, we can copy it from the “Answer to question” automation:

Then, we can paste it to our “Default Reply” automation and connect it in case the customer answers “Yes, please!”:

We also need to go to Settings, choose WhatsApp and click on Select Existing. Then, we need to choose our Default reply automation:

Here’s what this does. If someone types a keyword that doesn’t match any of the other automations we have in Manychat, the Default reply automation will trigger.
Now, we click on Set Live, and we’re done!
Congratulations, you’ve just completed your first WhatsApp automation with Manychat!
But that’s actually just the first step, because you can use WhatsApp as a marketing and sales channel.
If you want to learn more about this and send WhatsApp broadcasts to your leads and customers, feel free to check out this guide:

Or, if you want to add AI to your WhatsApp automation so it can answer any question automatically, see our guide on:
