
By Joren Wouters • Updated on
Facebook chatbots can be a powerful growth tool for almost any business.
If you’re wondering how to create a Facebook chatbot, it helps to understand why they work so well in the first place.
In short, Facebook chatbots help you:
- Generate more leads and sales
- Reduce manual work and support costs
- Deliver a faster, better customer experience
Let’s break down the biggest benefits one by one.
1. Boost Sales & Lead Generation
Most businesses still rely on traditional channels like landing pages and email to capture leads.
But these channels struggle to keep up with how people use Facebook today.
Here’s what the data shows:
Landing pages convert at around 6%.
Emails are opened roughly 20% of the time, with click rates closer to 4%.
Facebook chatbots are much better. Let’s compare them:
| Metric | Traditional Channels | Facebook Messenger chatbot |
|---|---|---|
| Conversion Rate | 6% | 50% |
| Open Rate | 20% | 70–80% (often within the first hour) |
| Click Rate | 4% | 40% |
Facebook chatbots outperform because:
- Conversations happen inside Facebook Messenger, where users already spend time
- You can instantly message users when they comment on a post
- There’s no friction from page loads, forms, or inbox clutter
This is why businesses that learn how to create a Facebook chatbot often see huge increases in sales.
2. Reduce Support & Operational Costs
Another major advantage of building a Facebook chatbot is automation.
A Facebook chatbot can:
- Answer common questions automatically
- Handle multiple conversations at the same time
- Work 24/7 without breaks
That means fewer repetitive tasks for your team and lower staffing costs overall.
According to research, businesses can save around 30% on customer support costs by using chatbots. And my own experience with my clients shows the same results.
Here’s a screenshot of how we automatically replied to 2,000 questions within the first month of going live:

Instead of replying manually to the same comments and DMs all day, your chatbot handles it instantly and consistently.
3. Improve Customer Experience on Facebook
When someone comments on your post or sends a DM, they expect a fast response. Facebook chatbots make that possible.
With a chatbot in place:
- Customers get instant replies, even outside business hours
- No waiting for human agents
- Clear, guided conversations instead of confusion
This creates a smoother experience for users and increases trust in your brand.
Step 1: Create a Free Manychat Account and connect it to your Facebook page
The first step is to create a free Manychat account.
Manychat is one of the best Facebook chatbot platforms. I have been using it for my own clients because it is:
- Easy to use: you don’t need any prior chat automation experience
- There is no risk of getting banned since the platform is 100% Meta approved.
- It’s very cheap: it comes with a free plan, and their paid plan starts at $15/month.
To create a ManyChat account, just click the button below (and get my 100% discount code):
Now click on Get Started:

Then, click on Facebook Messenger:

Once you’ve done that, click on the Continue with Facebook option to log in with your Facebook profile:

I have a video that explains all the steps you need to do to connect your Facebook page to Manychat. I highly recommend checking it out to ensure you have a good connection:

Step 2: Set up Facebook Triggers
In the rest of this tutorial, we will create a lead generation chatbot. Here, we’ll give something away for free, and in return we’ll ask for someone’s name and email.
And once we get that, then we send them our lead magnet.
In this tutorial, I’ll use an example of an investing guide. We will be giving away a free investing guide, in return for asking for someone’s name and email.
So, when you’re in Manychat, go to Automation and then New Automation:

Every automation in Manychat starts with a trigger. Once it’s triggered, we can send messages.
In this case, we’re going to add two triggers:
- One trigger for when someone comments a specific word
- One trigger for when someone DMs us a specific word
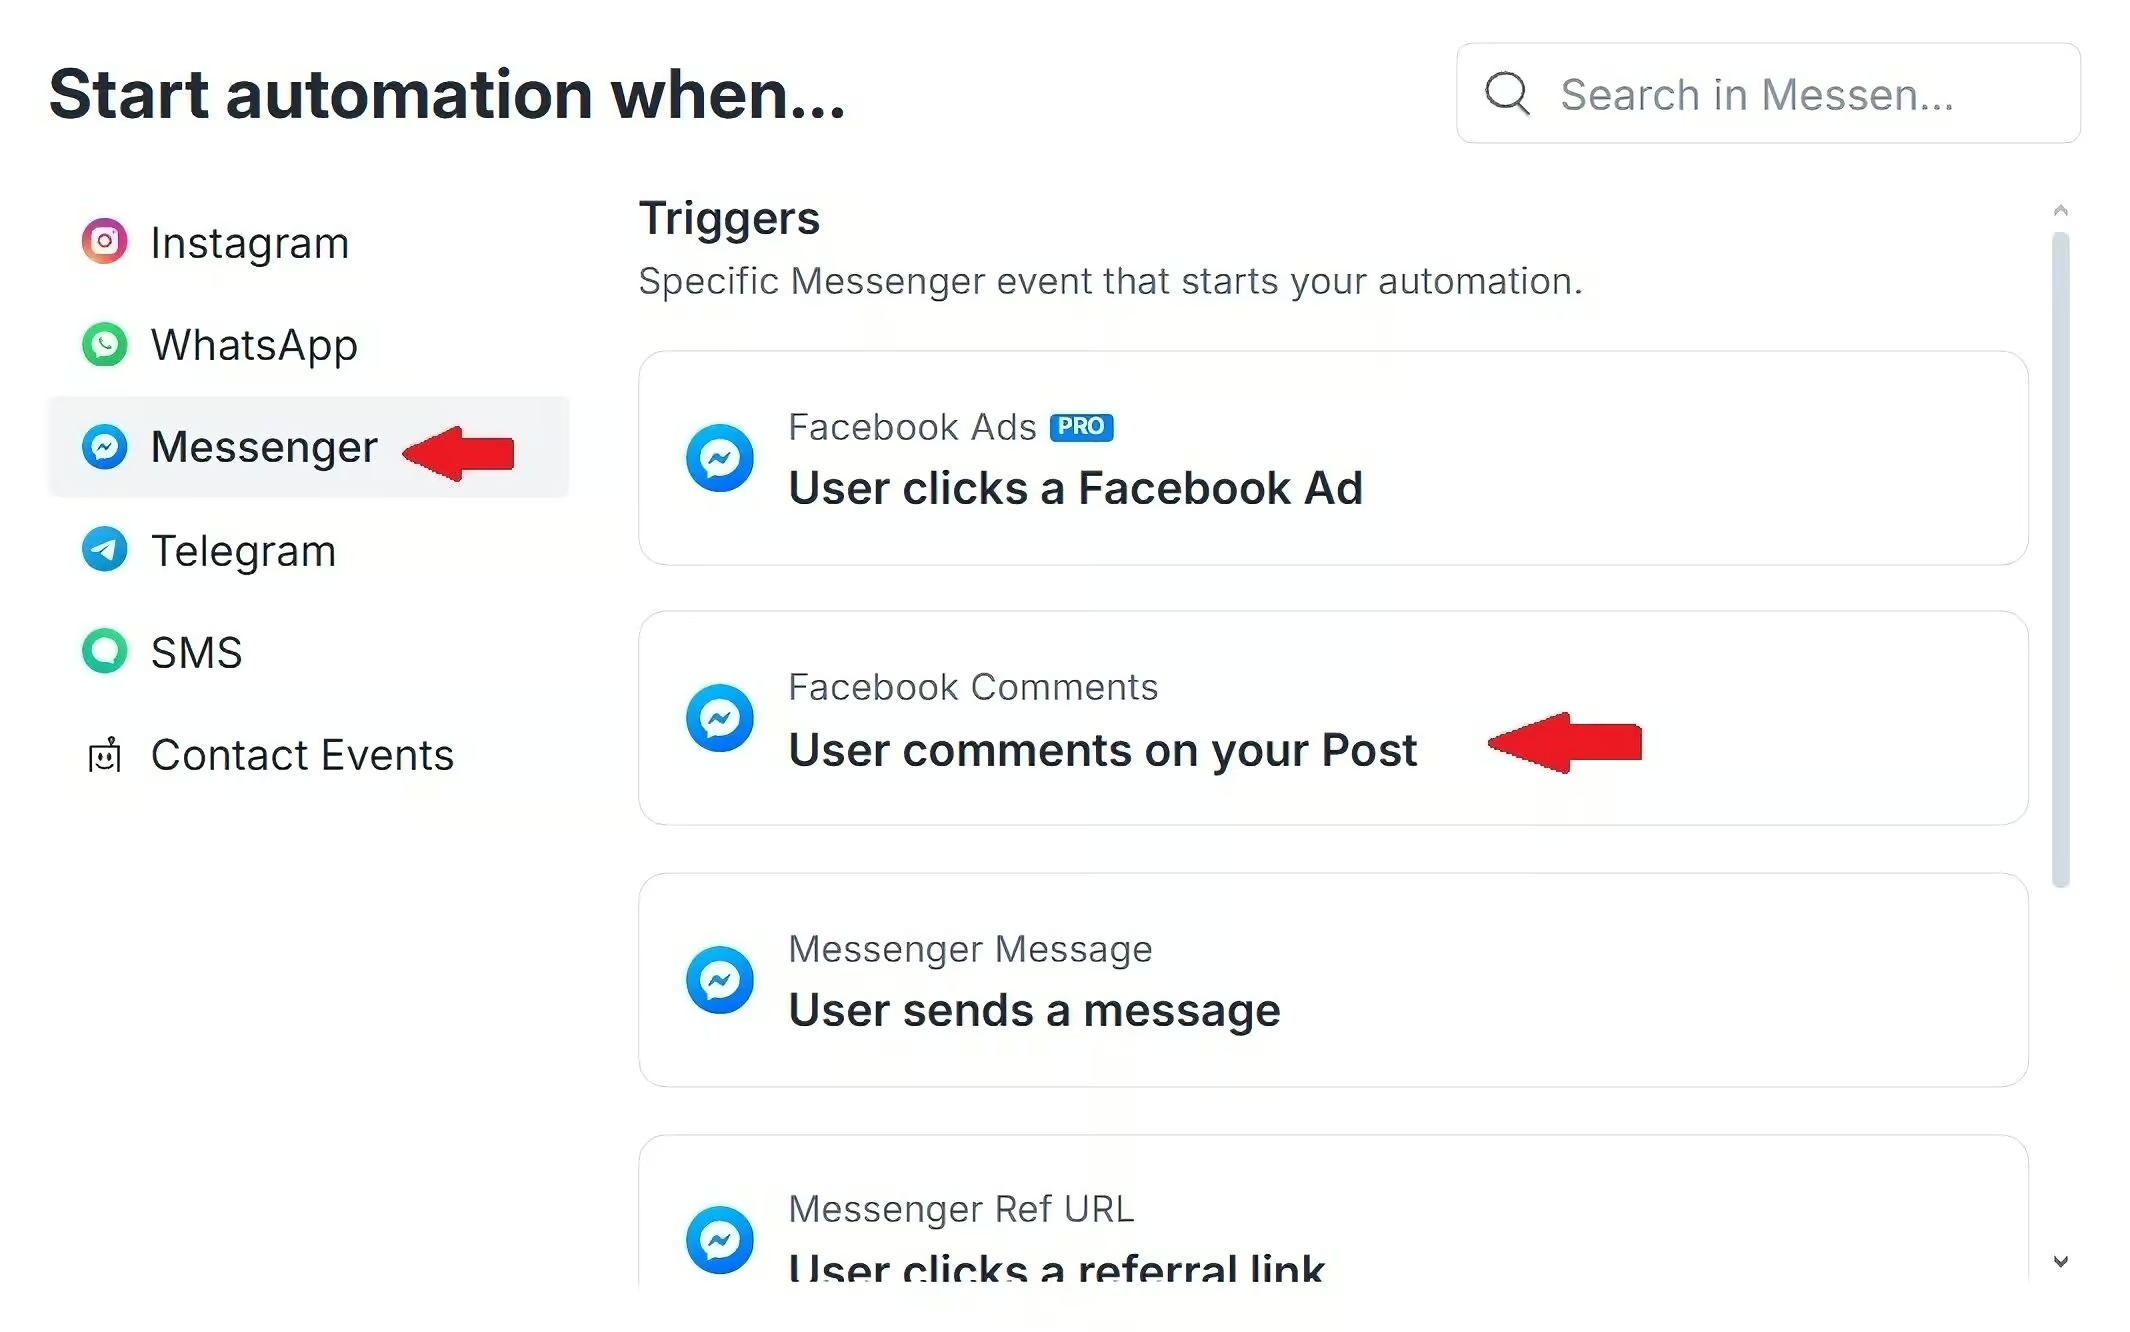
Let’s click on New Trigger:

Then go to Messenger, and choose User comments on your Post:
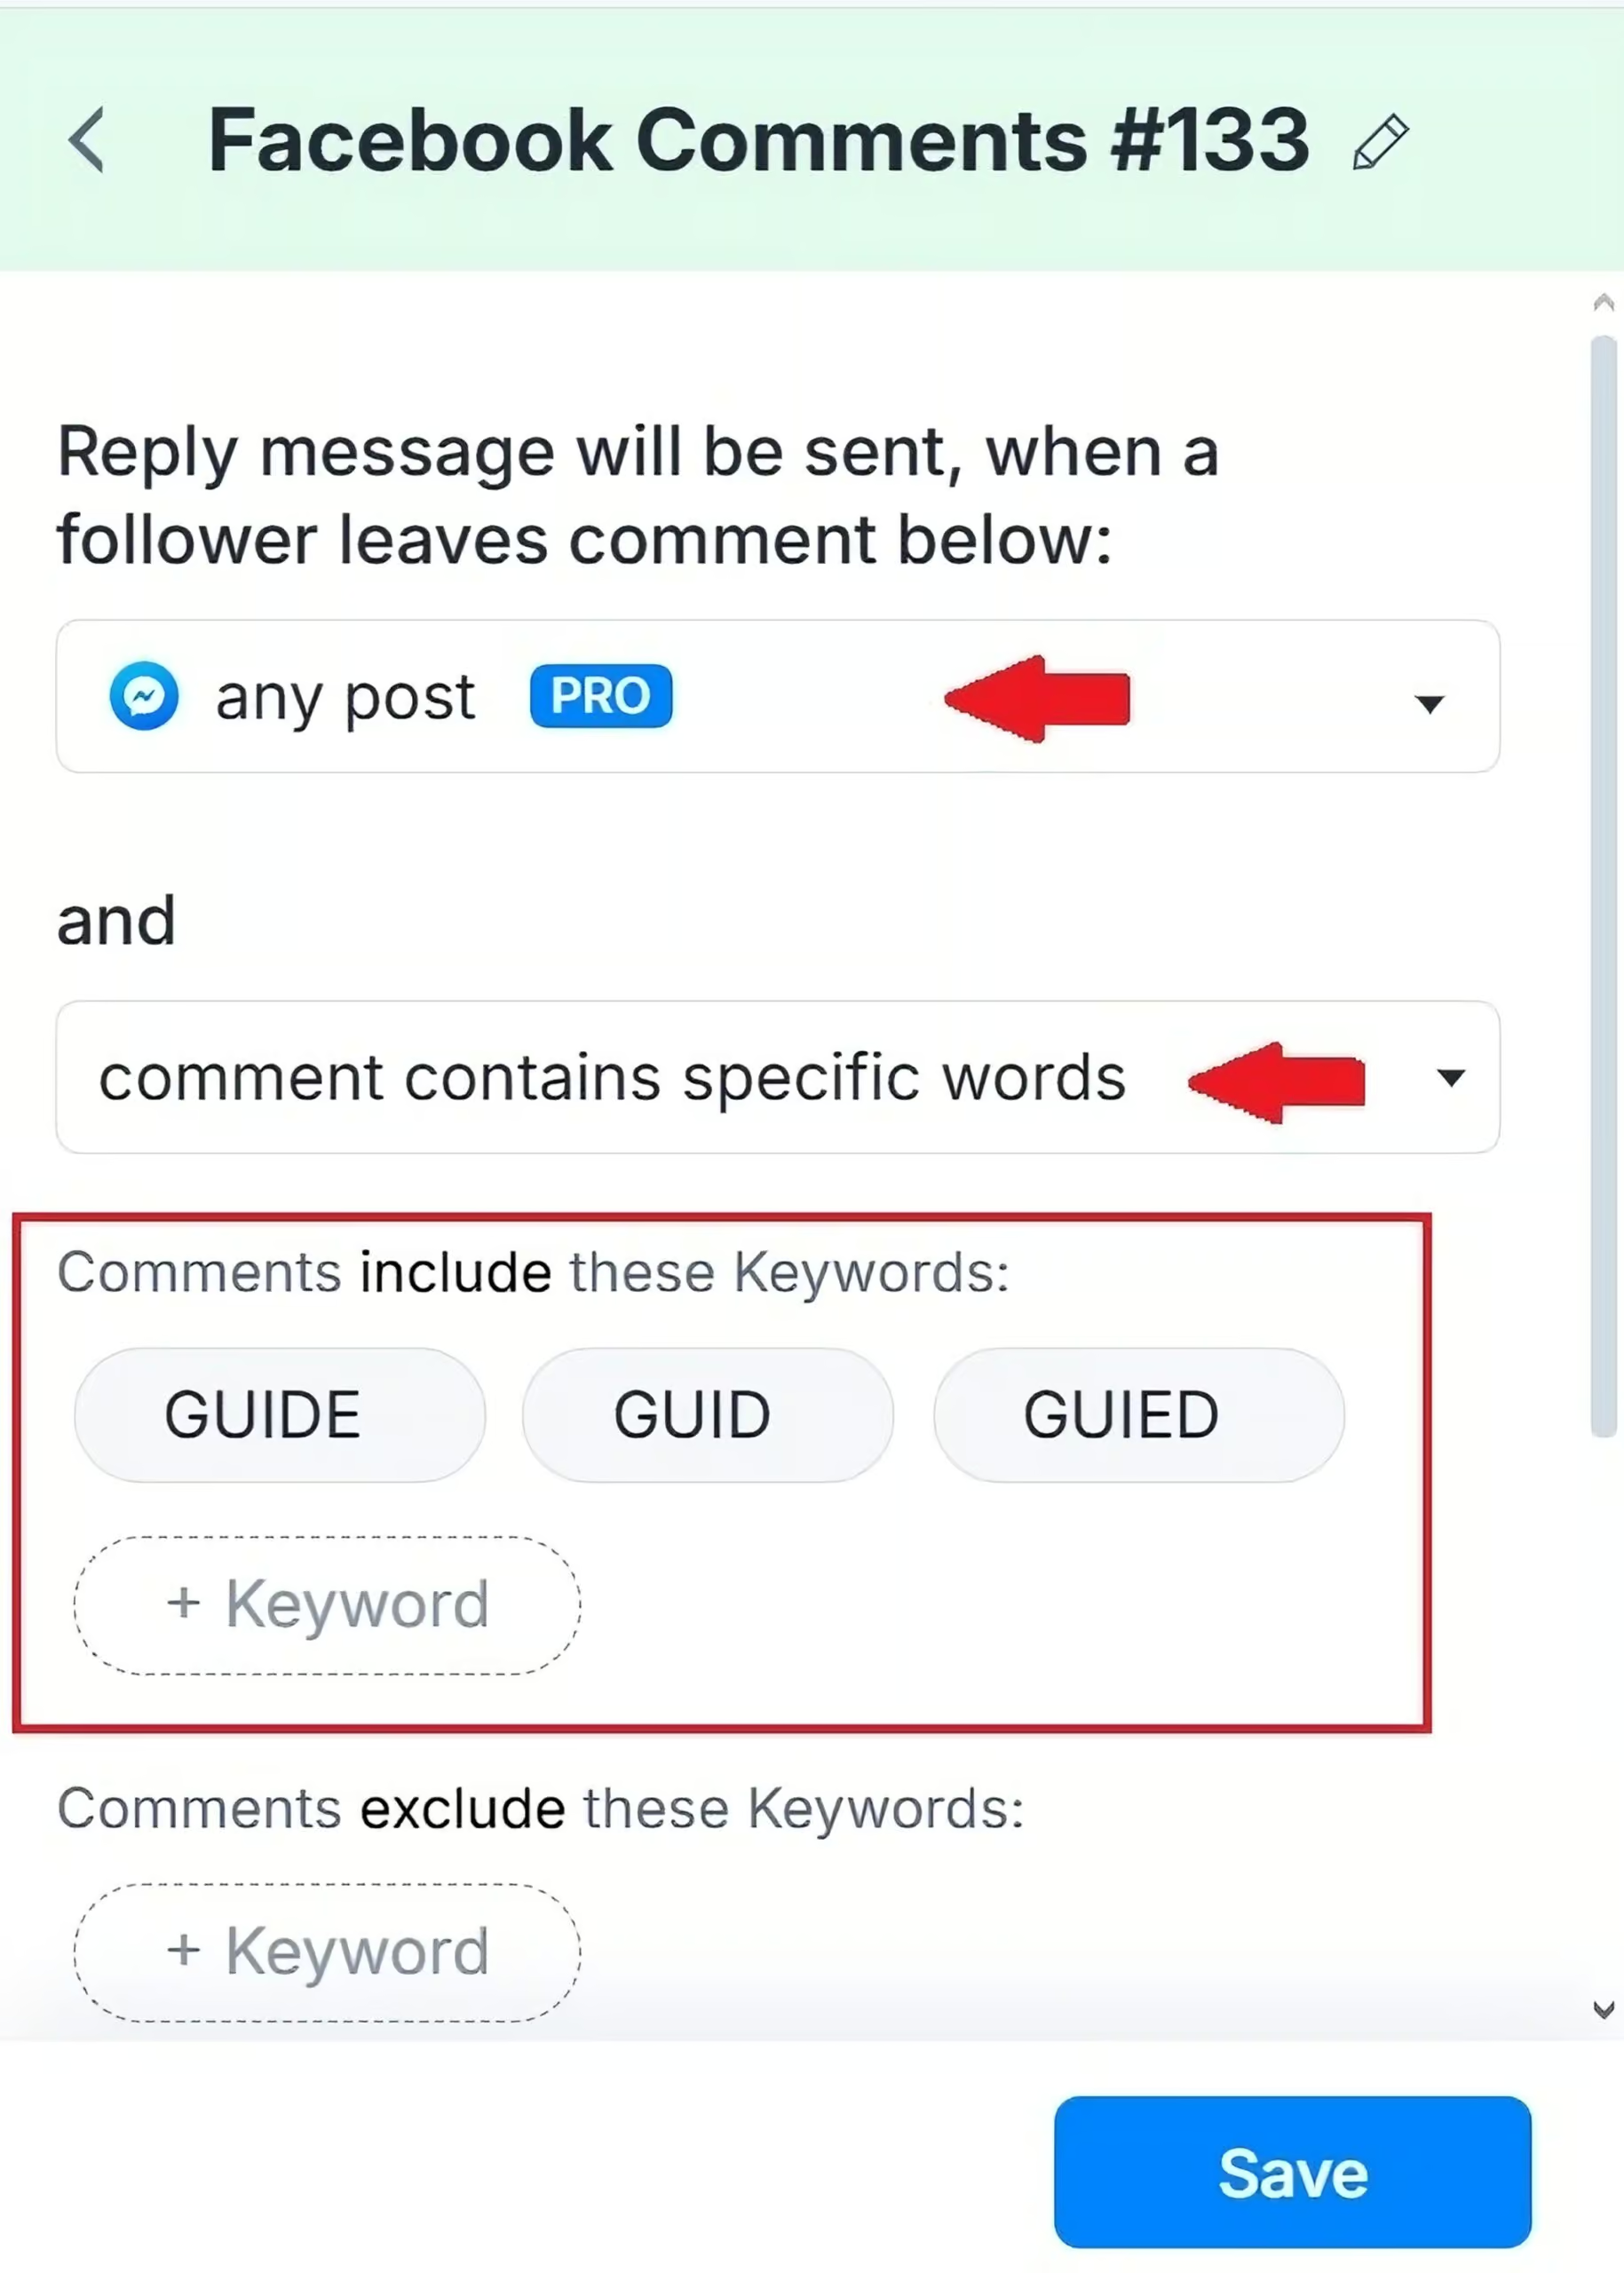
Here, we choose any post, because it means you can use this automation across all of your posts. Then, we choose comment contains specific words.
In your post, you can say “Comment ‘Guide‘ below and you’ll get my free investing guide”.
This is a classic example of using an auto-reply bot for Facebook comments. It
automatically moves people from comments into Messenger.
Then we set it up so that whenever someone comments “Guide” (including certain typos like “Guid” or “Guied”), this automation starts:
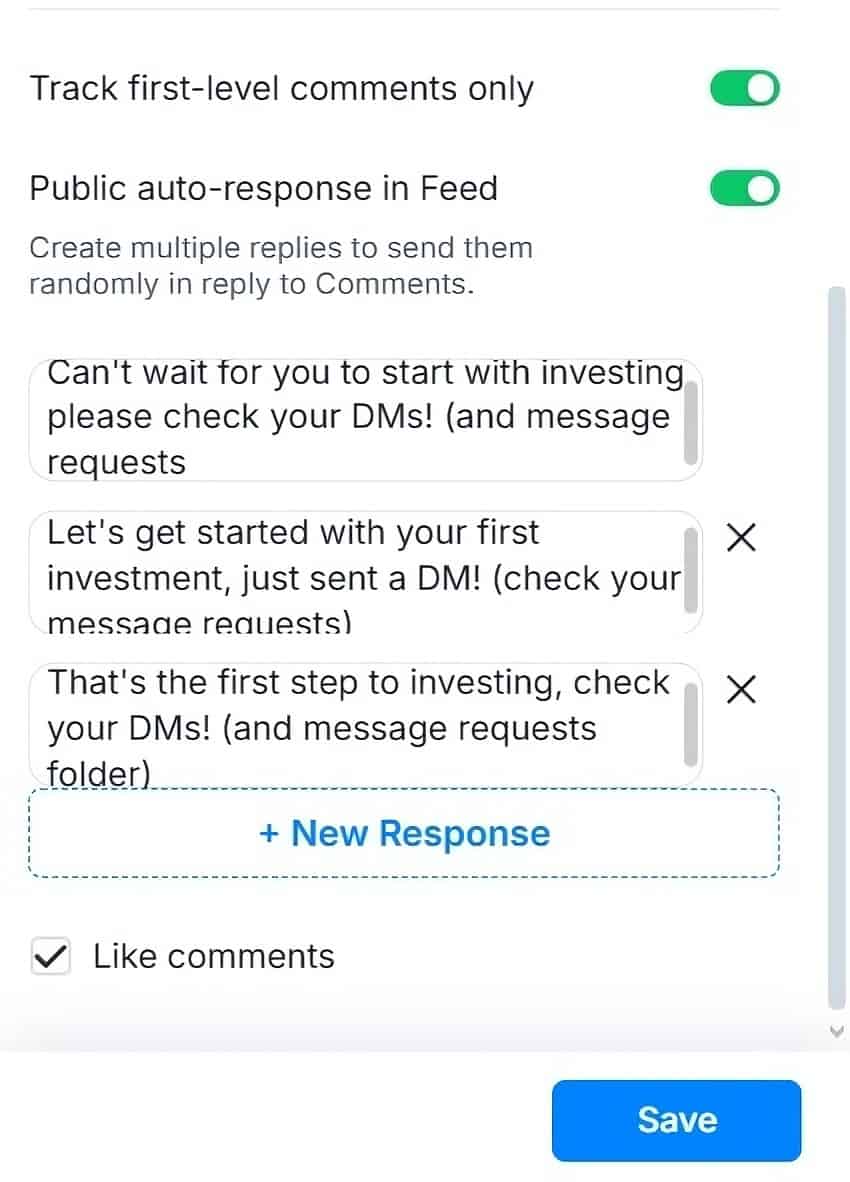
Then, I always pick Track first-level comments only (it means comments on comments are ignored).
The Public auto-response in Feed option means that when someone comments “Guide”, we automatically reply to it in the comment section.
In your public reply, you want to do two things:
- Make people excited for what they’re going to get
- Tell them they need to go to their inbox
We essentially hype them up and give them instructions to check their messages (and message requests).
It’s better to include at least three messages instead of one, just like I did. One of them will be picked at random, and that way, we avoid appearing like a spammer.
Finally, we can click on Like comments, which means we like all comments with the keyword “Guide”.
Then, we click Save:
That is our comment reply trigger. Now, we also need to set up another trigger, for when someone messages us the word “Guide”.
So, we’ll click New Trigger again:
Then we’ll choose Messenger, and User sends a message:
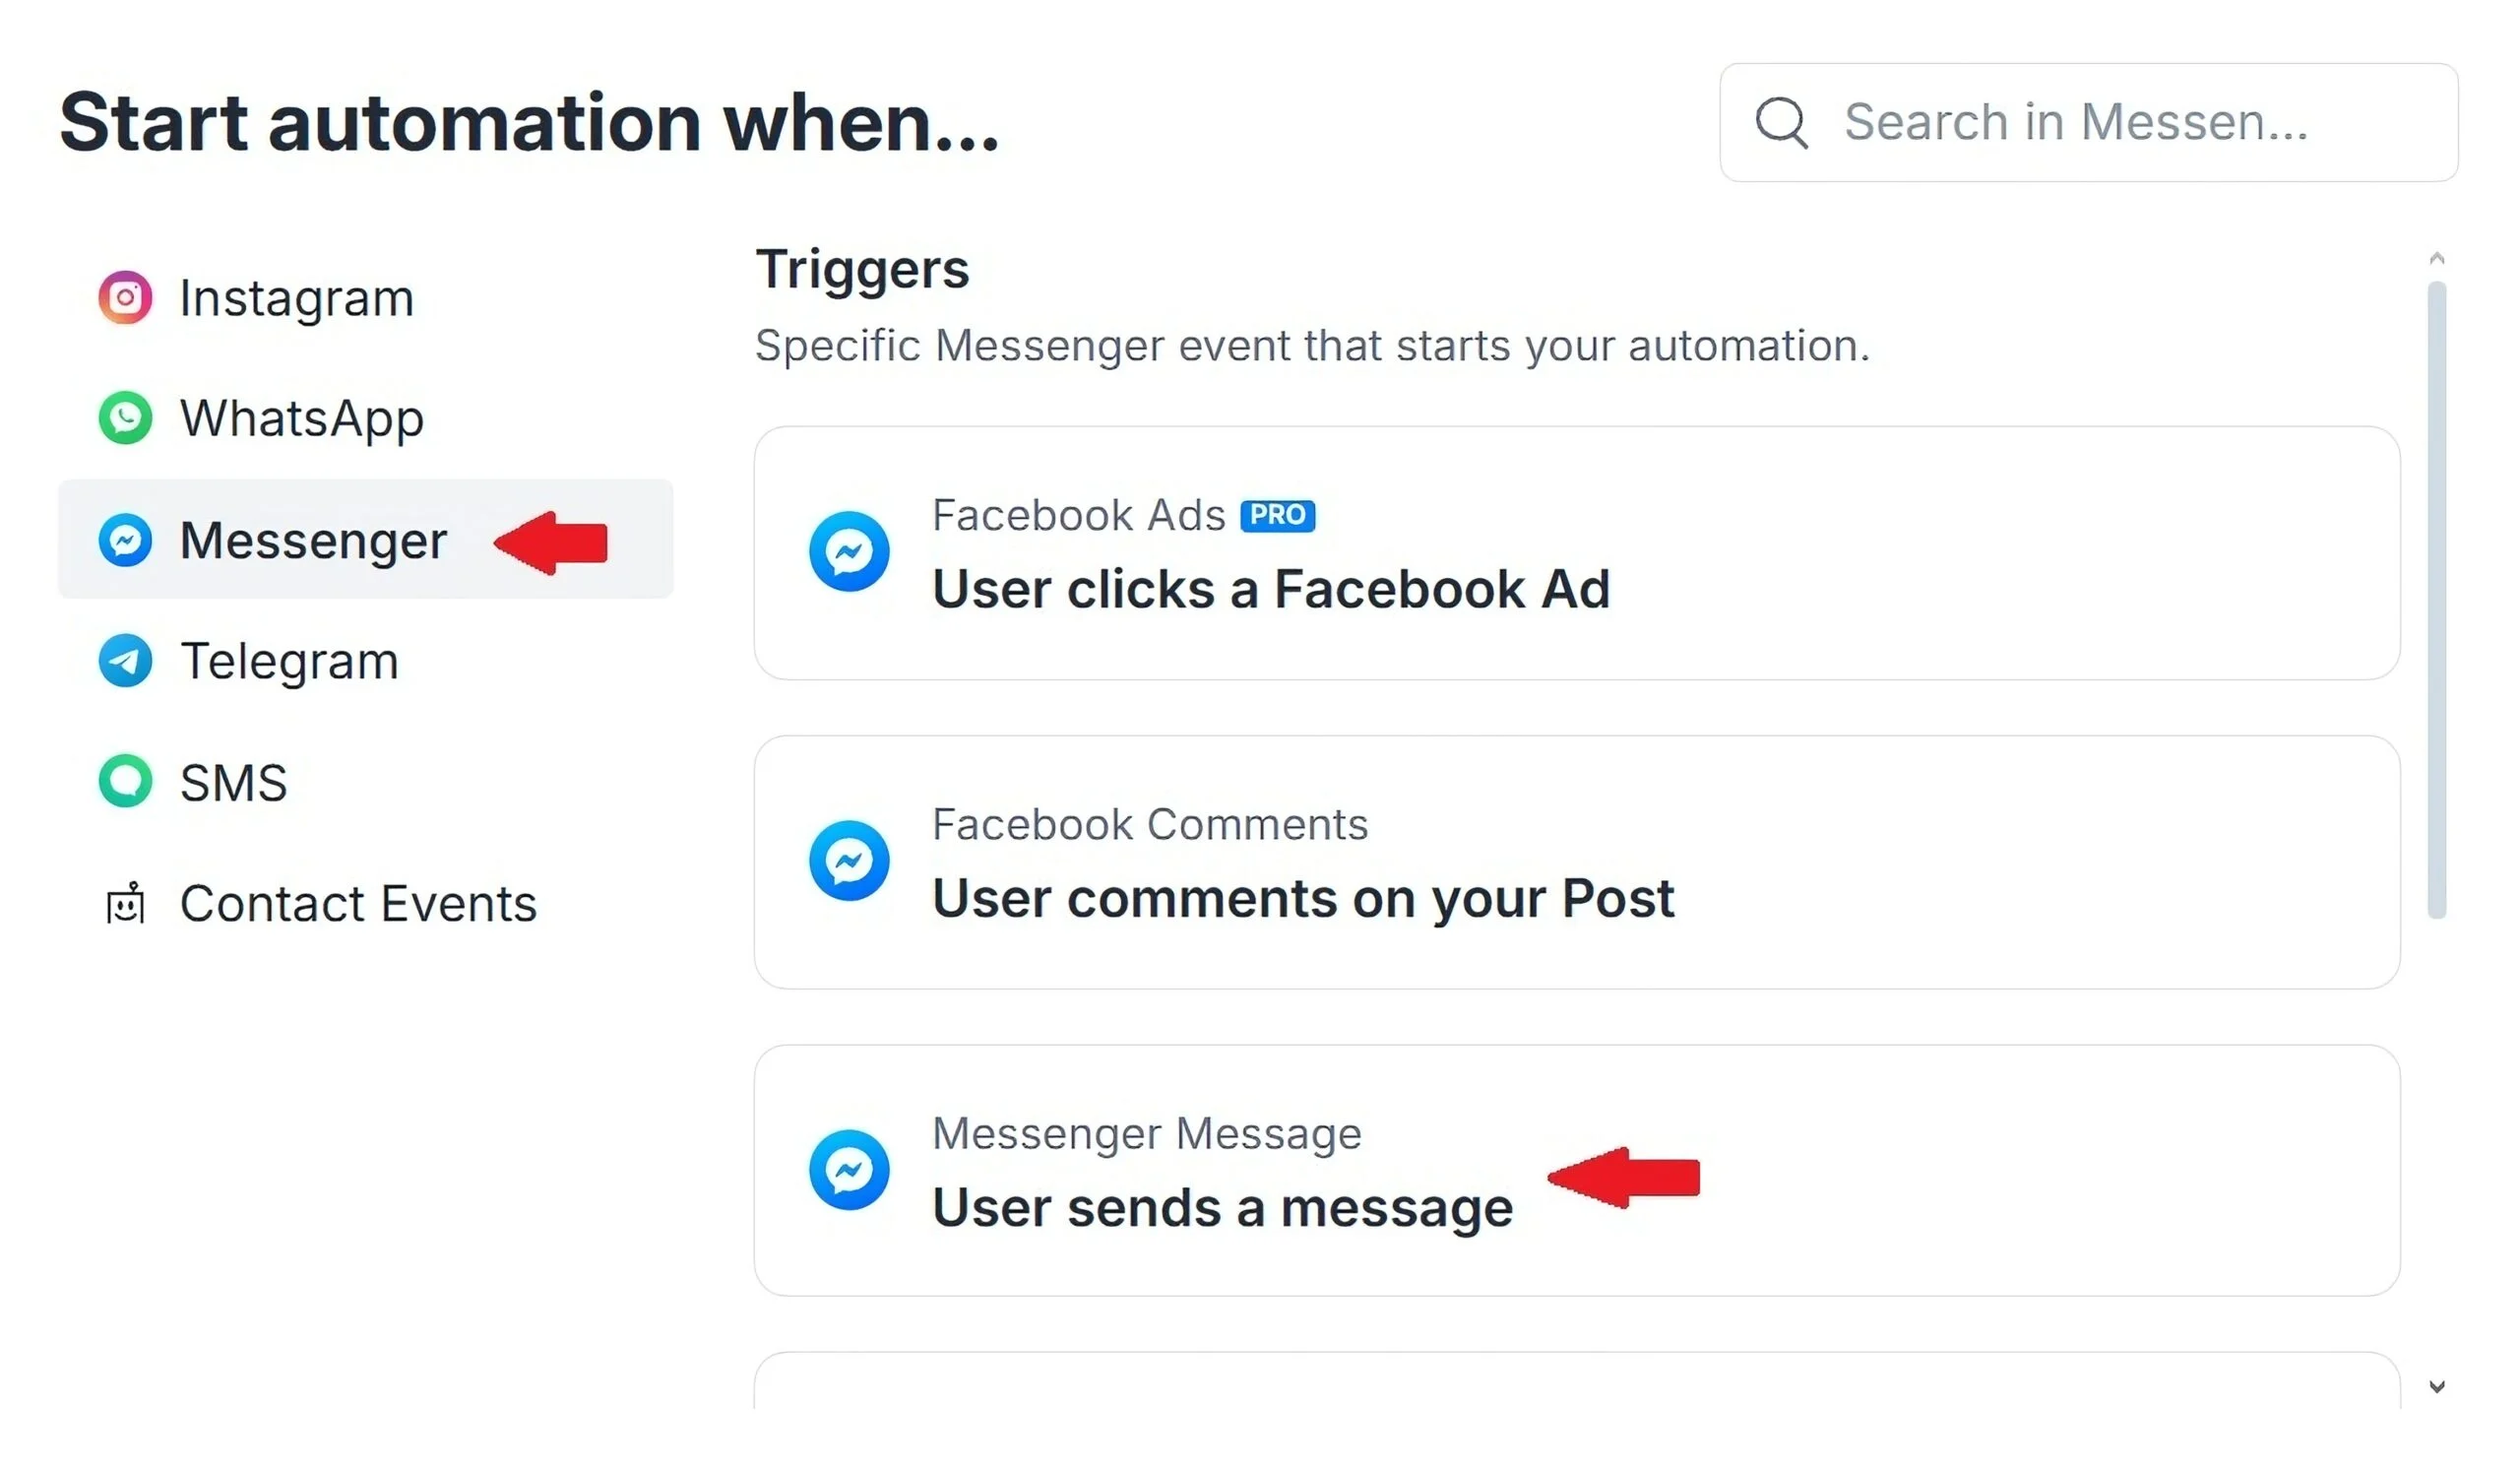
Then we click Detect specific words in a message:

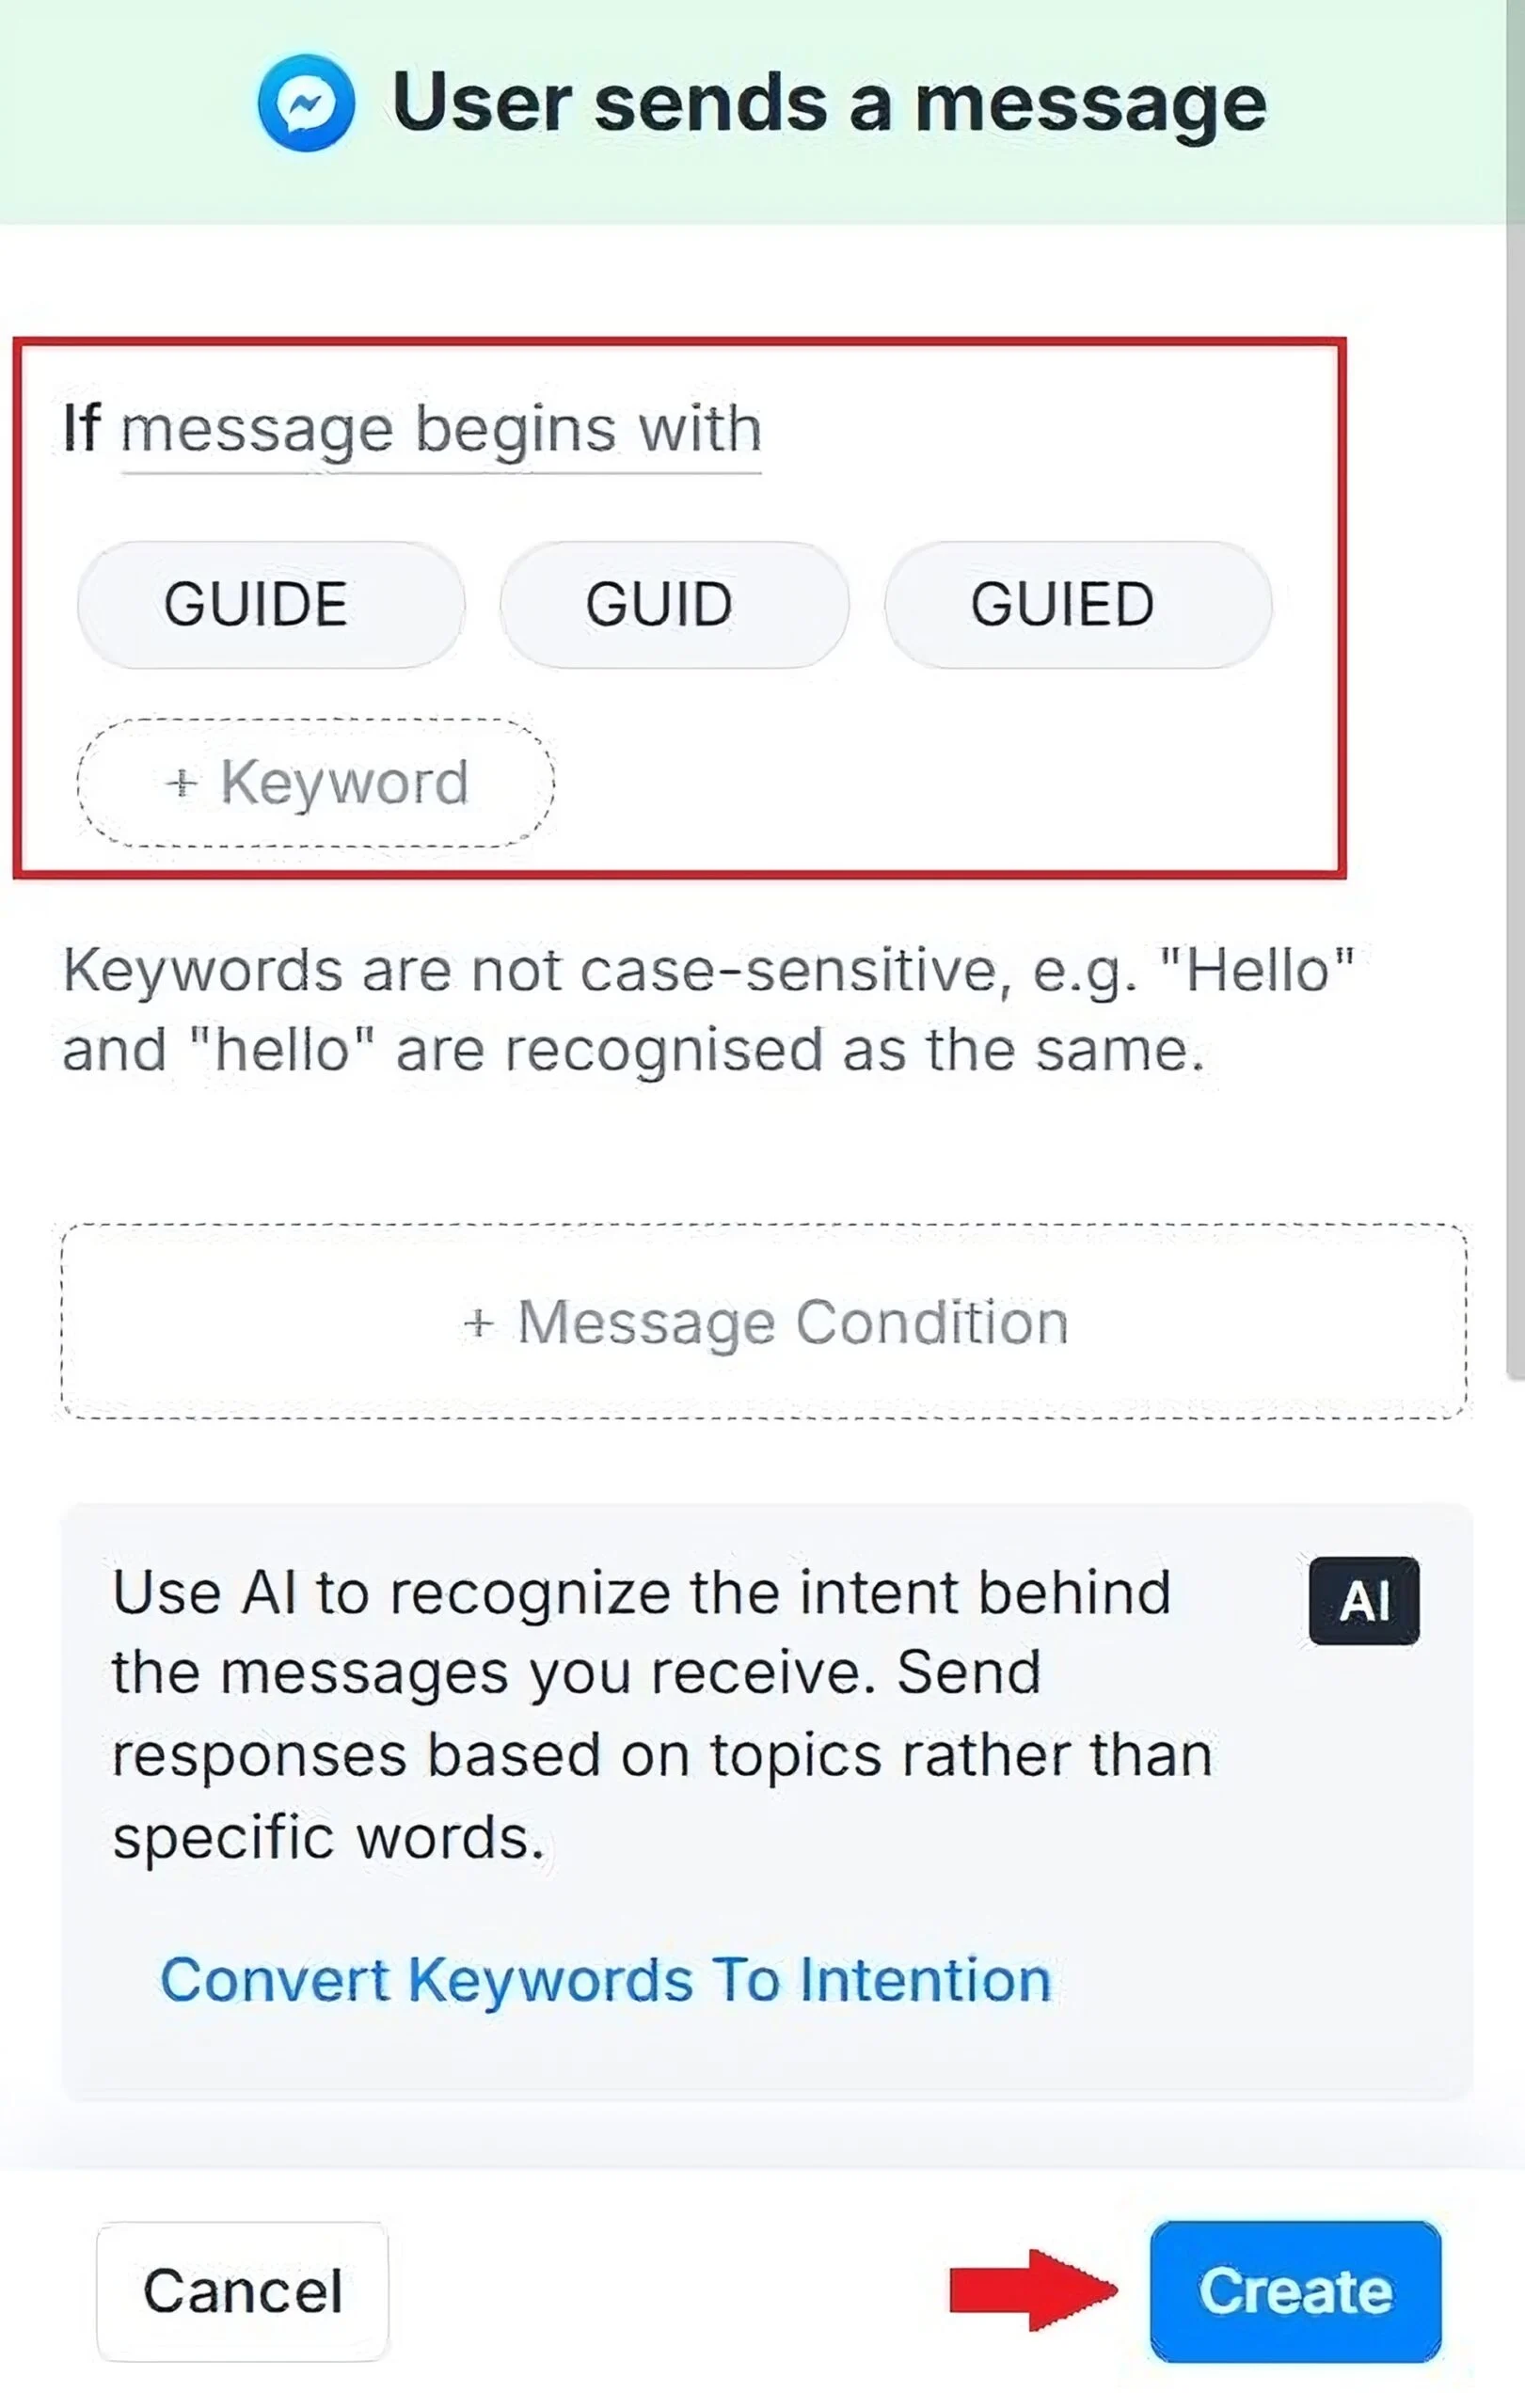
Now, we choose If message begins with, we type “Guide” as well as some common typos, and we click on Create:
So now, whenever someone comments “Guide” on our post, or sends us a message containing “Guide”, the automation will start.
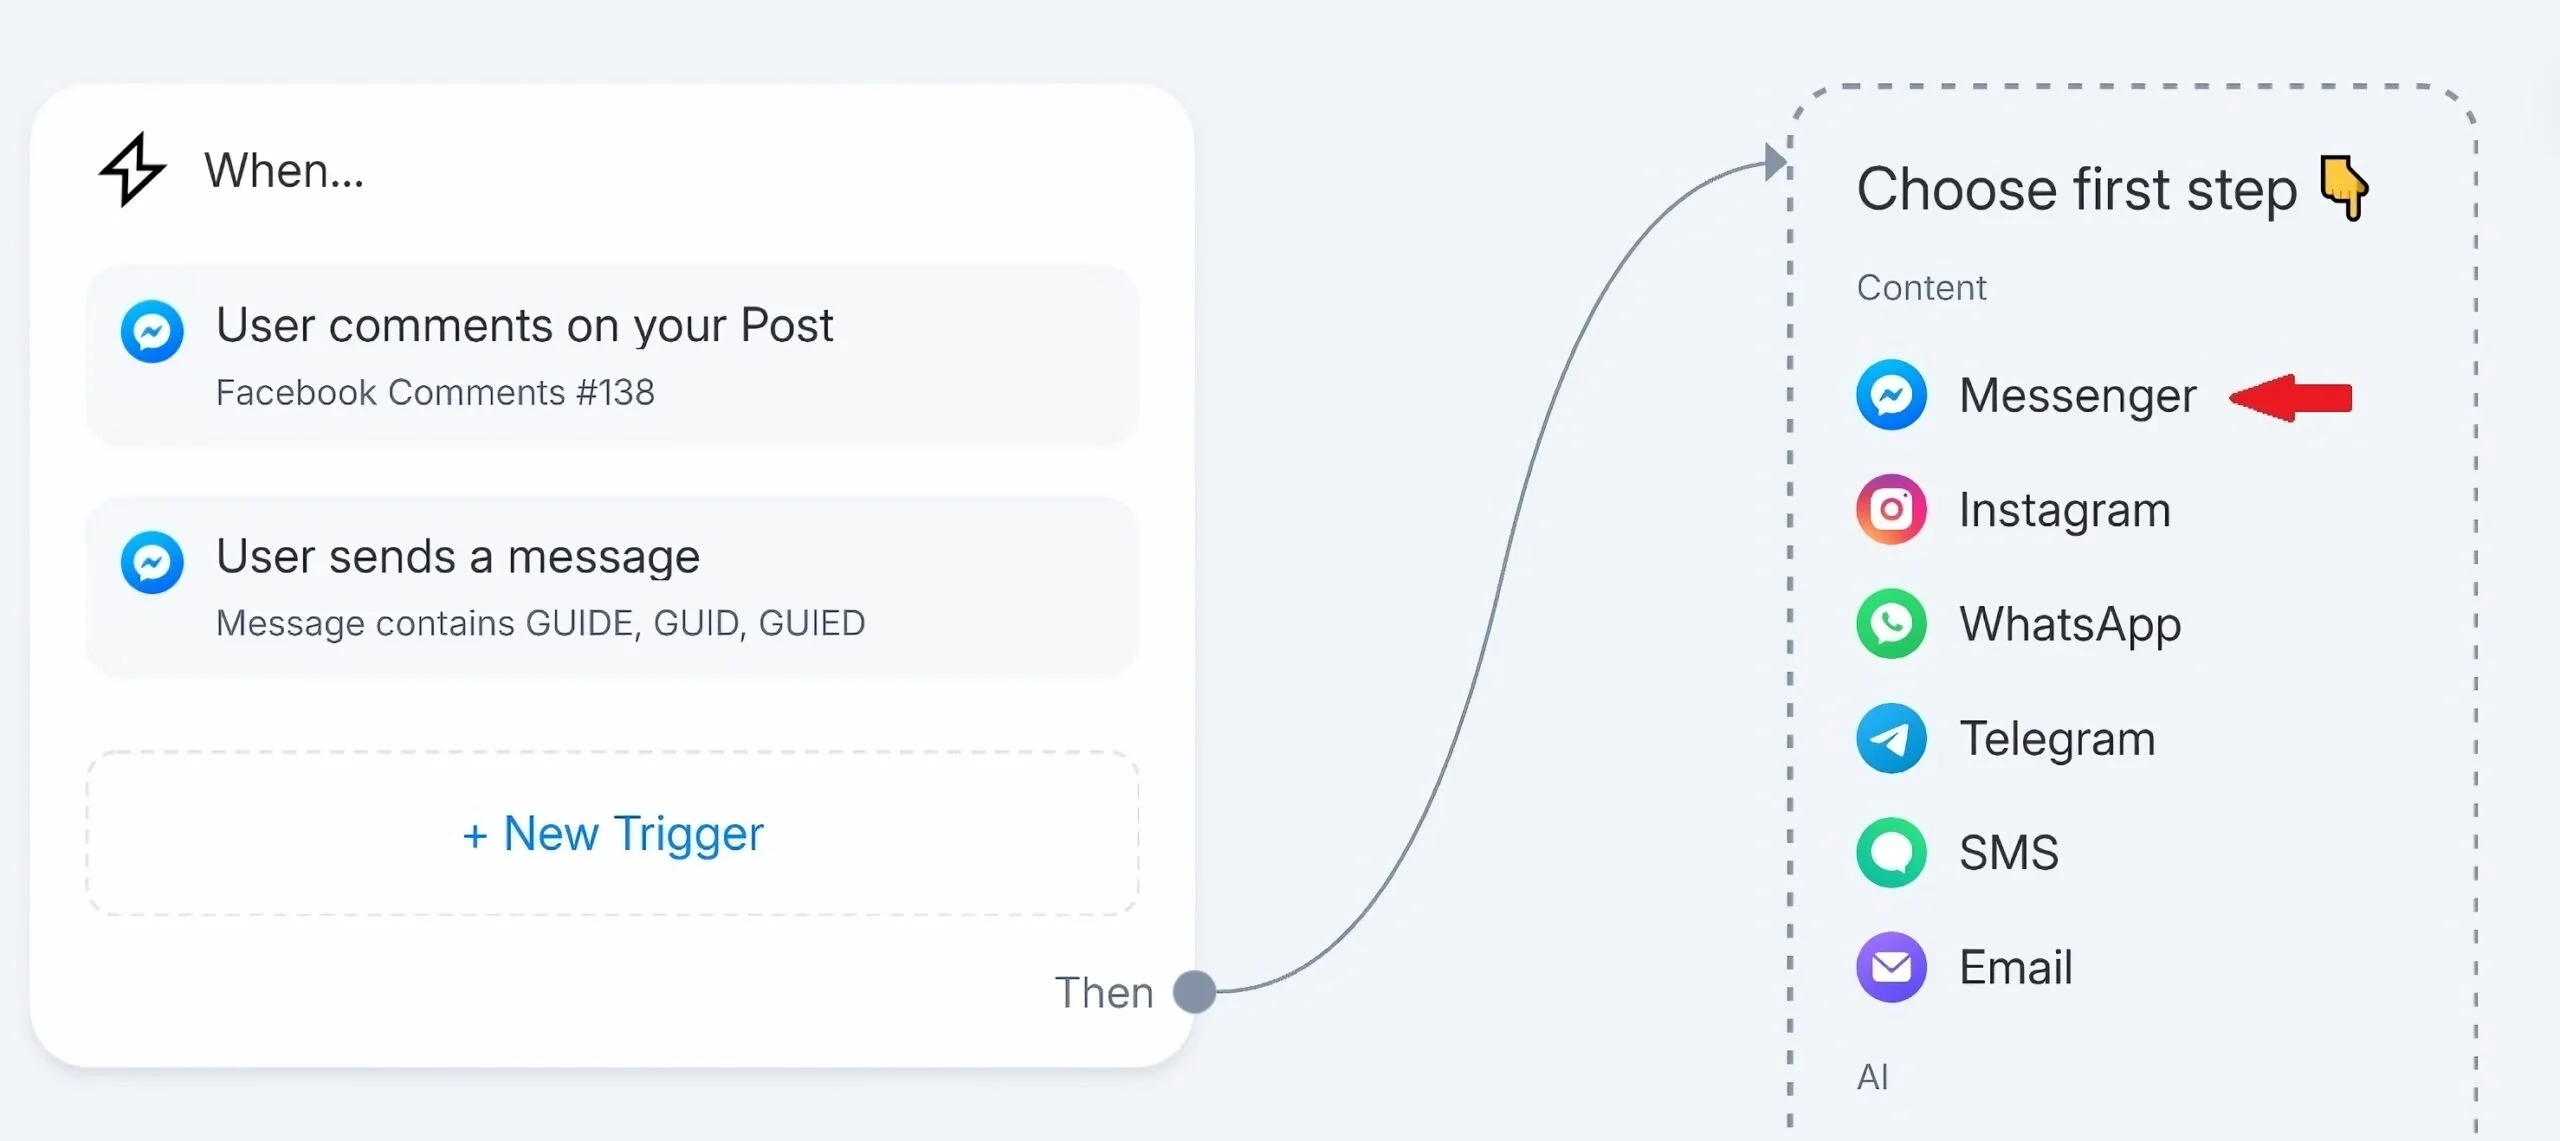
Step 3: Create a Facebook Chatbot Funnel
Now that we’ve set up Facebook triggers, we need to create a Facebook chatbot funnel.
We can start with Messenger:
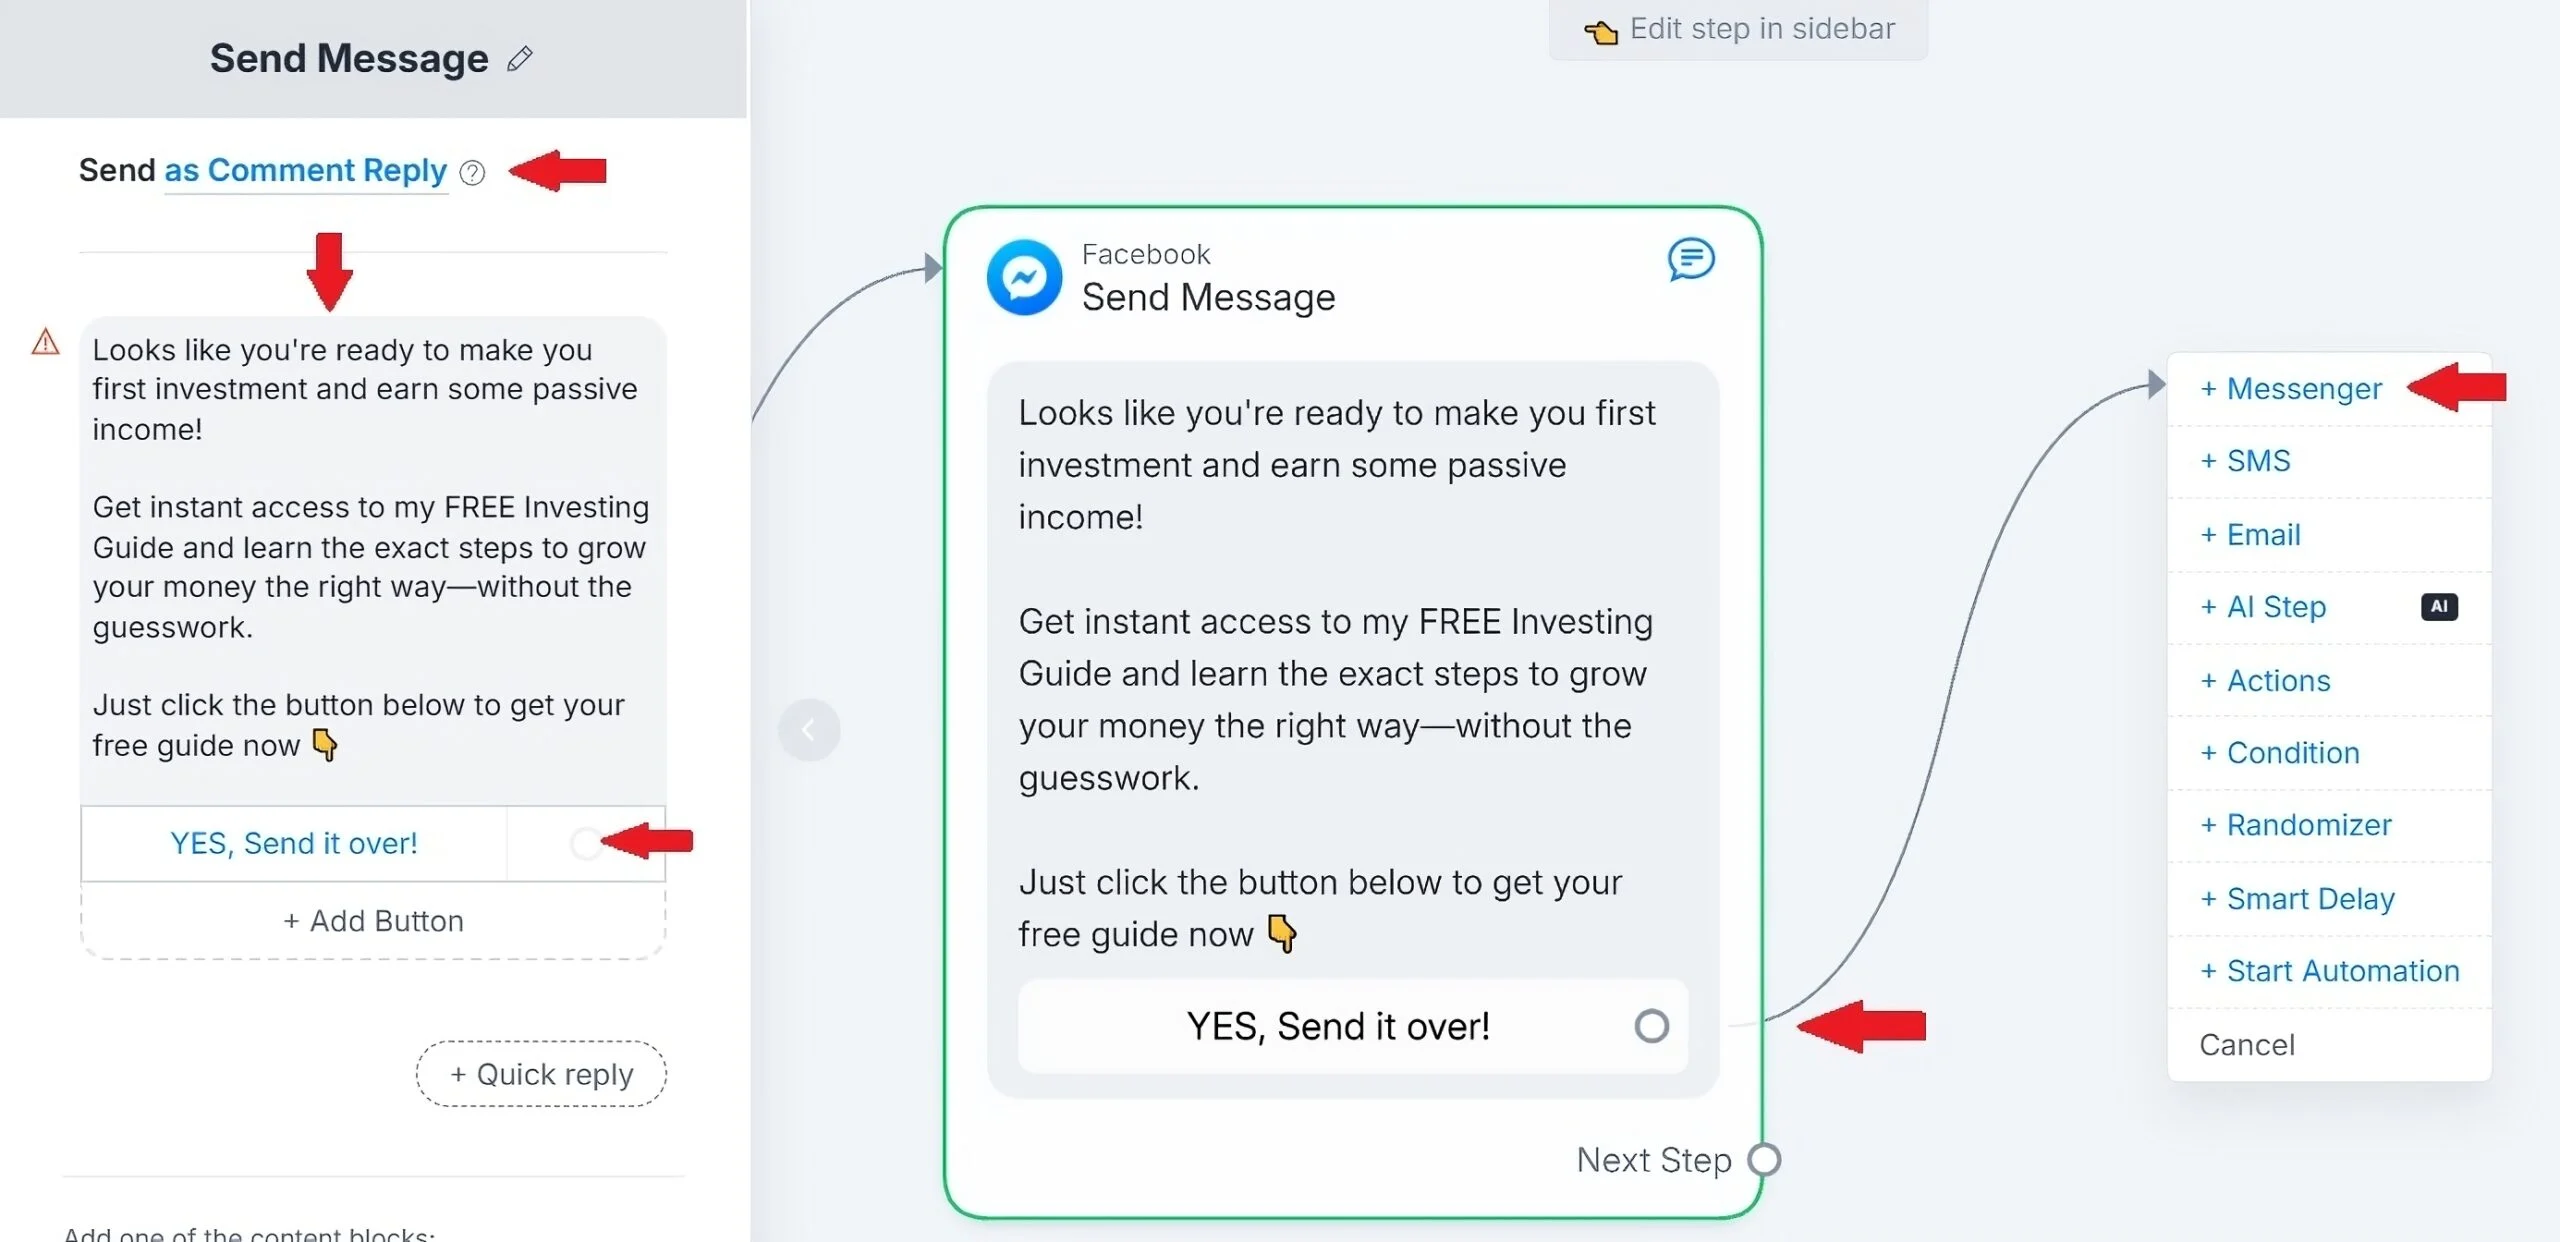
Then we’ll write our first message:
Looks like you’re ready to make you first investment and earn some passive income!
Get instant access to my FREE Investing Guide and learn the exact steps to grow your money the right way—without the guesswork.
Just click the button below to get your free guide now
The goal here is to confirm their interest. We also need to set Send as Comment Reply at the top.
At this point, we’ll add the button so it says “YES, send it over!”.
Now, whenever they click on this button, they go to the next step. Then, they get another message.
And we can set up the next message by clicking on button and then choosing Messenger again:
Now, we can tell them “Awesome, just a few quick steps to get your access”. And we can add a Delay of 3 seconds:
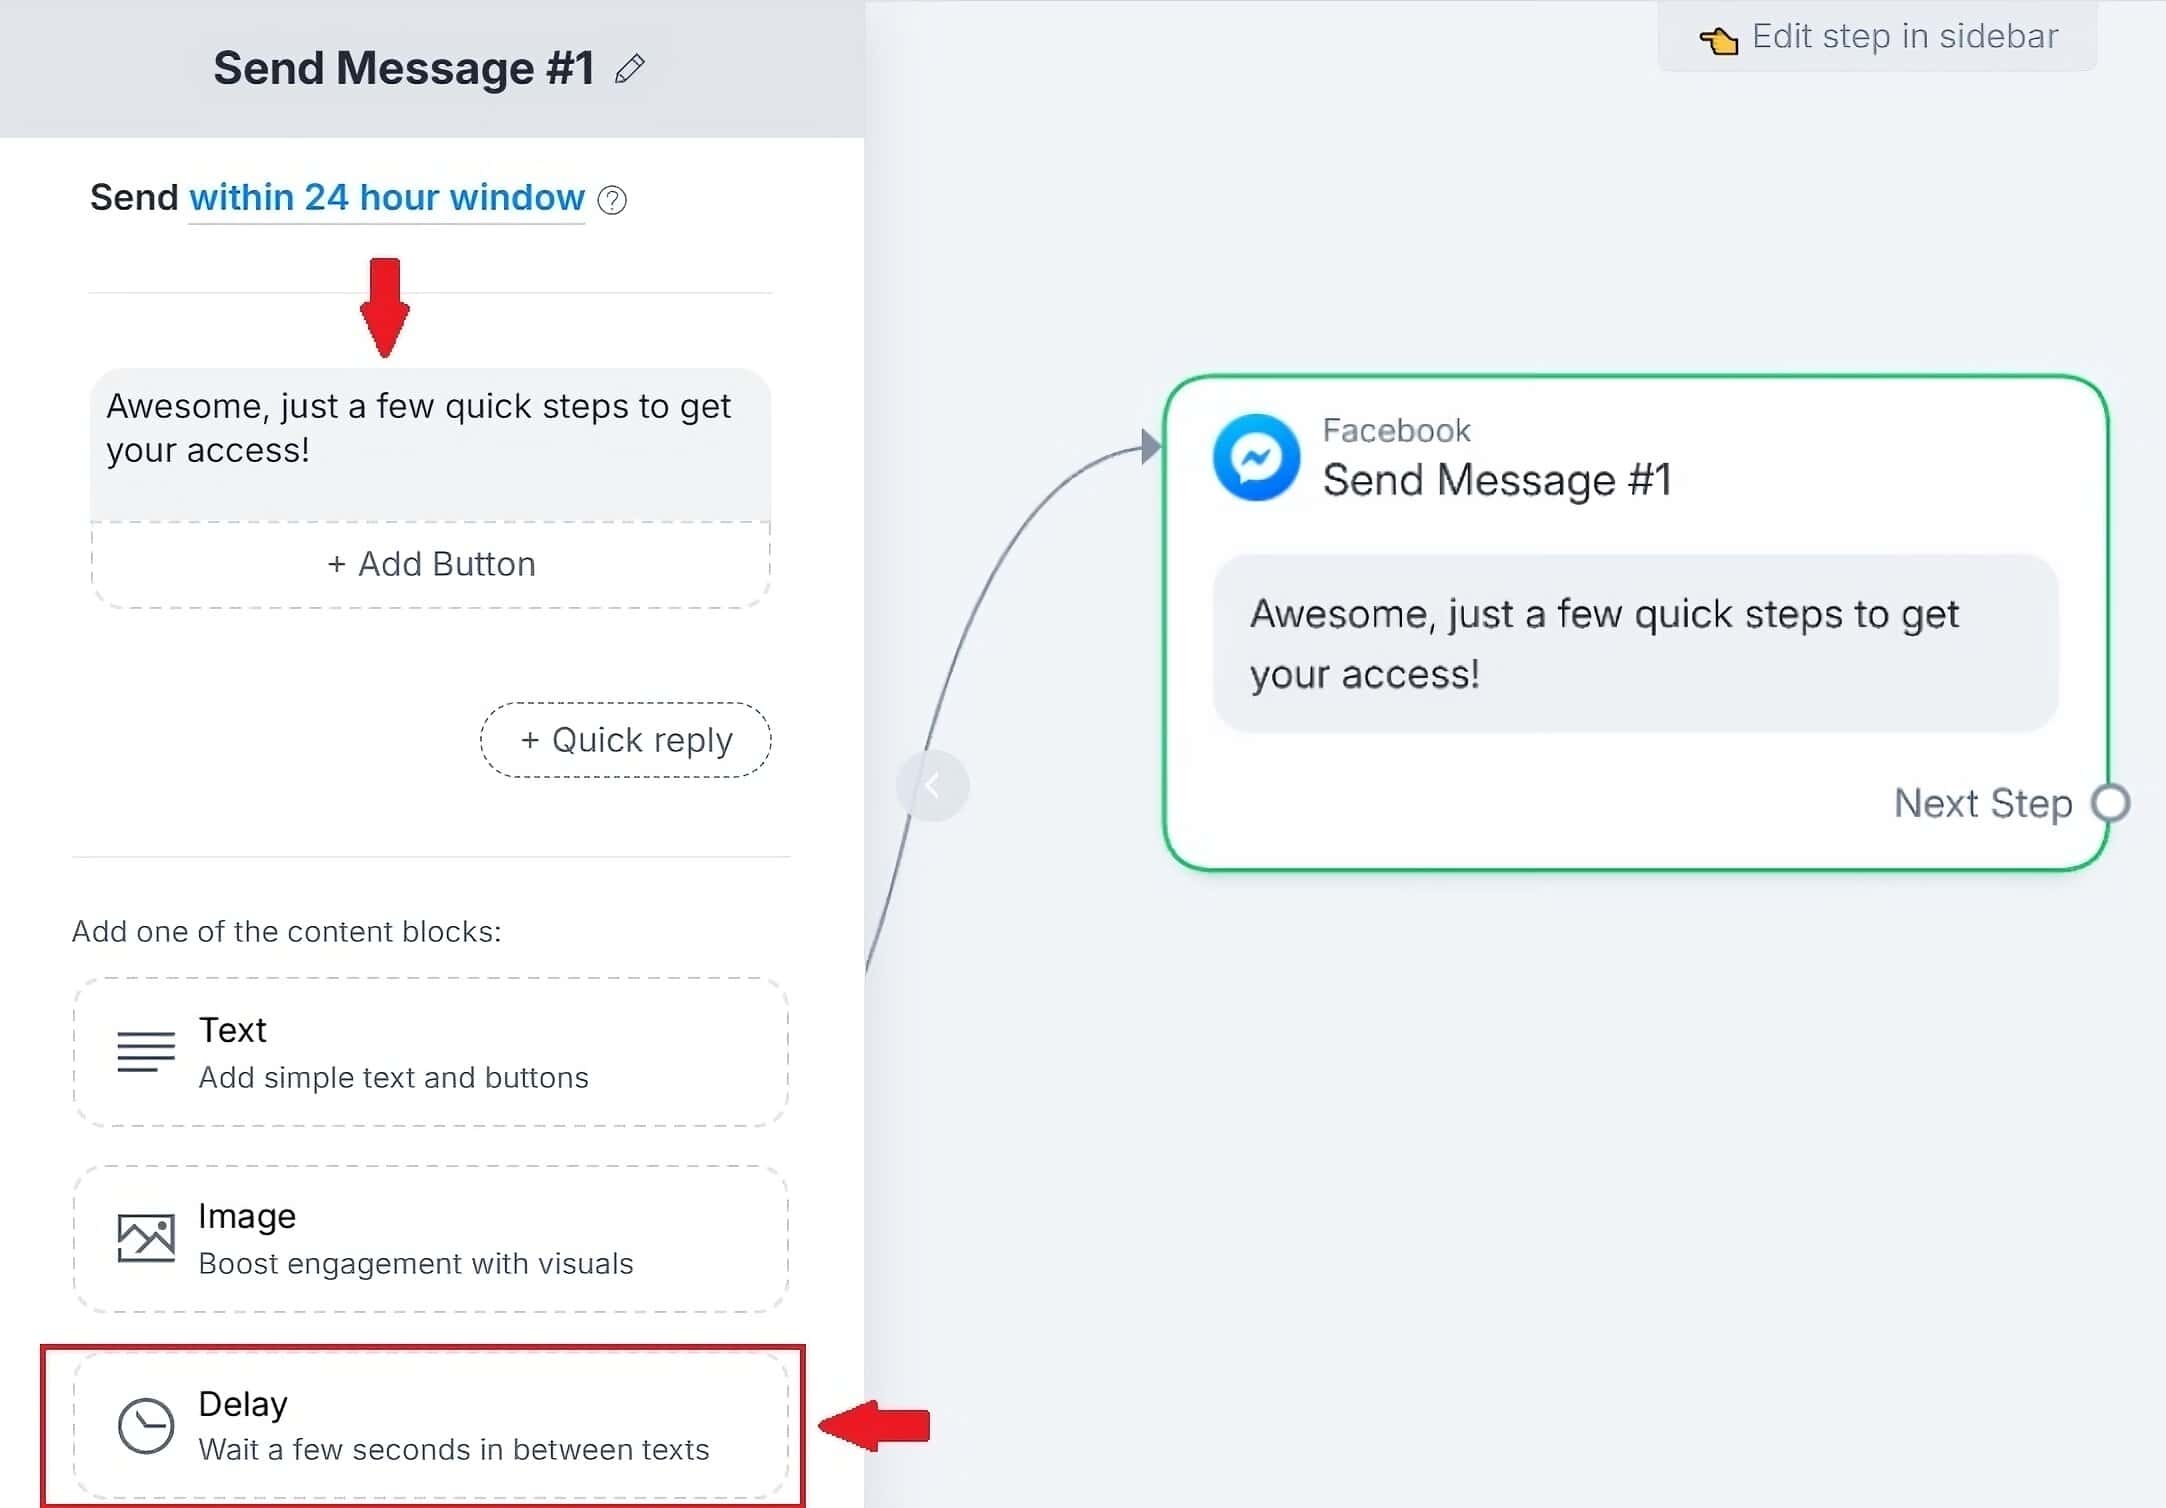
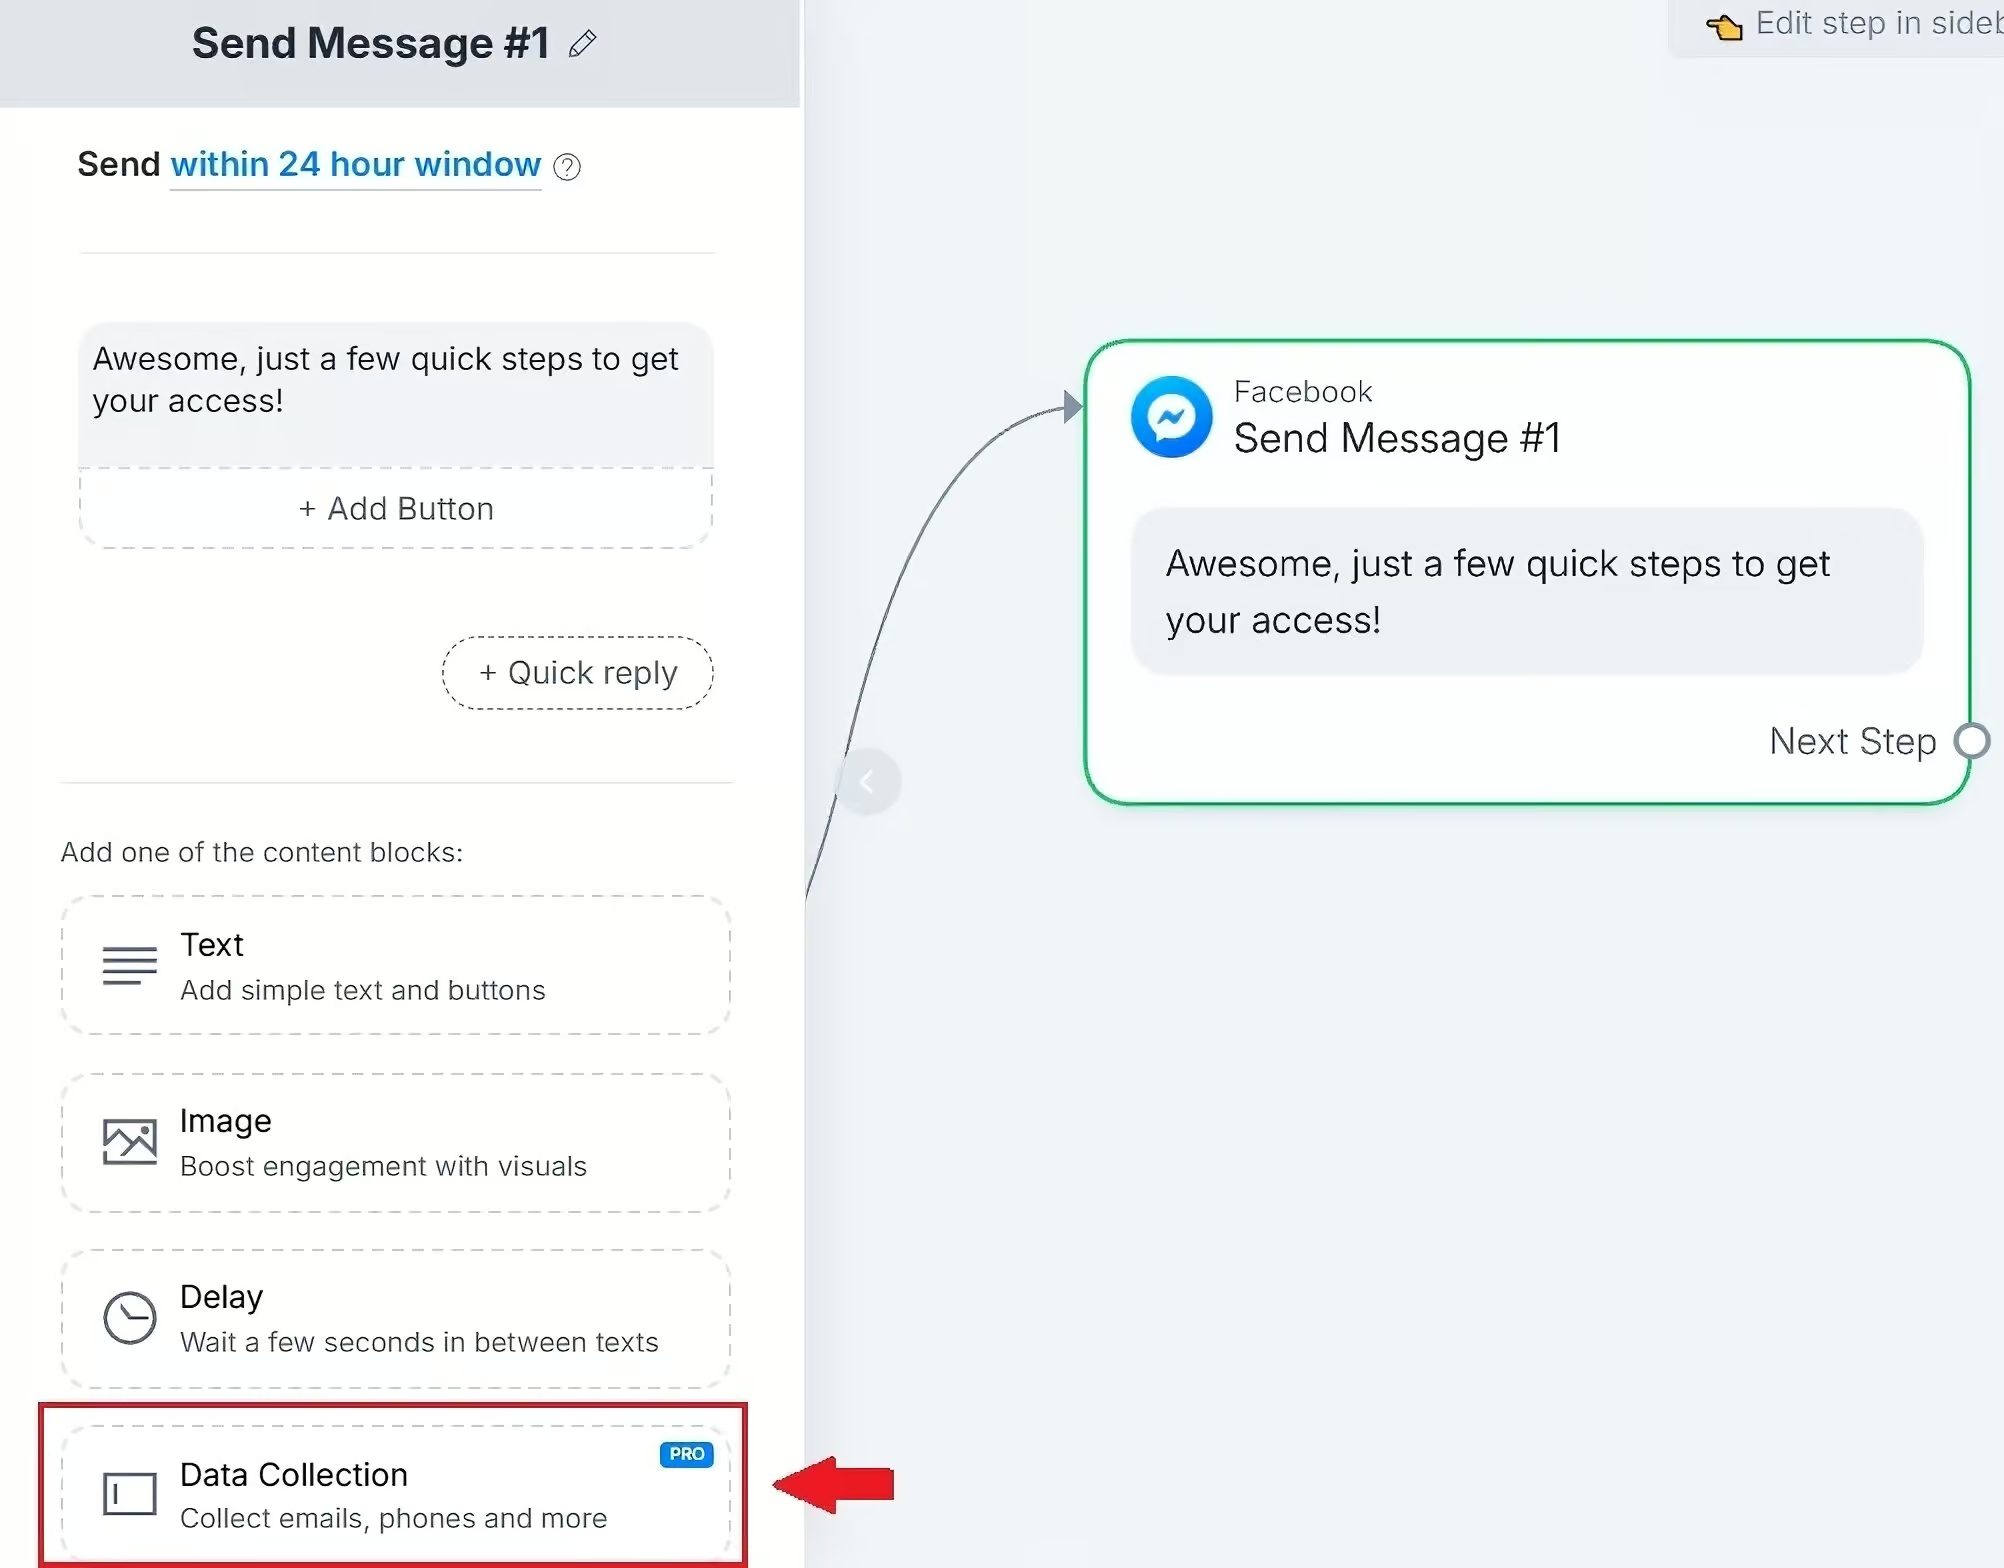
The next step is collecting someone’s name. So, we click on Data Collection:
And here, we can ask for a person’s first name. We should set Reply Type to First name. I recommend setting Data Collection expires to 23 hours:
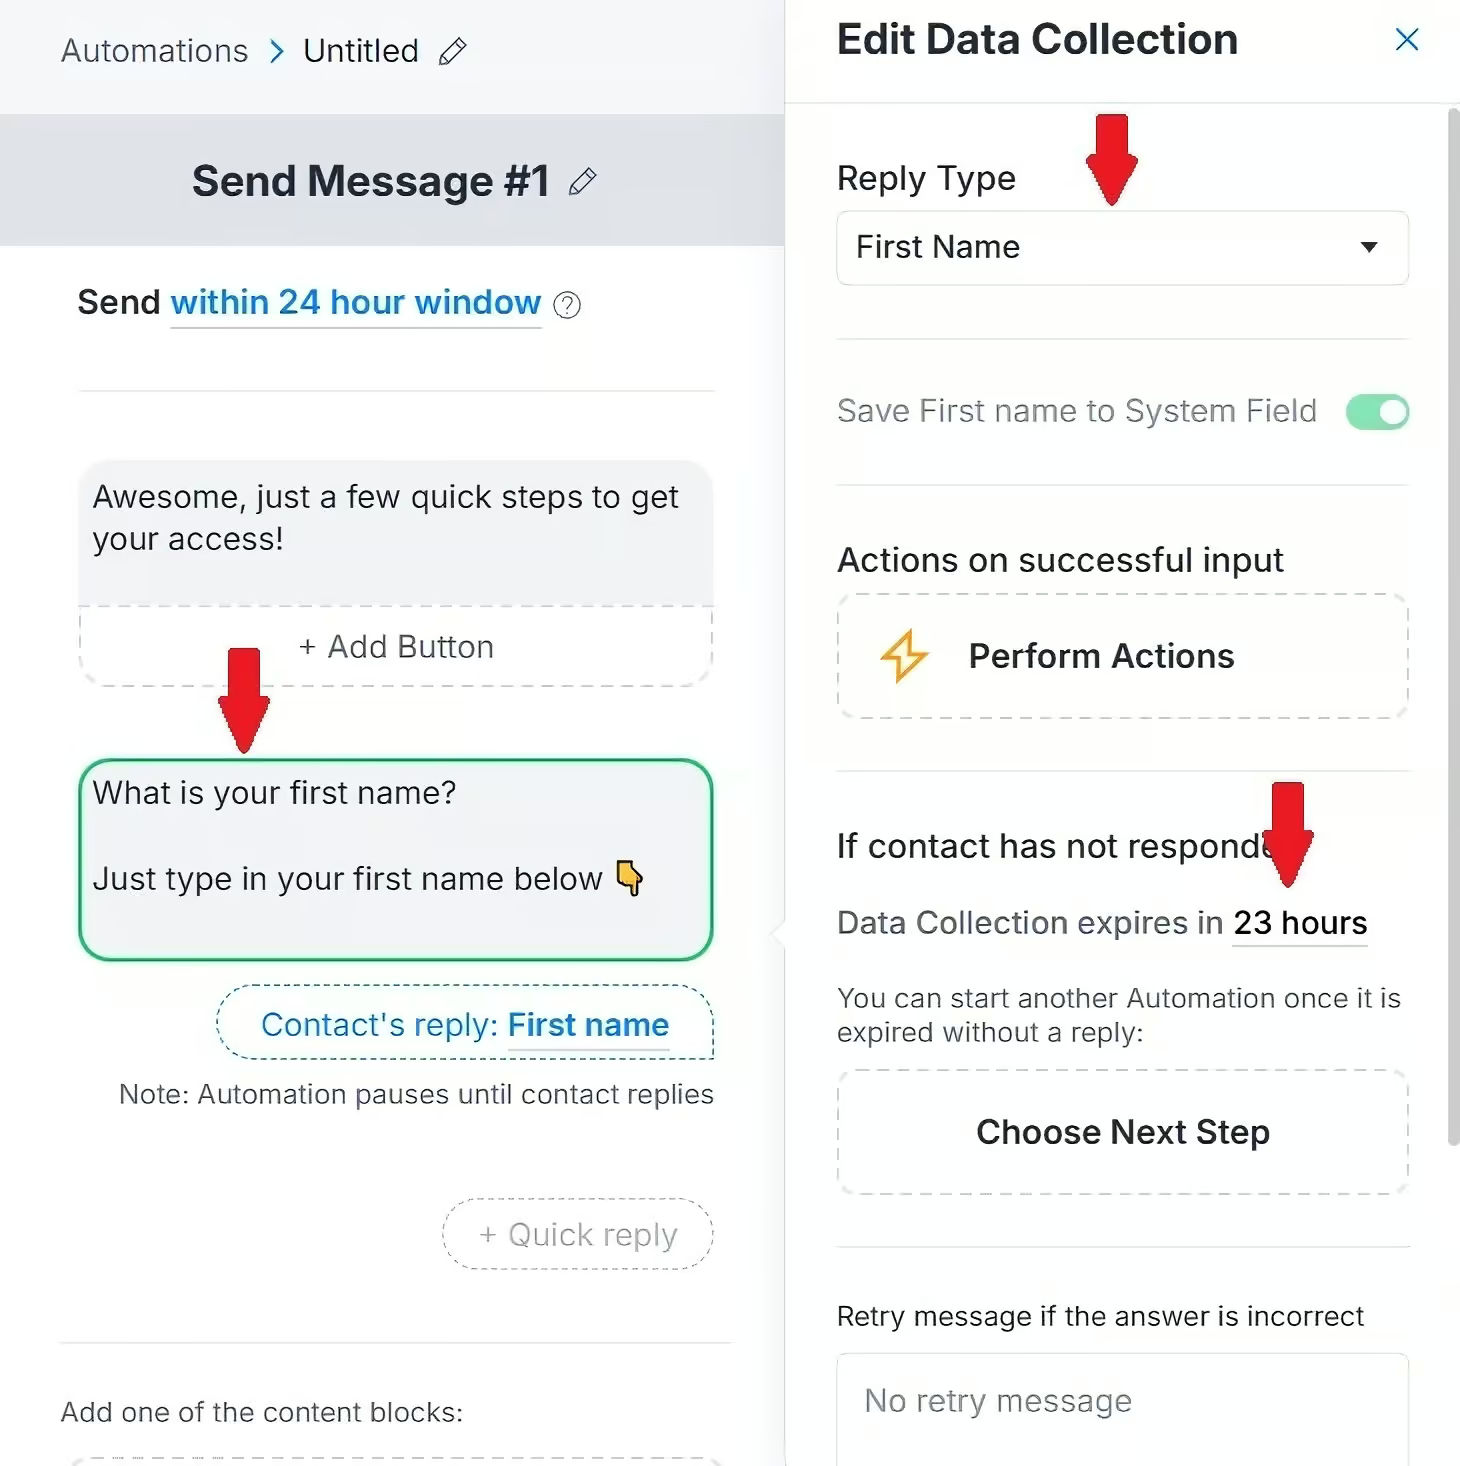
This means people have 23 hours to reply to this message.
Then, scroll down and remove the Skip button text, so that users can’t skip this question:

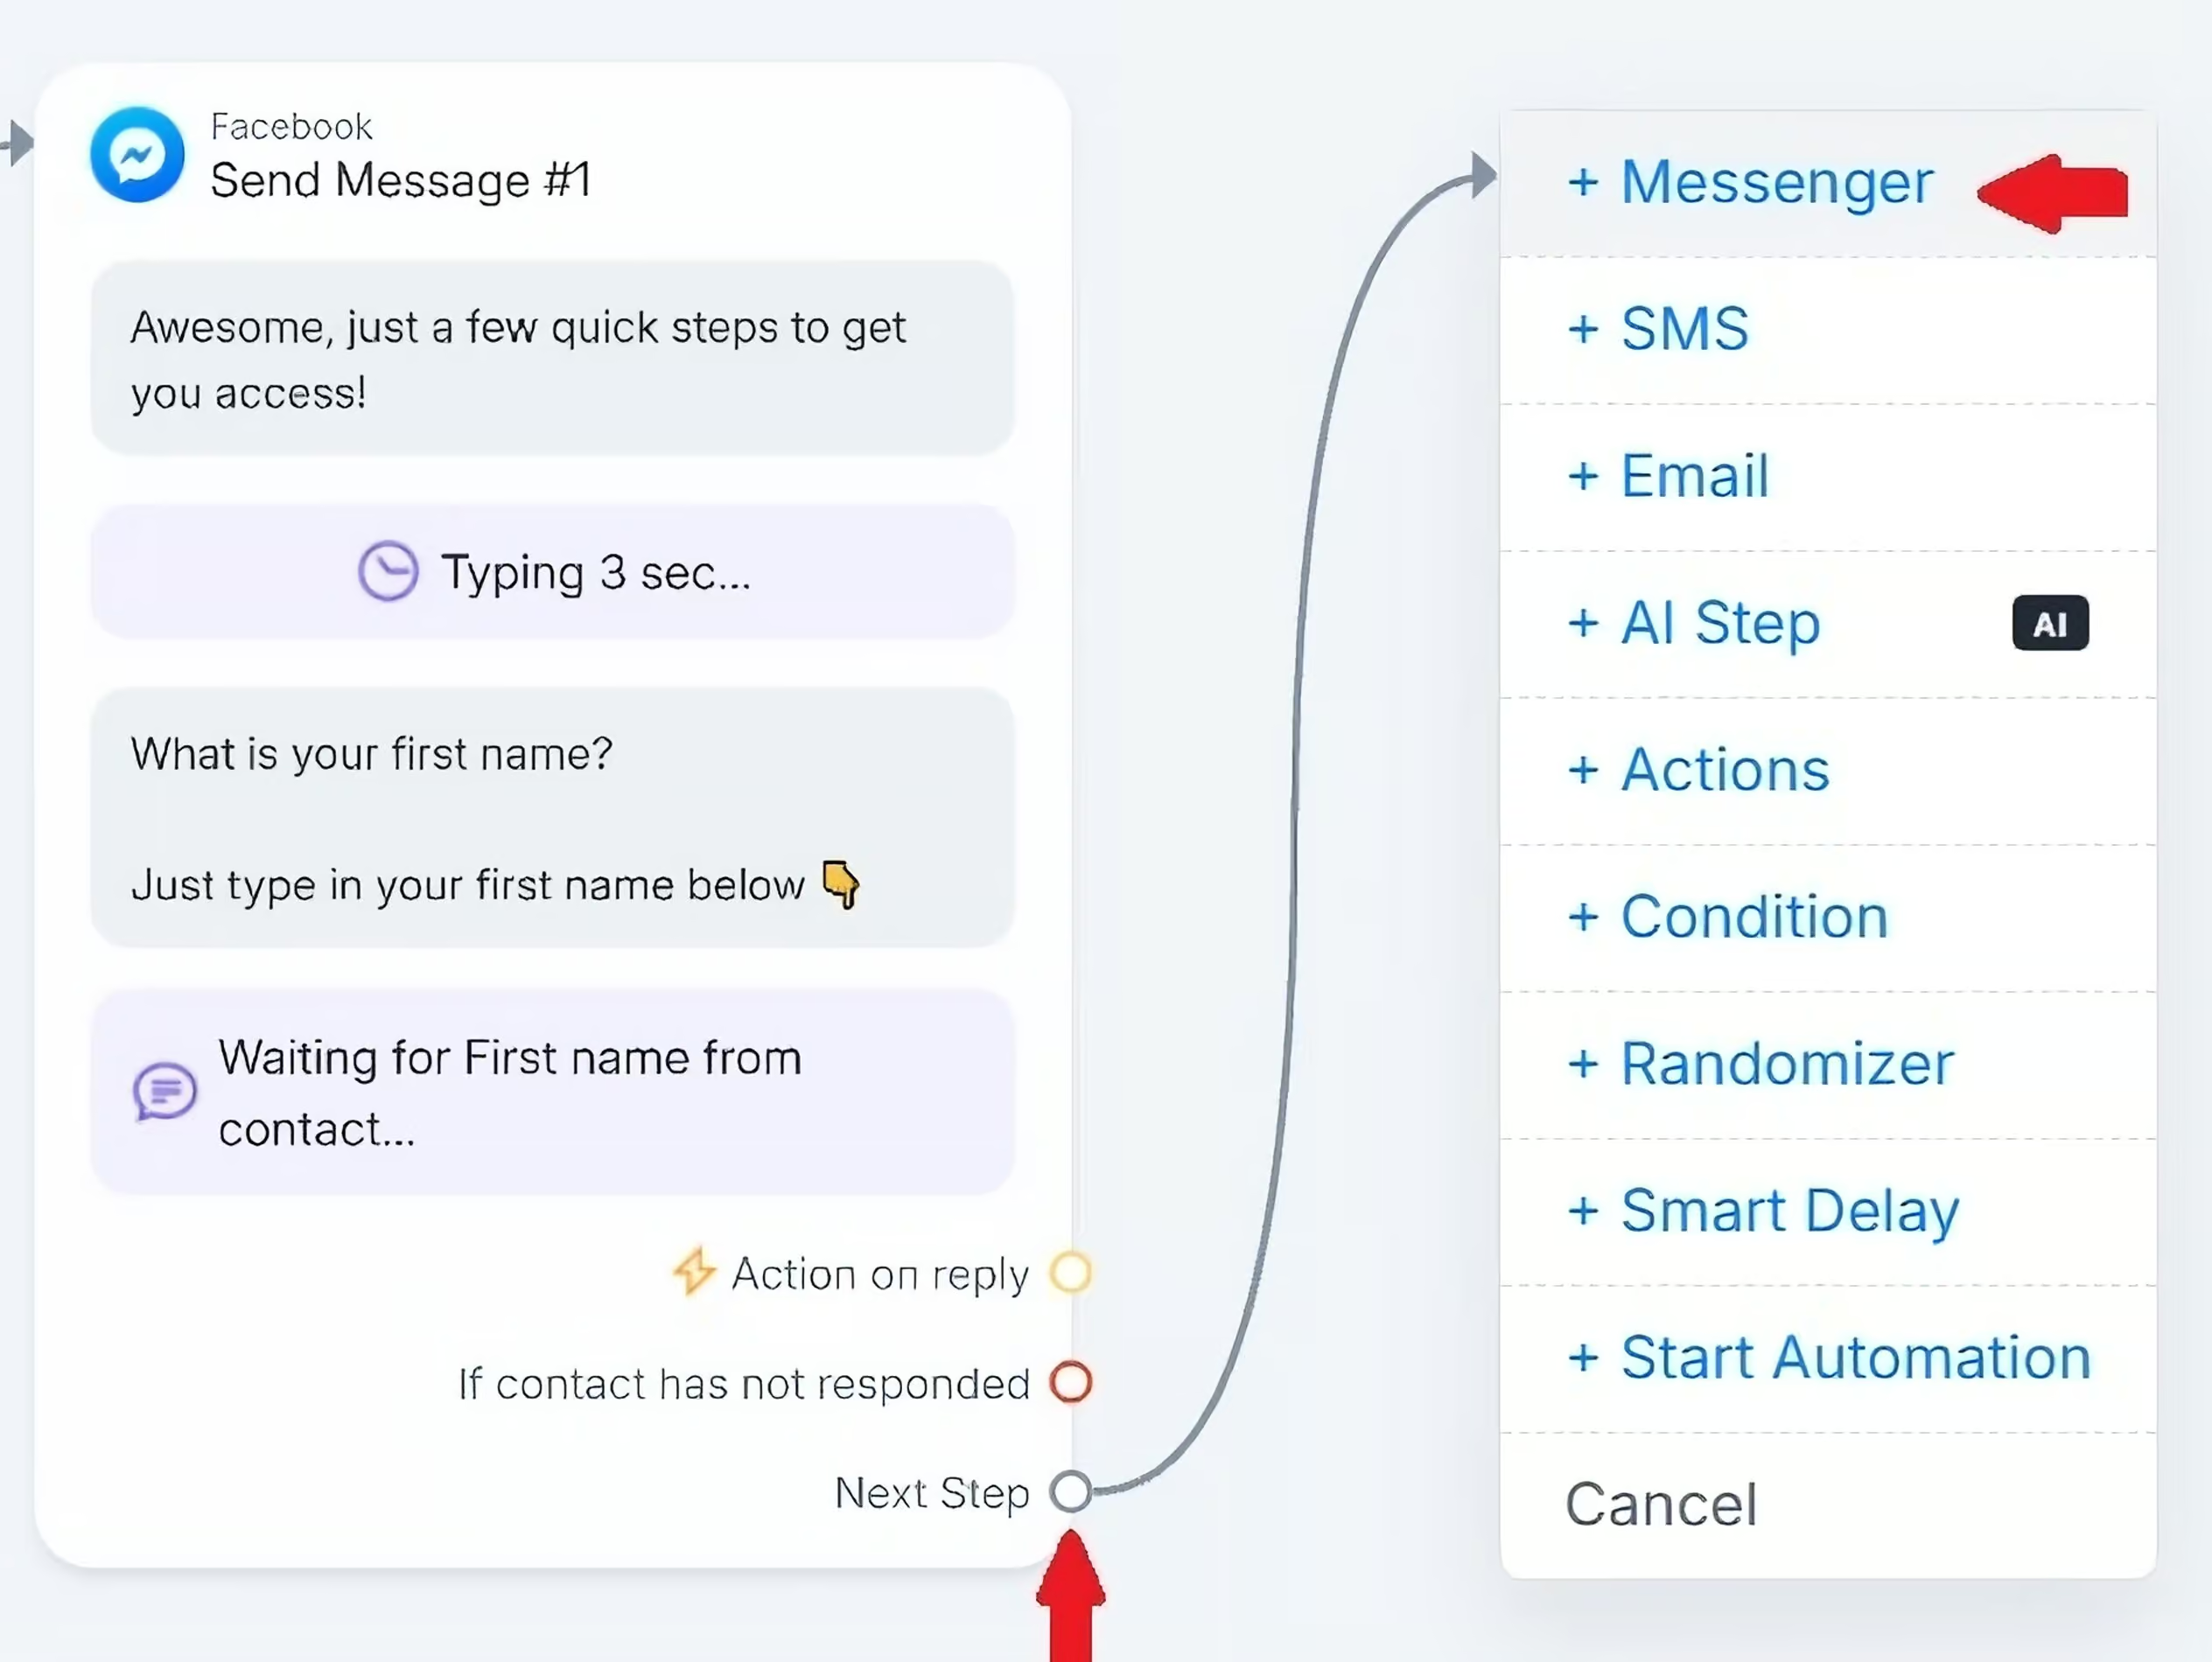
So now we ask for their name. And once we got that, we need to ask for their email.
To do that, you can just connect this block to a new block and select Messenger:
Then we can type “Nice to meet you {First Name}”:
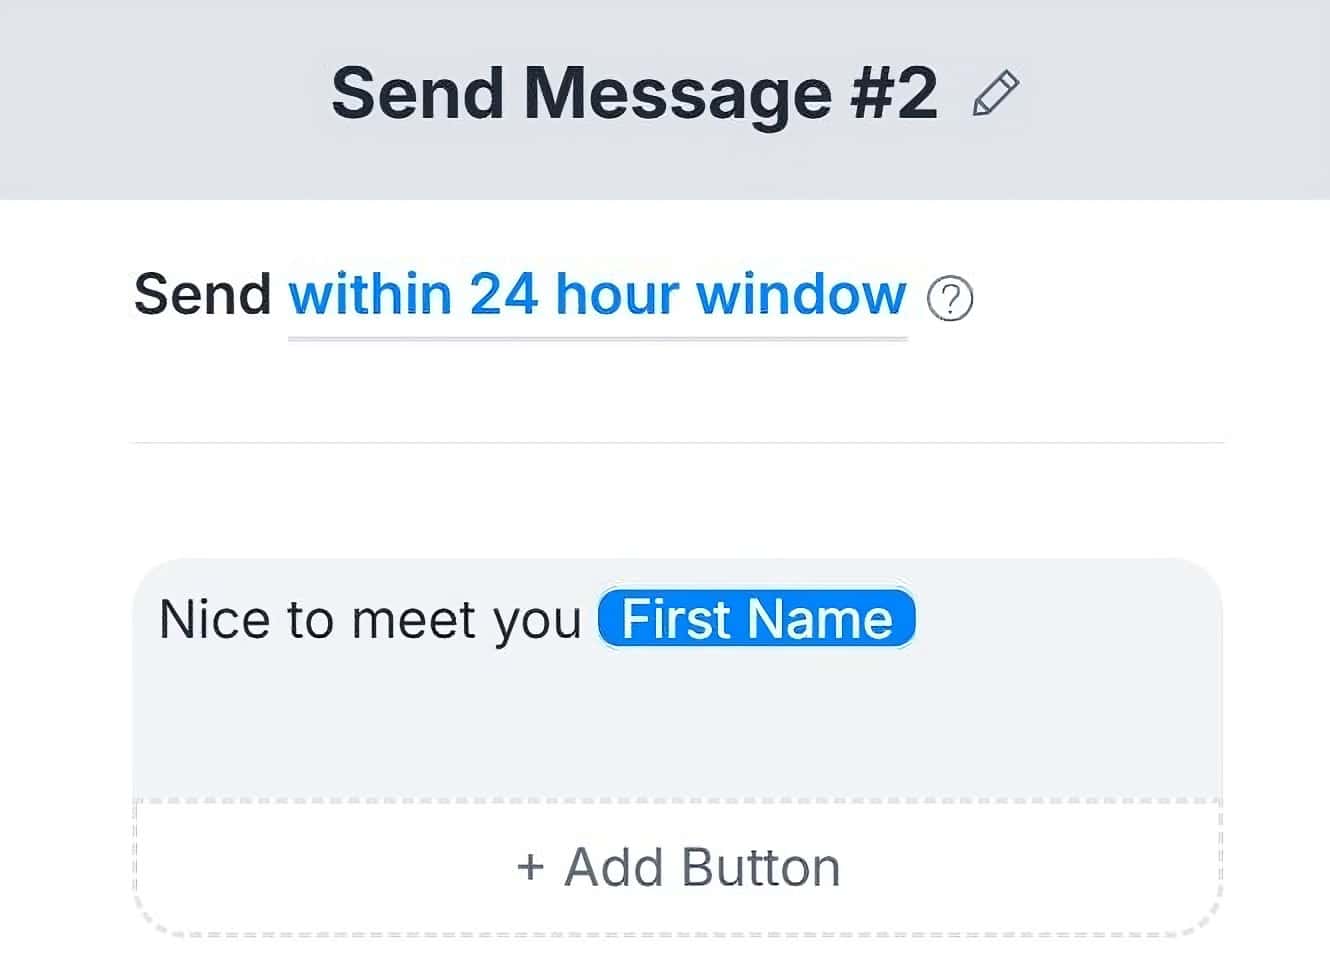
And we add another Delay, then click on Data Collection again.
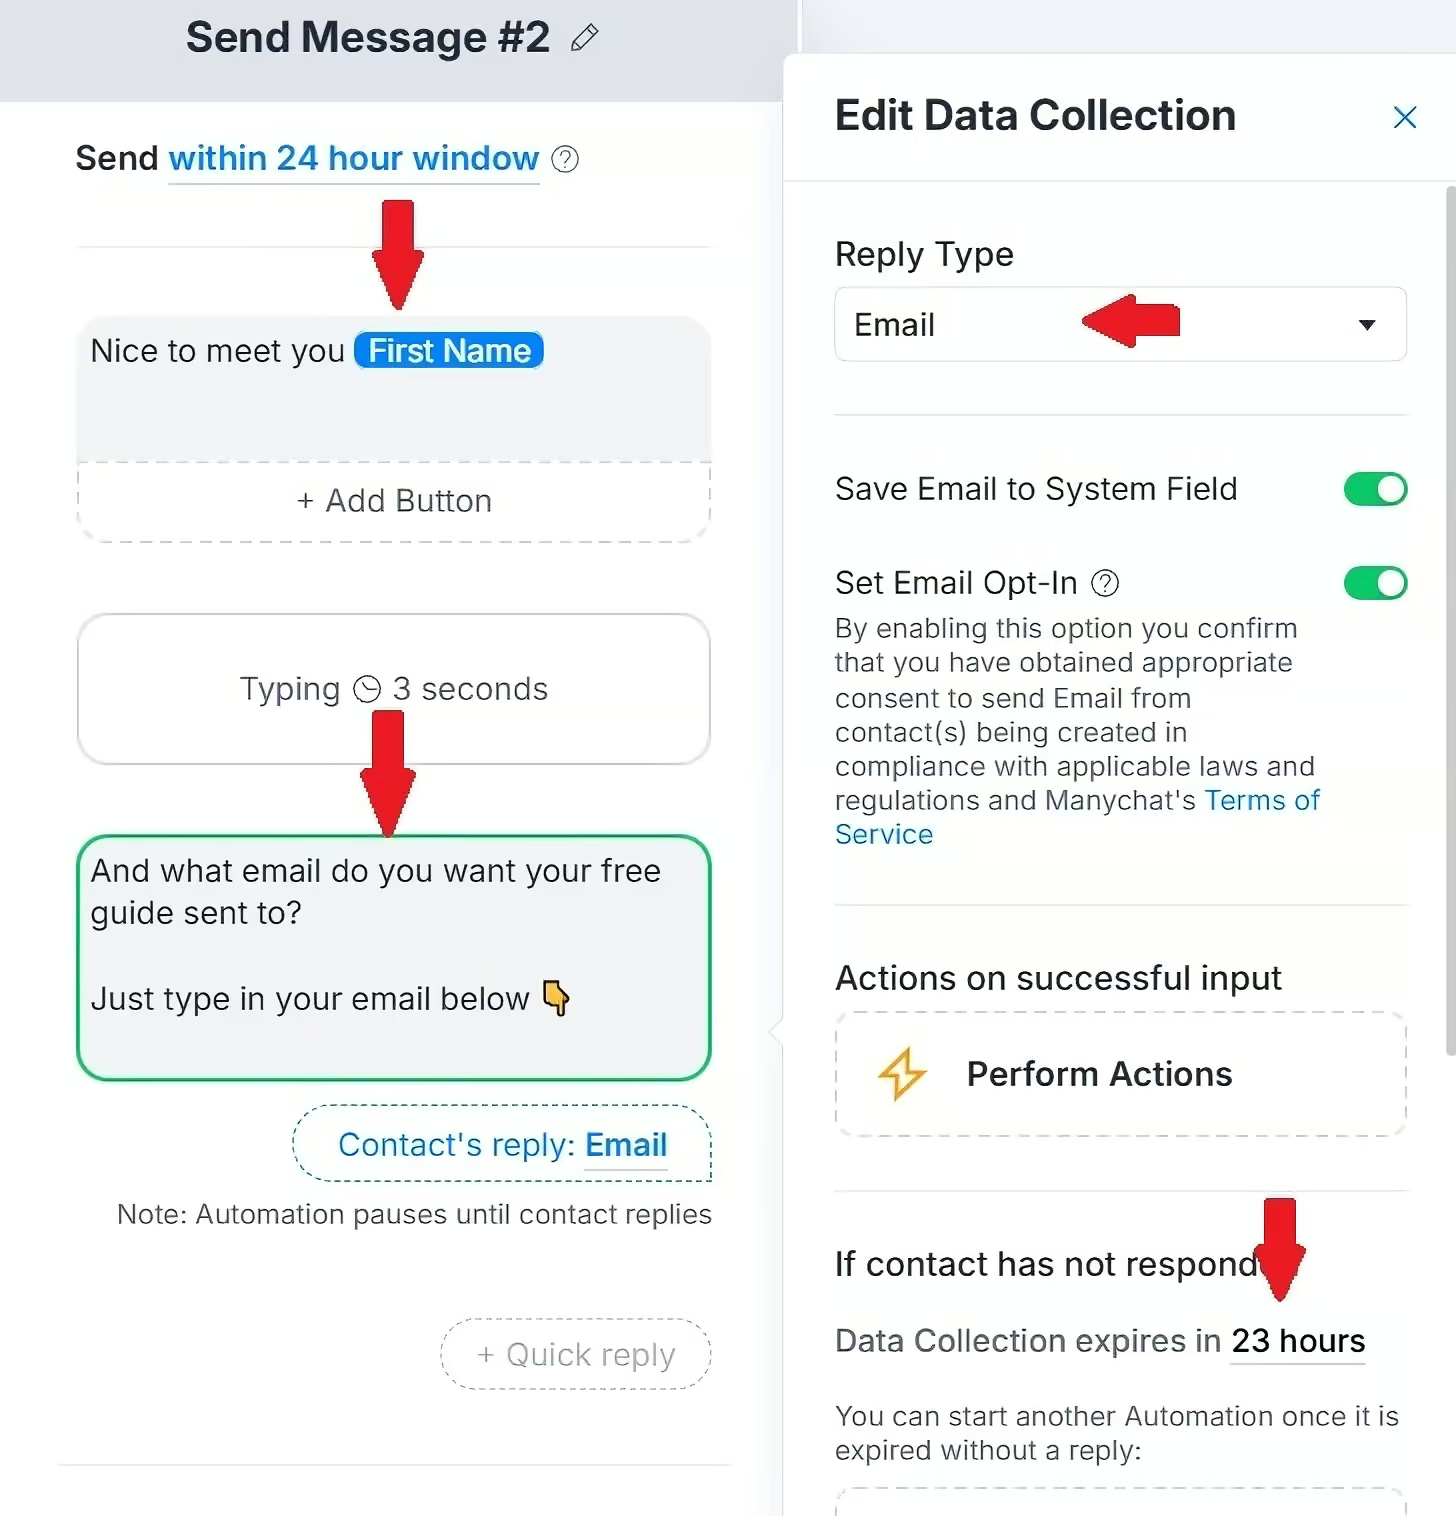
Here, we can ask “And to what email do you want to receive your guide? Just enter your email below  “
“
How you phrase this question is really important. When you ask for someone’s email, it’s better to give a reason. When you give a reason (in this case -> to send the guide), the user is way more likely to give it.
Now, you need to set the Reply Type to Email (and Manychat will auto-check if the given email is an actual email).
And just like in the previous step, we set Data Collection to 23 hours:
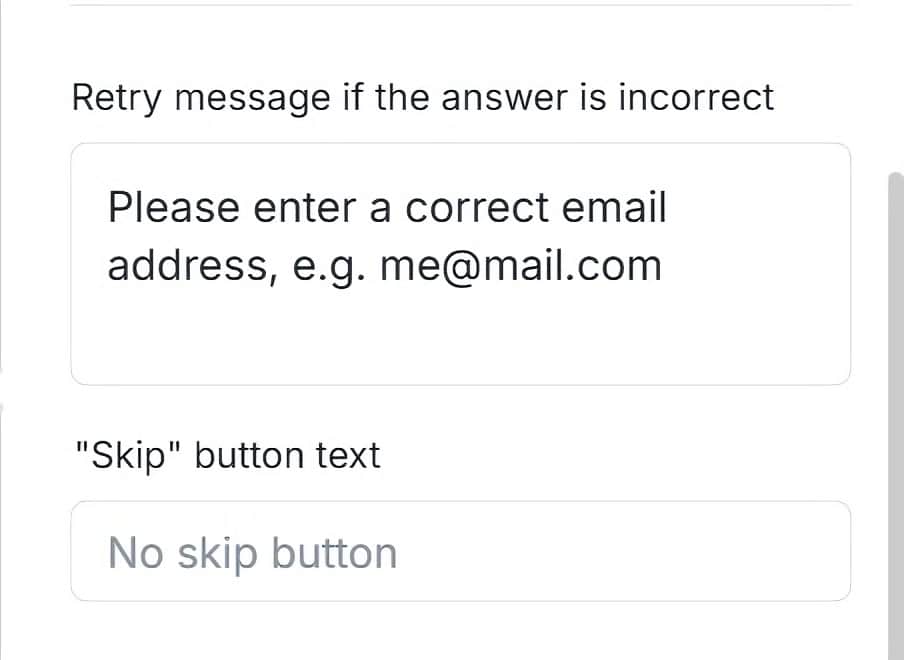
Here, we remove the Skip option again, and we also enter Retry message in case someone enter an invalid email:
Once we get their email, that’s when we deliver the lead magnet.
So, we’ll set up a new message, and a new button for them to click to get free access to our guide. Then, when they click on that button, we can open the website:
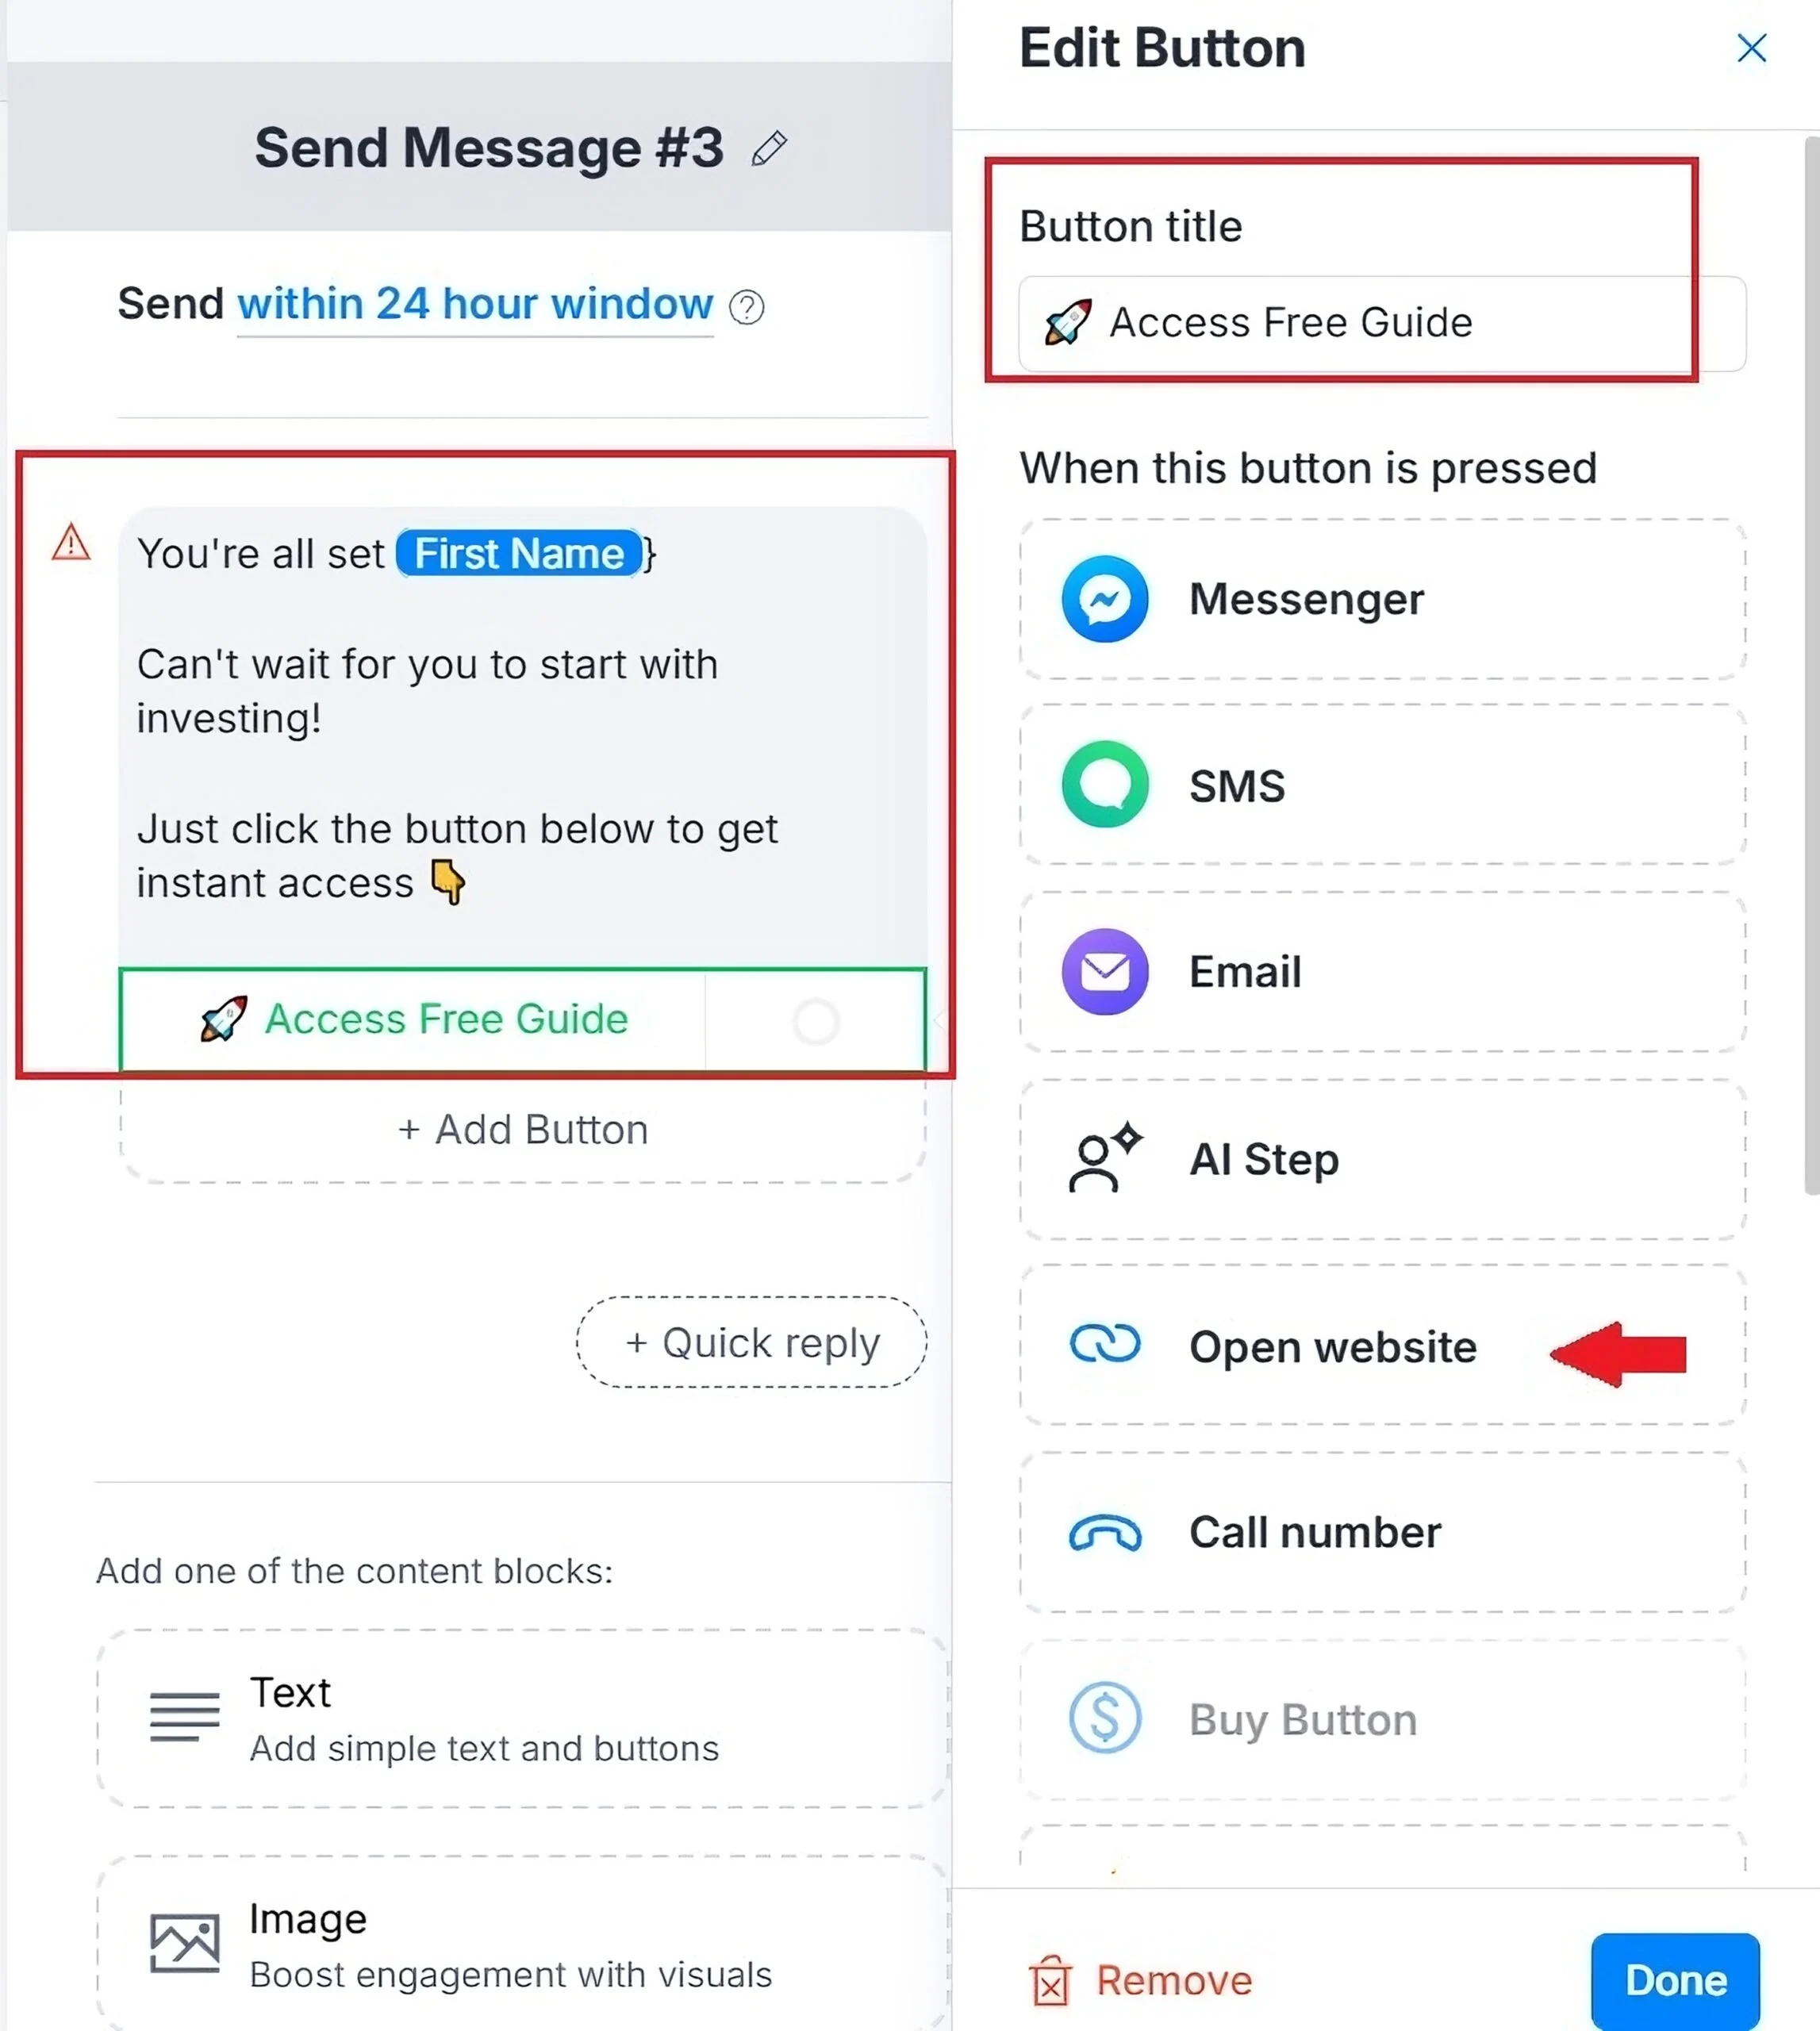
It will take them to a link where you stored that free guide. I will use chatimize.com as an example, but you should of course set your own URL, whether it’s a Google Drive, your website, or wherever your guide is: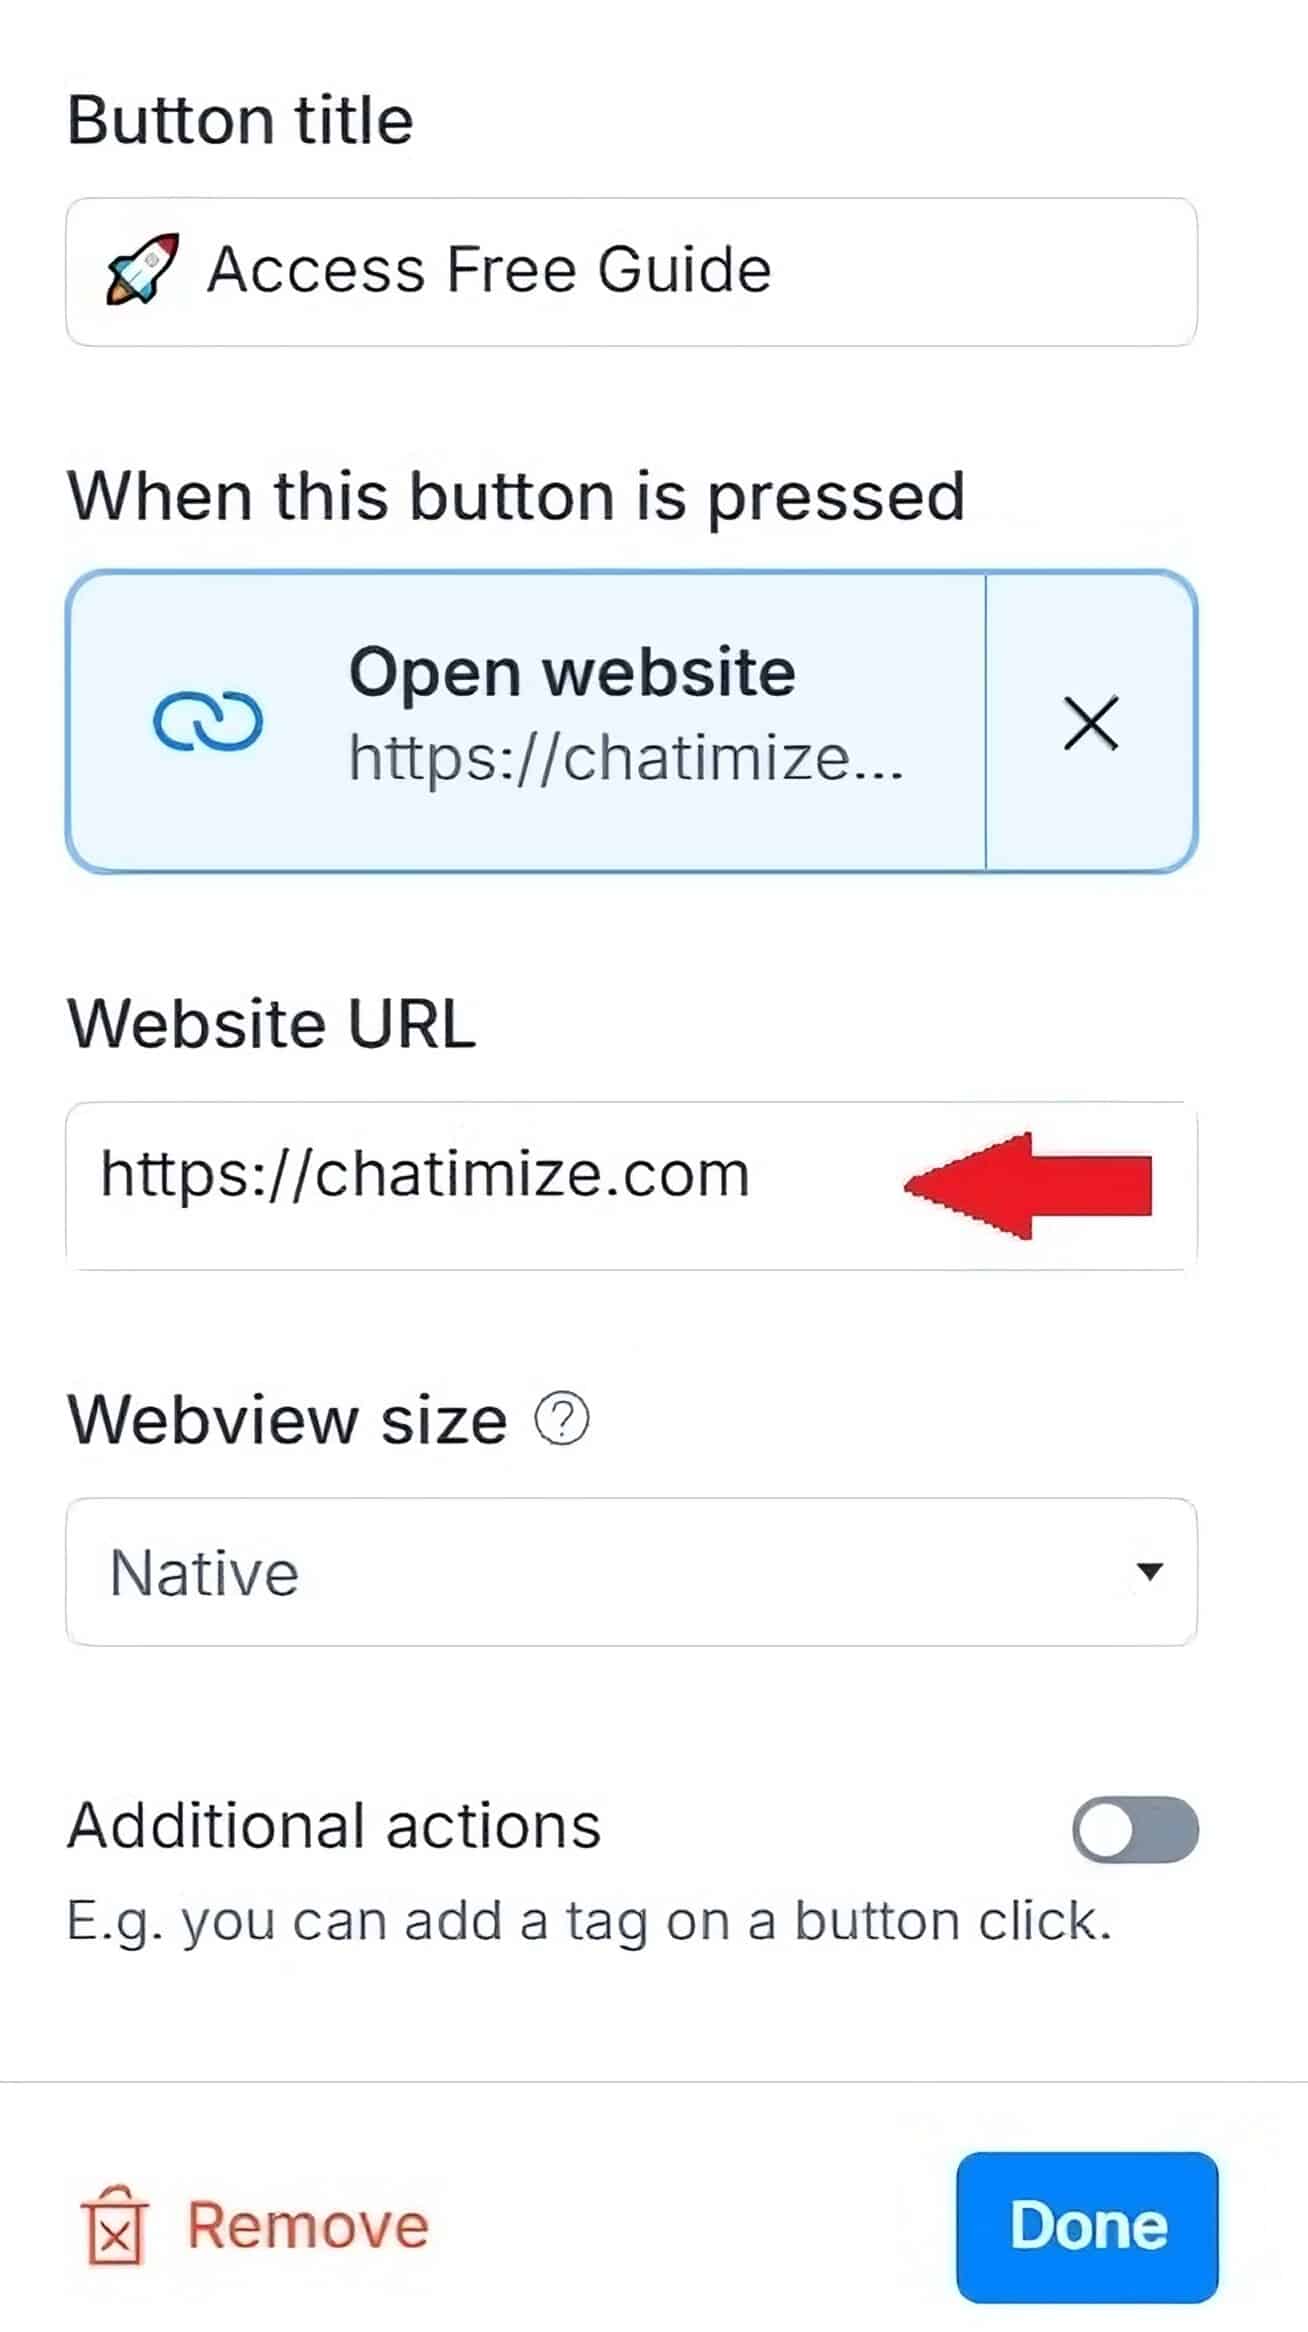
And that’s it!
Here’s a quick summary of how the Facebook chatbot works:
- Whenever someone comments or sends us a message with “GUIDE”, we start a DM Conversation.
- In that DM Conversation, we ask if they want the guide.
- If they click on the button, we ask for their name and email.
- Once we get those, we give them the link to the free guide.
Step 4: Integrate Manychat with other Tools
The last step is to connect Manychat with your email platform, so that when you collect someone’s info it’s automatically added to your email list
Manychat has direct integrations with other tools. We can use these so that whenever we get someone’s email, we can automatically send it to your CRM or email marketing platform.
You can also connect Manychat to your Facebook ads to automatically start Messenger conversations from ads.
If you go to Settings, then Integrations:
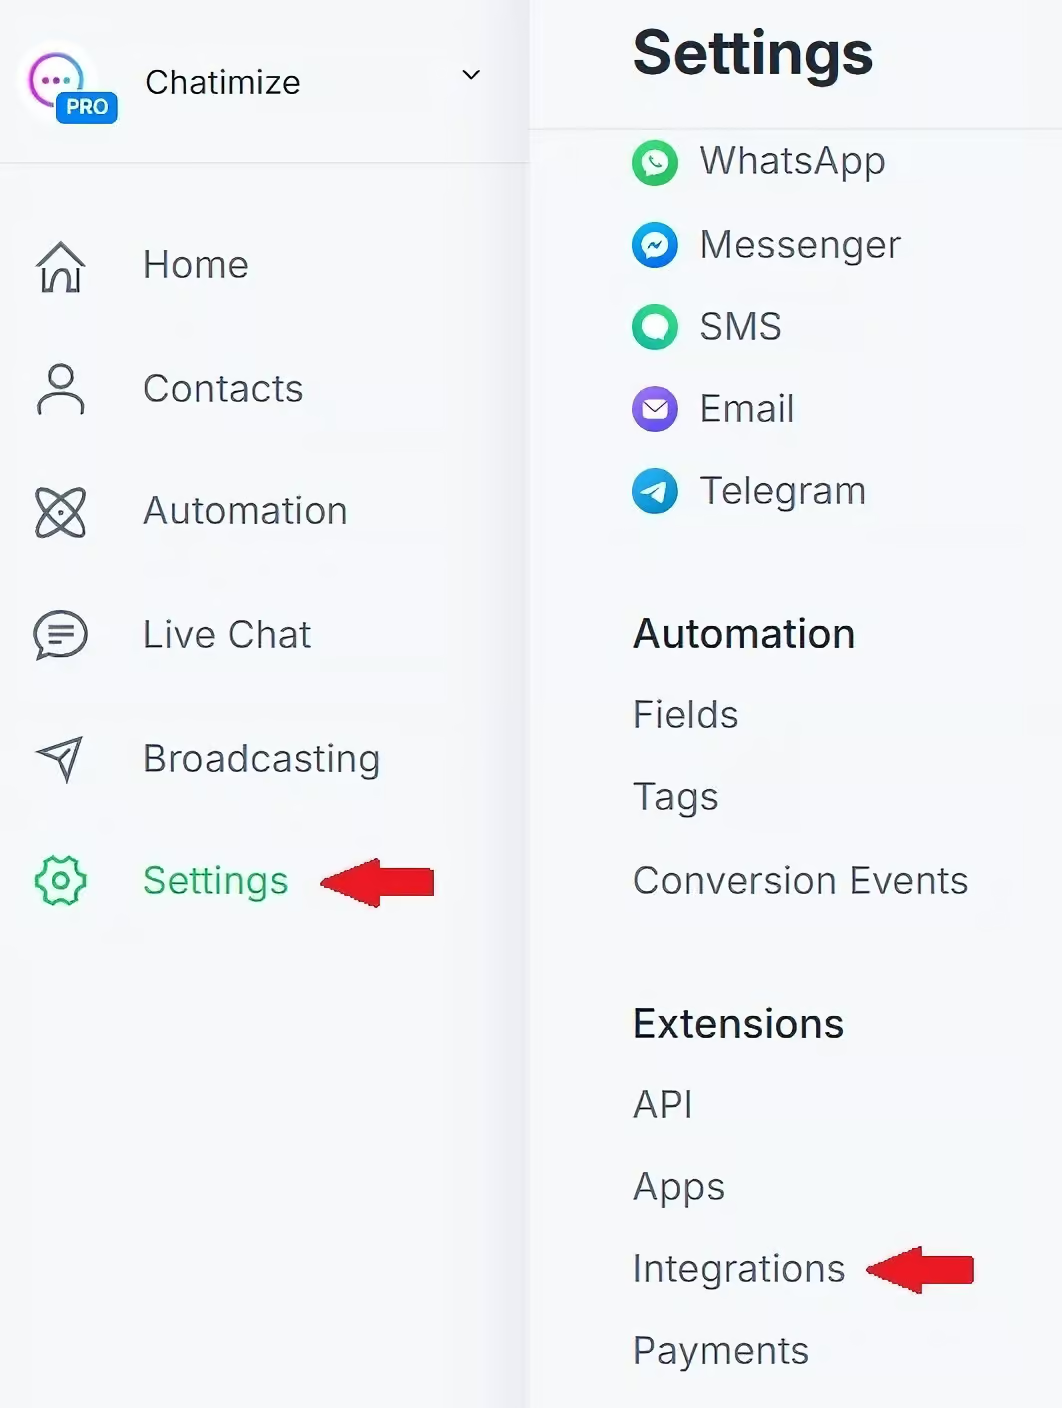
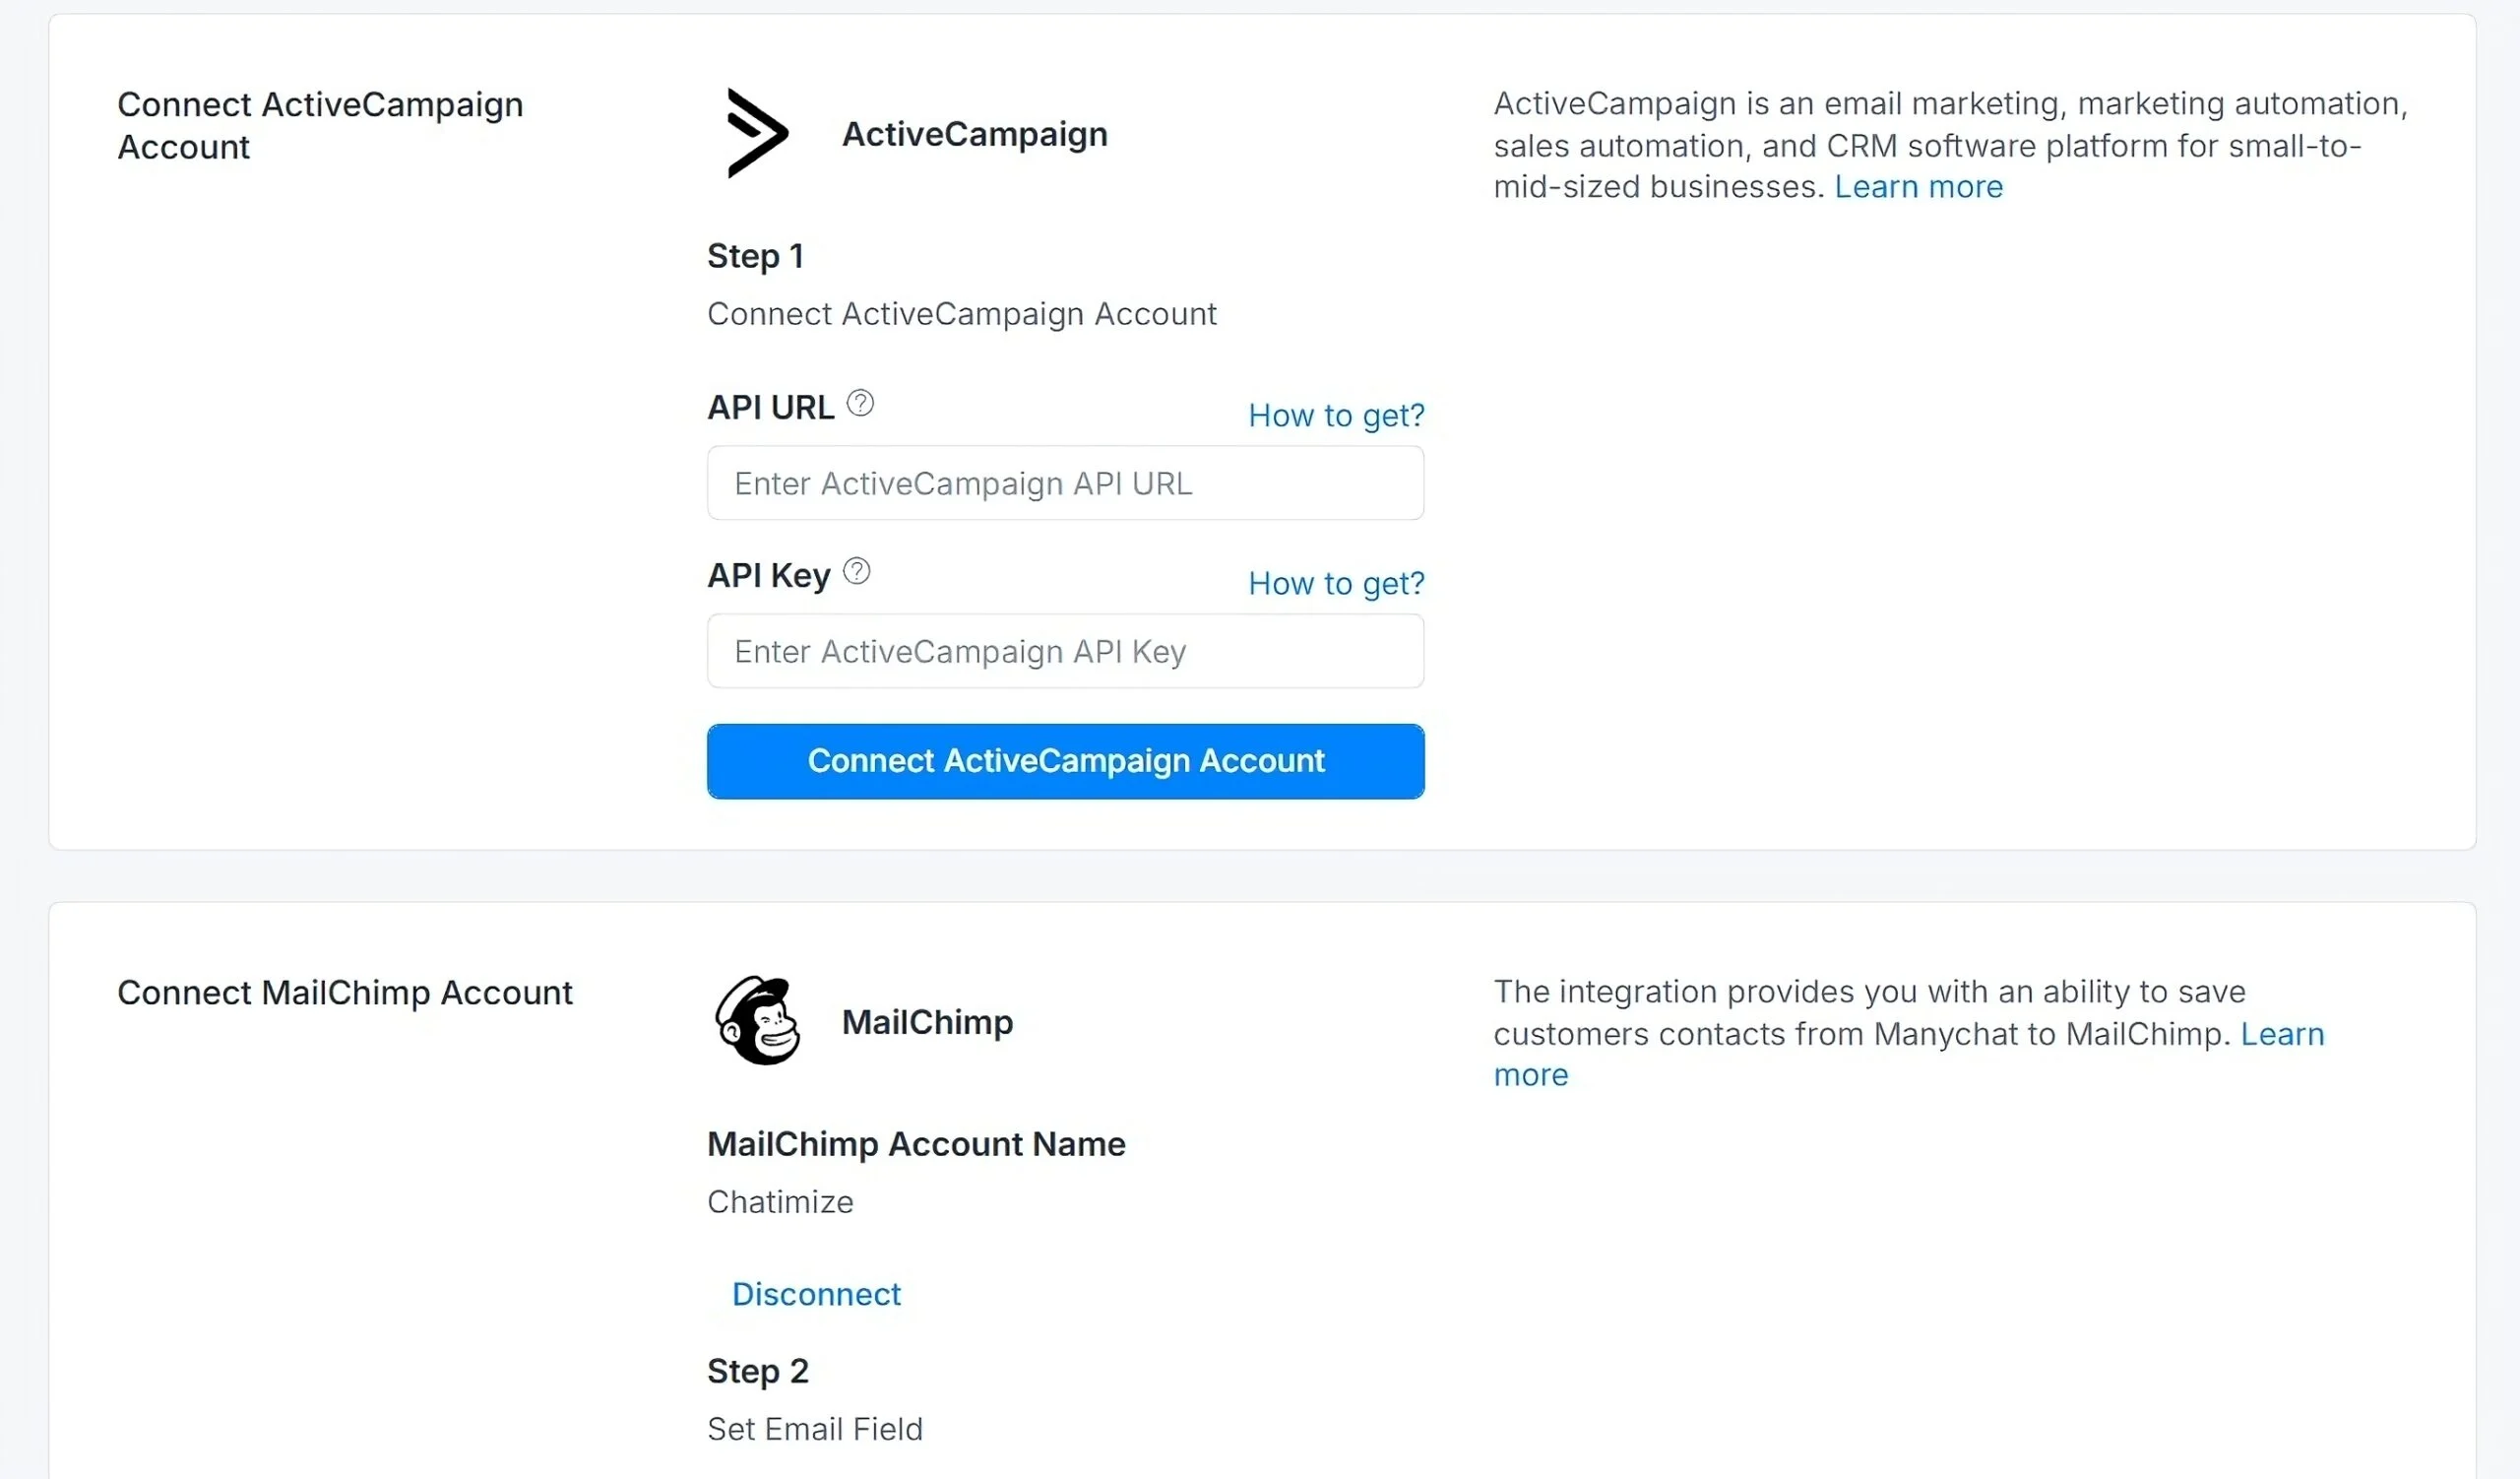
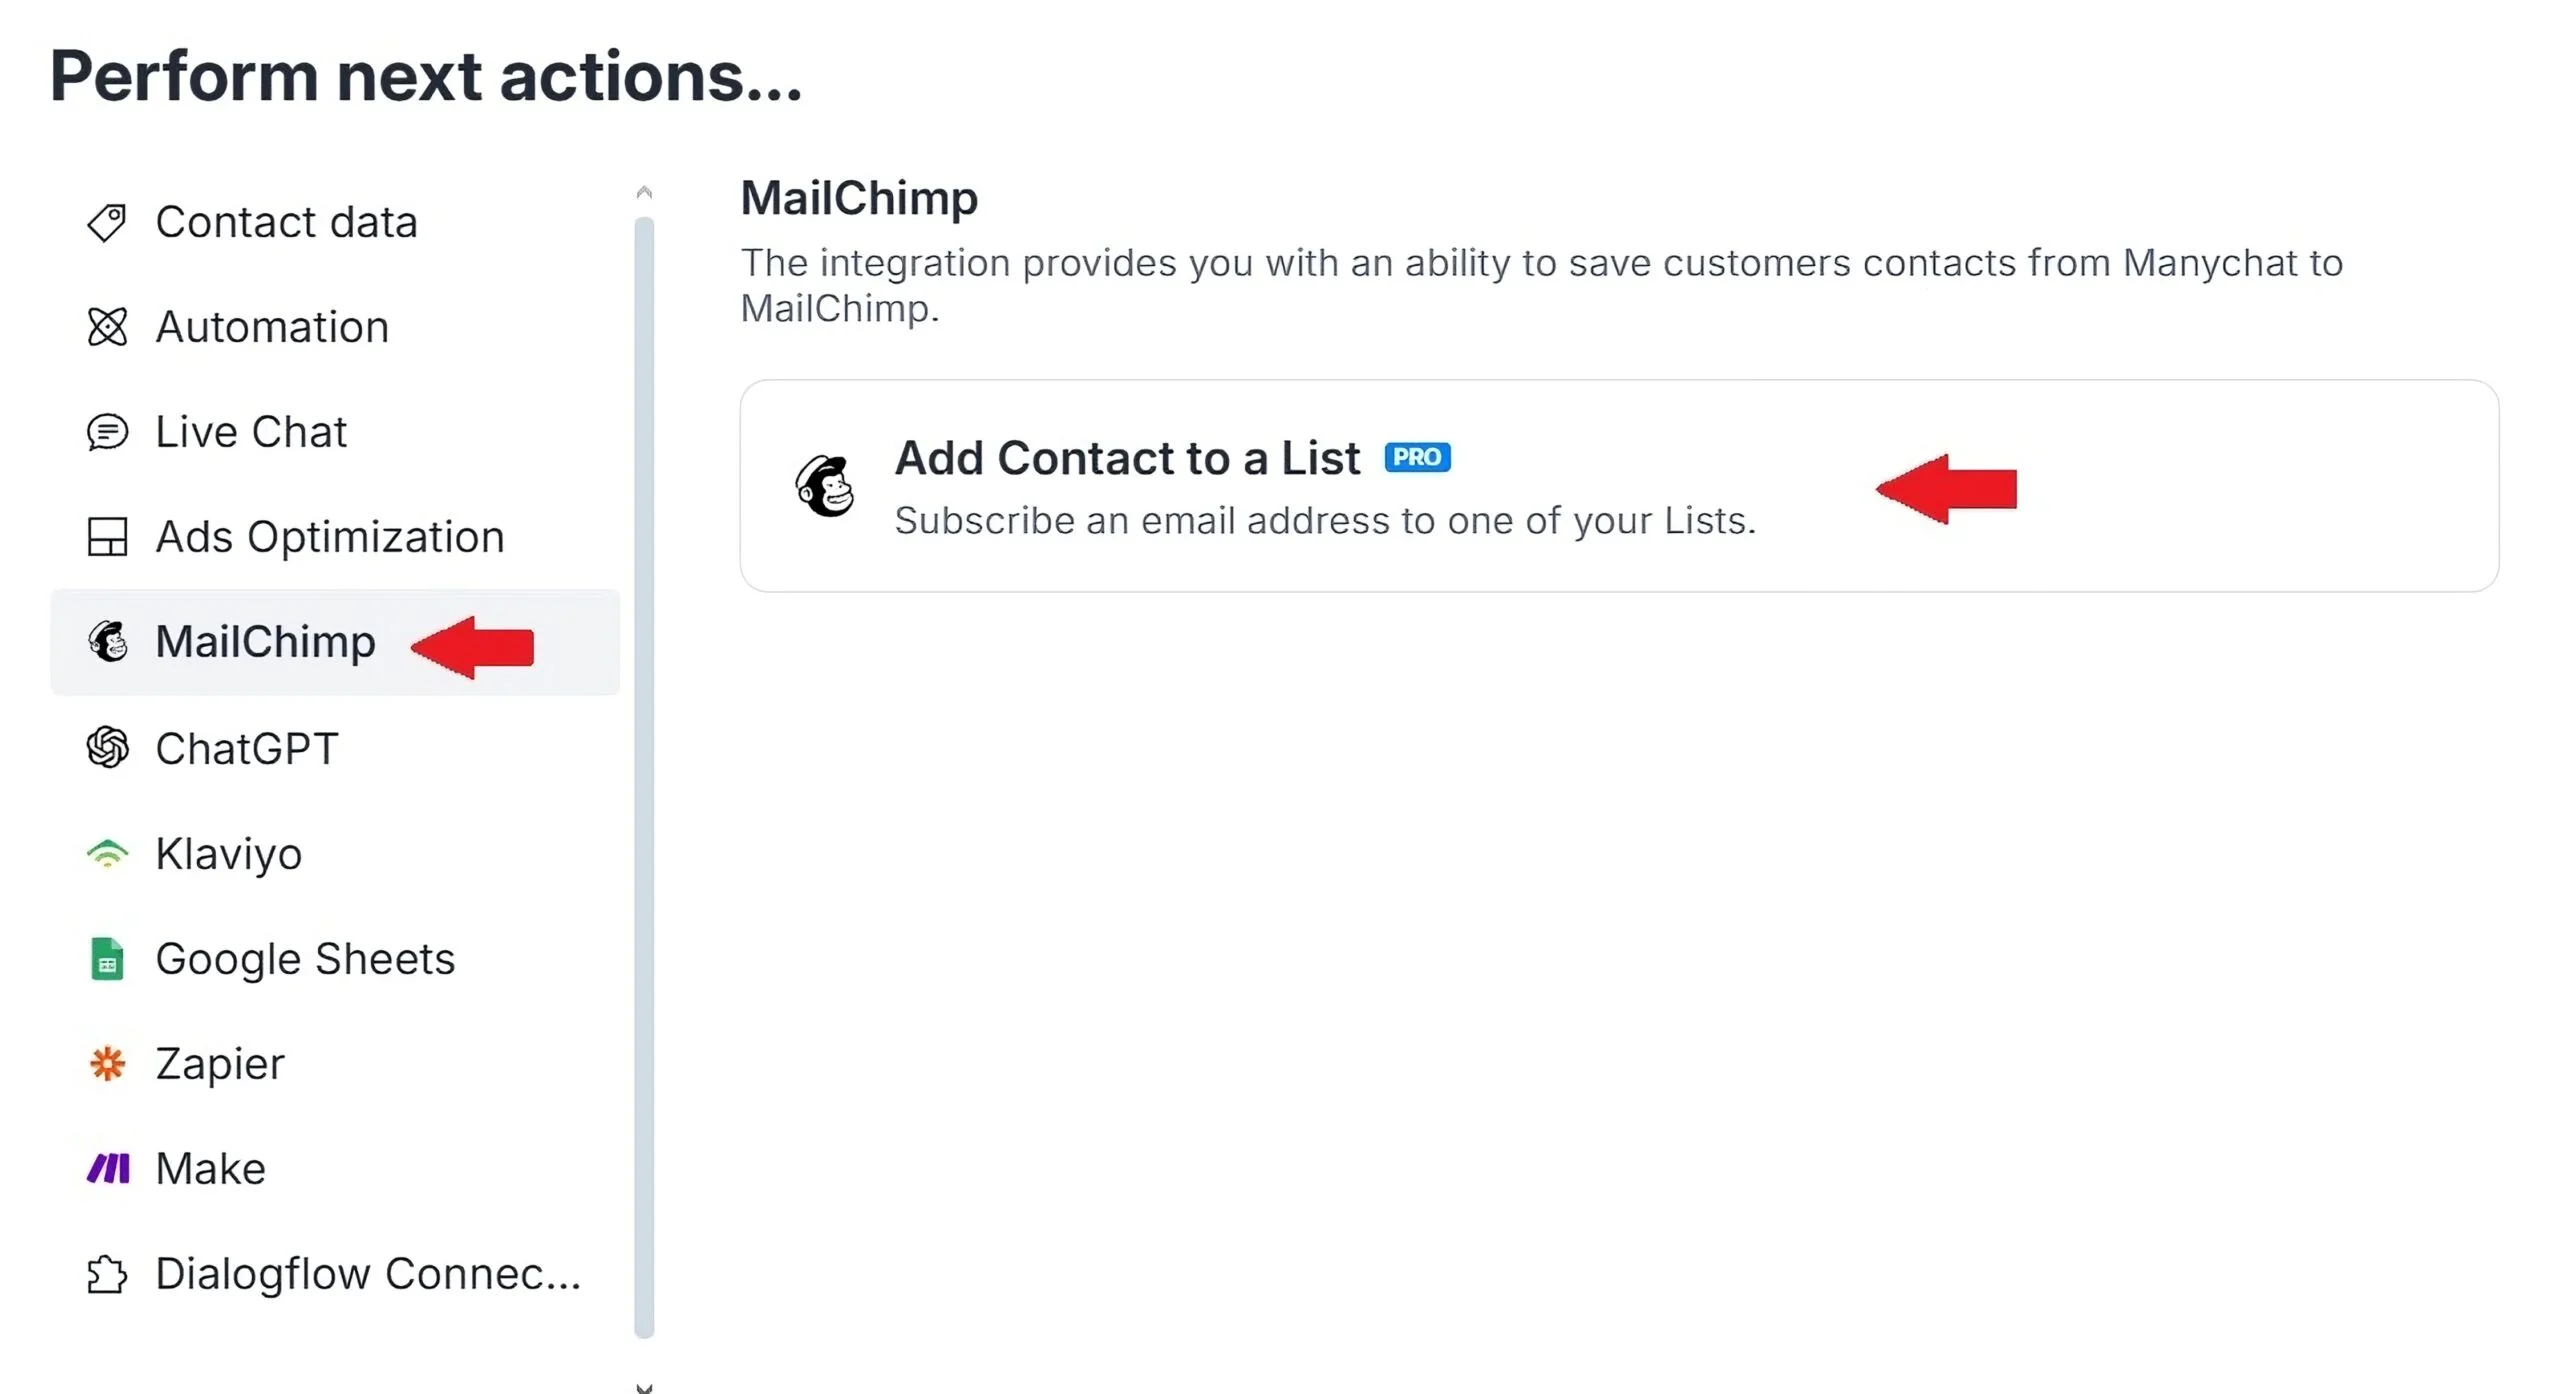
You can see all the Integrations that Manychat has. For example, you can connect your Manychat to your MailChimp account, or your ActiveCampaign account:
Once you’ve done that, you can go to Manychat again and add Action on reply to the Data Collection element (where we ask for someone’s email):
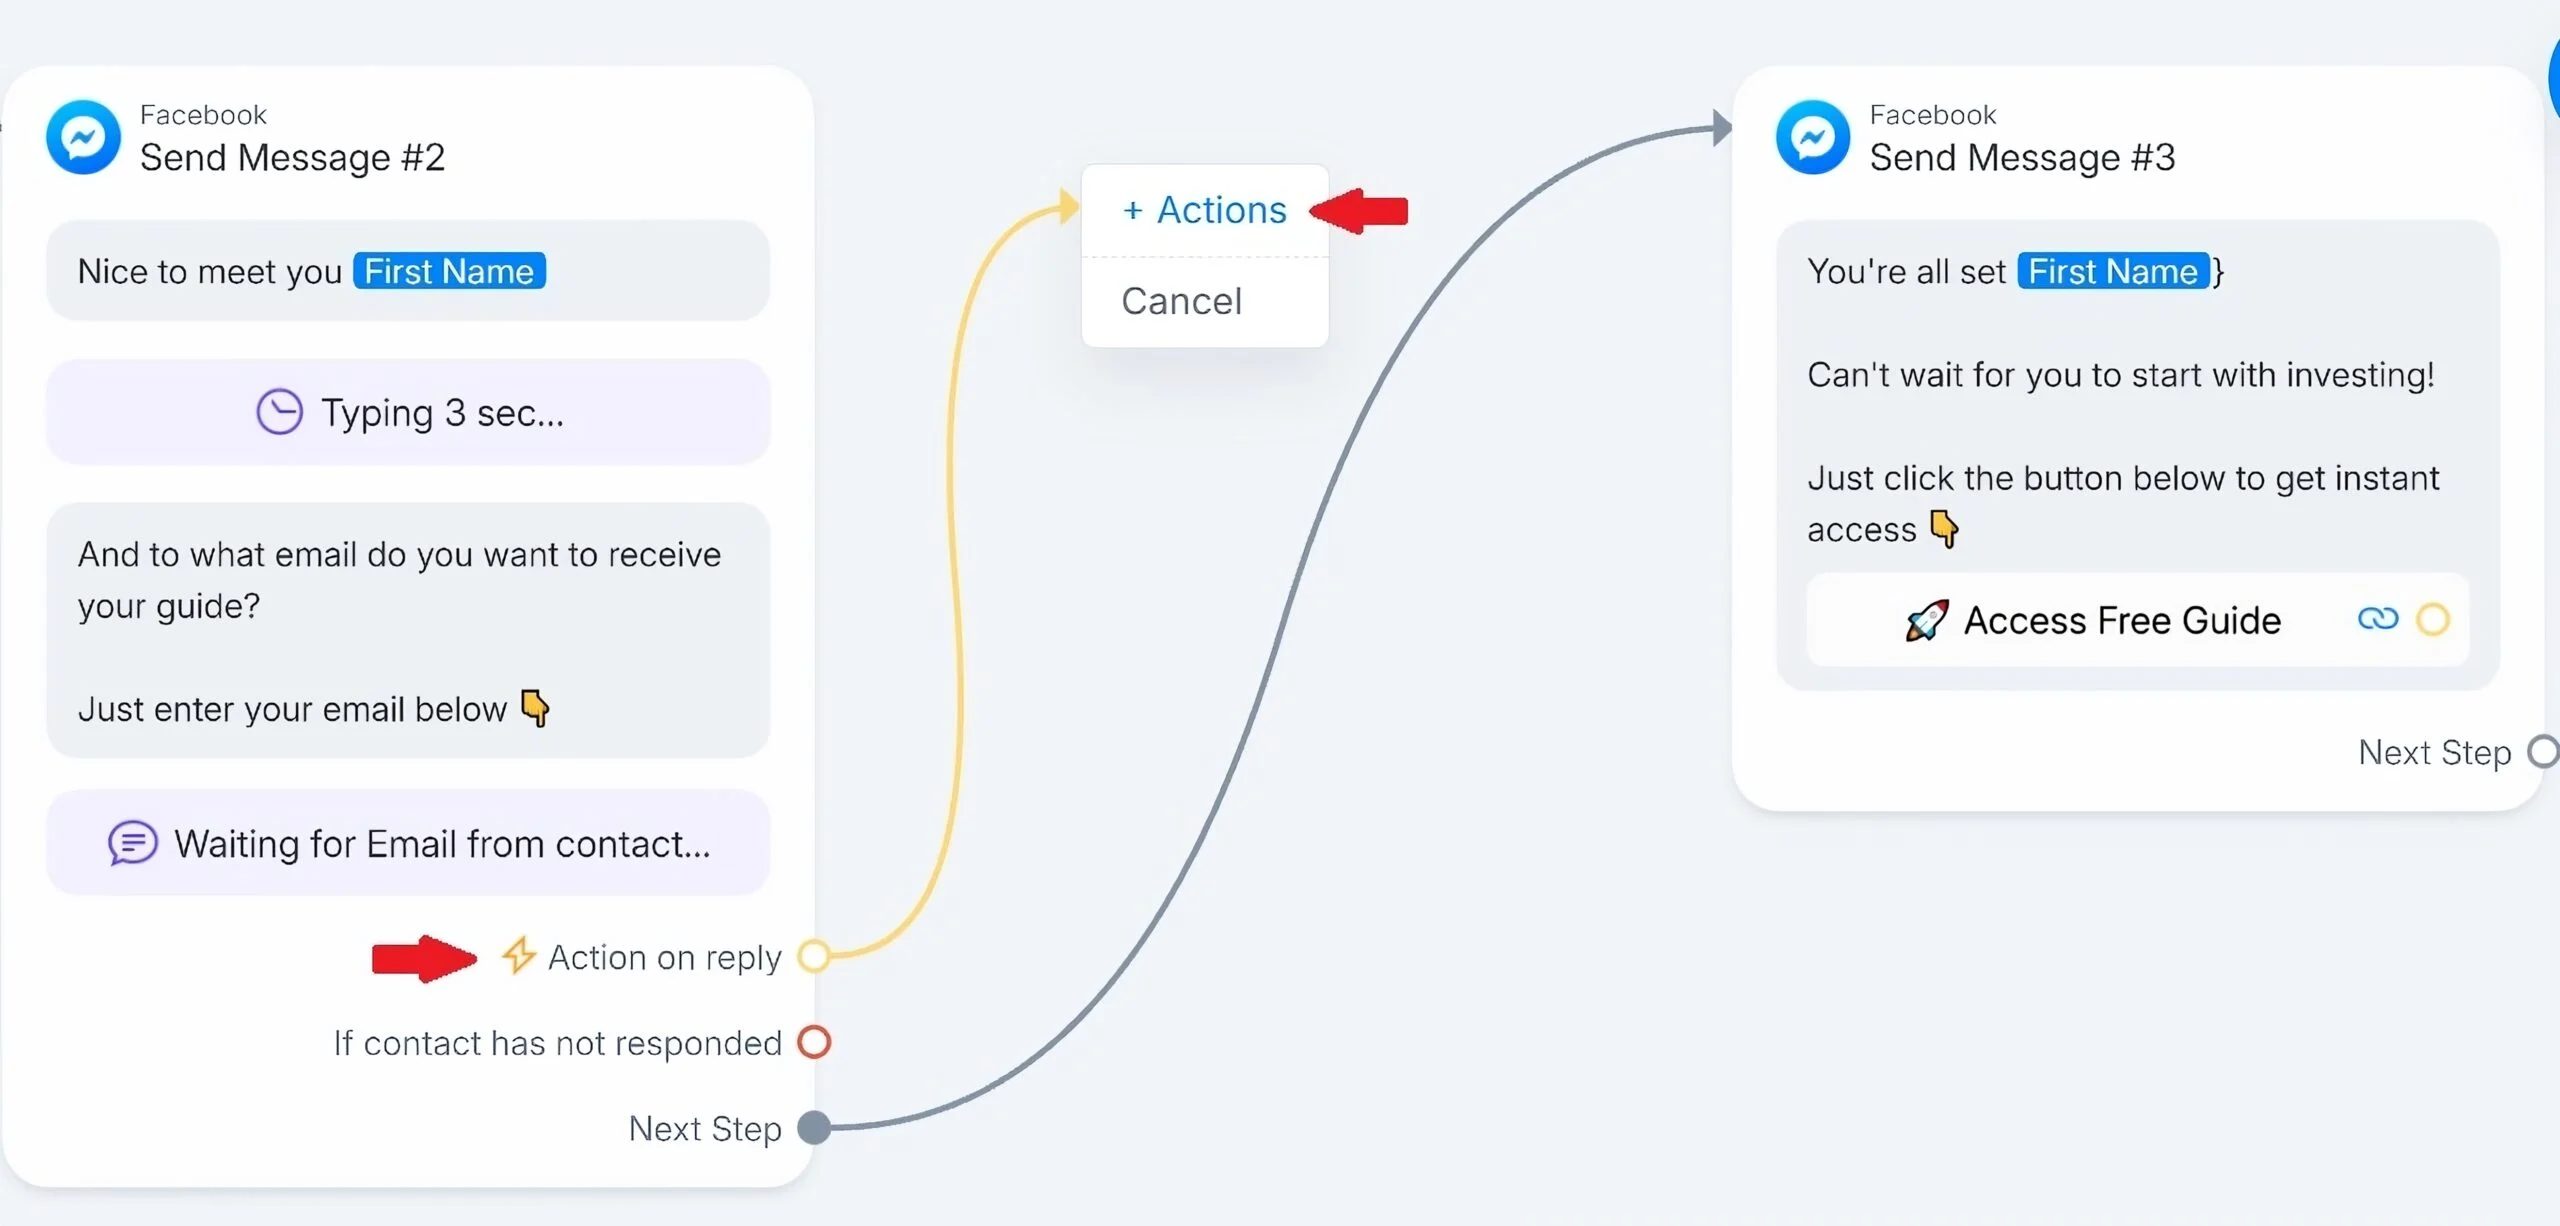
Here, you can set it up so that whenever you get someone’s email, it’s automatically added to MailChimp:
This works in a similar way with other tools, like ActiveCampaign, Klaviyo or HubSpot.
And that’s it! You have now set up your Facebook chatbot.
